Lab#SB08-2: Vaadin
Spring Boot Restaurant Management Vaadin
📘 Spring Boot Lab#SB00-2: RestaurantManager Vaadin We are going to evolve the current Java SE Restaurant project into a Spring Boot Restaurant Management System with an H2 DB and web interface using Vaadin.
1 Create a new Spring Boot project & H2 DB
From RestaurantProject to RestaurantManagement, reference code where to start:
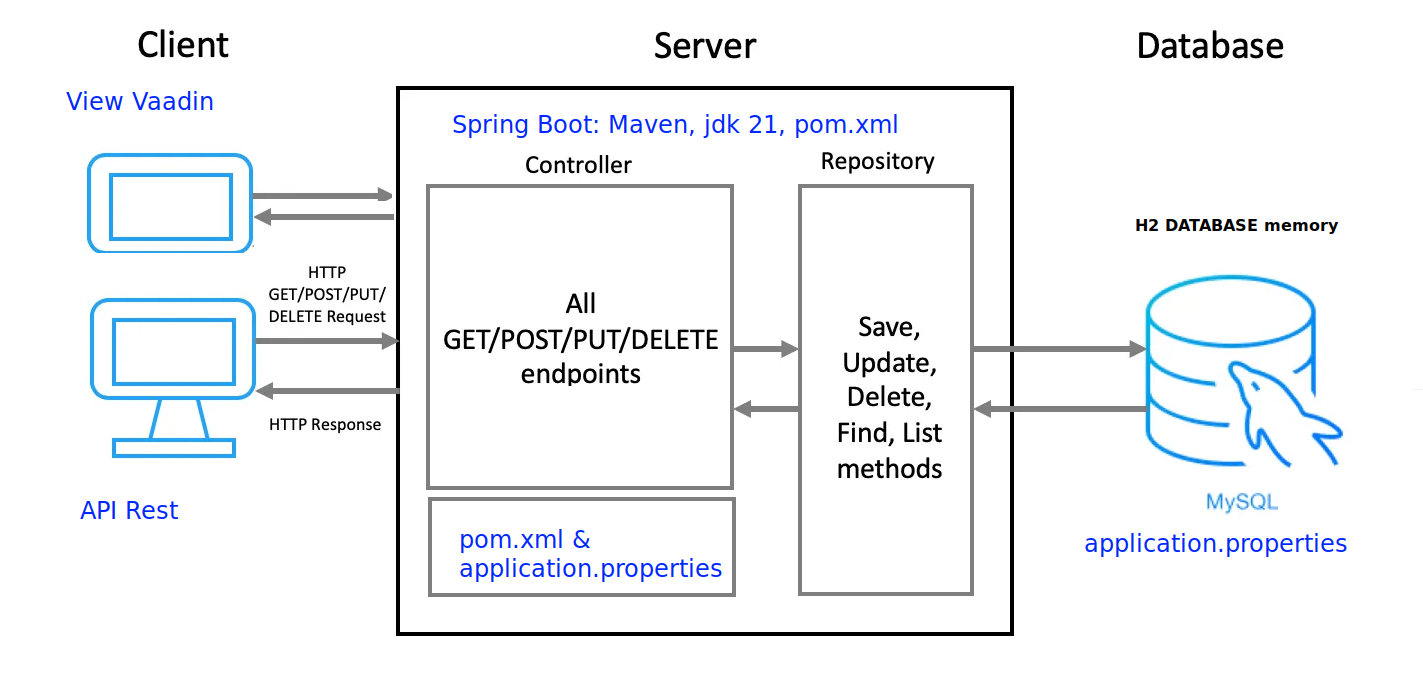
- Create a new Spring Boot project: The first step would be to create a new Spring Boot project in the preferred IDE or text editor.
The project can be created using Spring Initializr, which will create the necessary file structure and dependencies.
- Configure the H2 database: In the newly created project, configure the H2 database by adding:
- the H2 dependency in the
pom.xmlfile, - and also create a new
application.propertiesfile - set the database properties such as:
- the database URL,
- username,
- and password.
- the H2 dependency in the
1.1 Model & Entities
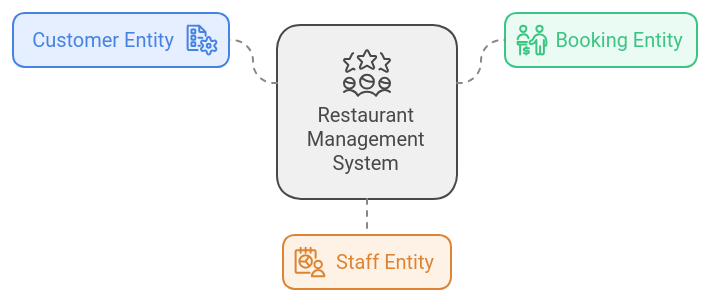
- Create a Menu Entity: To represent a menu item in the restaurant management system, create a Menu
@Entity
It could include attributes such as name, price, description, category (appetizer, main course, dessert, etc.), and availability status.
Create a Customer Entity: To represent a customer in the system, create a Customer entity that includes attributes such as customer ID, name, phone number, email, and reservation history.
Create Booking Entity: To represent a booking in the system, create a Booking entity that includes attributes such as booking date, time, number of people, tables, and associated customer.
Create Staff Entity: To represent staff members in the system, create a Staff entity that includes attributes such as staff ID, name, position, shift schedules, and assigned tables.

Domains: @Controller, @Service and @Repository
Create Repositories: To access the data stored in the database, create repositories for each entity. The repositories will provide the methods to create, read, update, and delete the data.
Create Services: Create services that will implement the business logic of the system by calling the repository methods.
The services will provide the methods to search for available tables, make a reservation, update menu items, process orders, manage staff schedules, handle customer feedback, and generate reports on restaurant performance.
- Create Controllers: Create controllers that will handle the requests from the Vaadin UI by calling the service methods.
The controllers will provide the methods to create a customer account, search for available tables, make a reservation, view and update menu items, place an order, manage staff schedules, submit customer feedback, and generate various reports.
2 Vaadin
Modern Java framework for building web applications
Vaadinis a web application framework for Java that allows developers to build modern, interactive web applications using Java without having to writeHTML,CSS, orJavaScript.
Here are some key points about Vaadin:
- Vaadin Official Website
- Vaadin Documentation
- Vaadin Spring Boot Integration
- Vaadin Flow
- GitHub Tutorial Vaadin 24
- Vaadin Maven CLI create a project
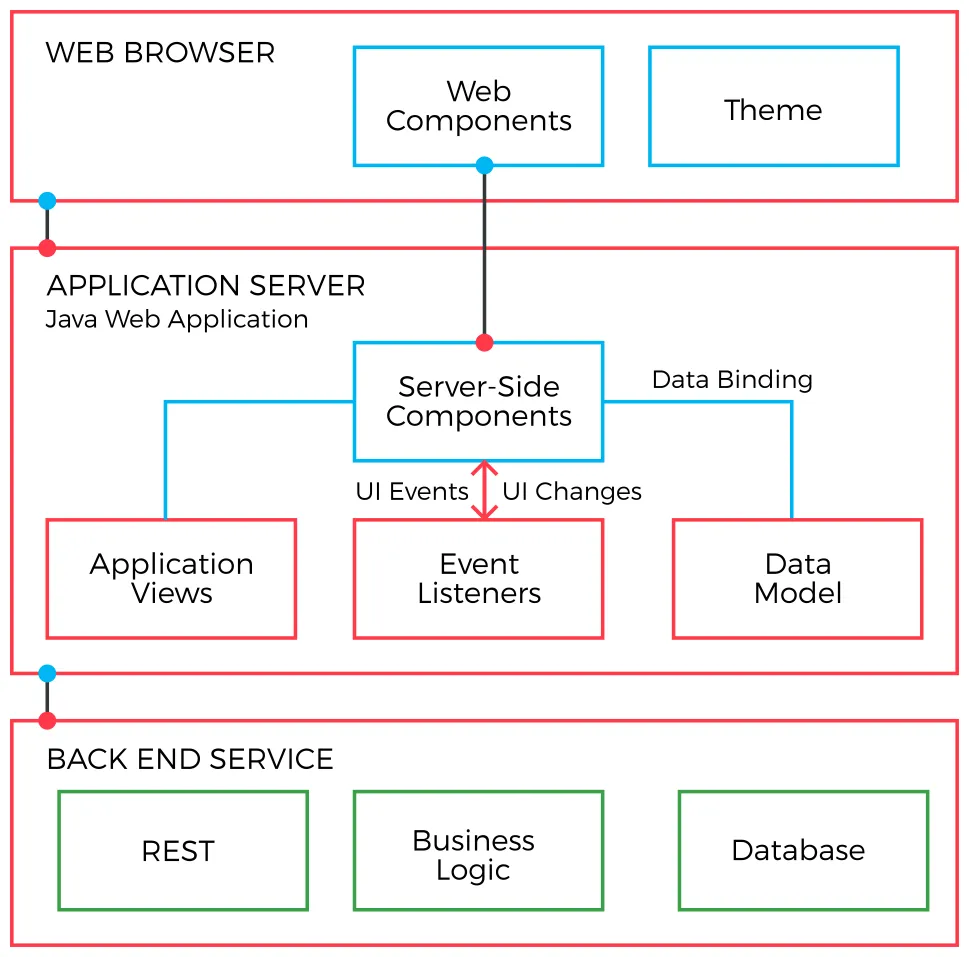
Vaadin Flow lets a server-side Java application build a user interface from components in Java. These Java components are connected to web components running in the browser. Flow manages the relaying of user interaction back to the server-side application, which can handle it with event listeners.
Application views and their components are typically used to display and accept input of application data. This data is often stored in a backend service, such as a database. Application logic is often created using application frameworks, such as Spring.
Vaadin offers two main flavors for web application development:
Hilla: A full-stack framework combining a Spring Boot backend with a React or Lit frontend. It provides type-safe communication between client and server, auto-generated TypeScript interfaces, and built-in security features.
Flow: A server-side Java framework for building web applications. It allows developers to create UIs using a component-based approach, with automatic server-client communication and state management.
Both flavors leverage Vaadin’s extensive set of UI components and themes. Hilla is ideal for developers comfortable with modern JavaScript frameworks, while Flow suits those preferring a Java-centric approach.
Both can be used to create responsive, feature-rich web applications with excellent performance and maintainability.
2.1 atmosphere
Vaadin uses the Atmosphere framework to facilitate robust client-server communication, particularly for real-time and push-based features.
Atmosphere is an open-source project that provides a powerful abstraction layer for various asynchronous communication protocols, including WebSockets, Server-Sent Events, and long-polling.
Vaadin integrates Atmosphere to handle its server push functionality, allowing servers to send updates to clients without the need for client-side polling. This integration enables Vaadin applications to create responsive, real-time user interfaces with minimal developer effort.
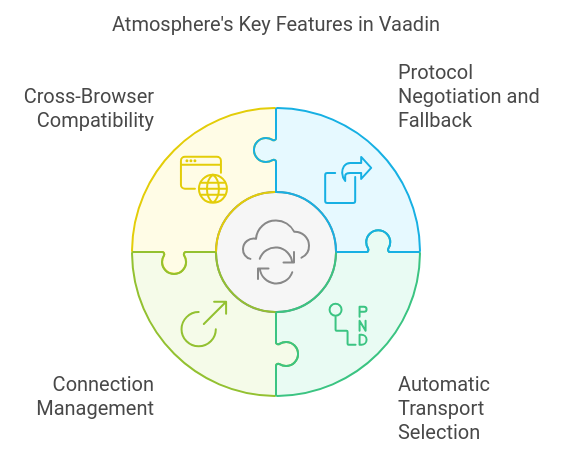
Atmosphere’s key features utilized by Vaadin include:
- Protocol negotiation and fallback mechanisms
- Automatic selection of the best available transport method
- Handling of connection management and reconnection scenarios
- Cross-browser compatibility
By building on Atmosphere, Vaadin abstracts away the complexities of low-level communication protocols, allowing developers to focus on application logic while still benefiting from efficient, real-time communication between client and server.
2.2 Binding
In Vaadin, the Binder is a data binding class used to connect UI components to Java beans. It is not a container but rather a utility that facilitates the transfer and validation of data between the user interface and backend objects.
Binder reads values from business objects, converts them to the format required by UI fields, and vice versa, supporting validation to ensure data integrity. This makes it essential for creating dynamic and interactive forms in Vaadin applications.
There can be only one Binder instance for each form.
You should use this instance for all the fields in the form.
Client To Server: How to Bind Form Data
The following steps include everything needed to load, edit, and save values for a form. Java 8 method references are used.
// Create a Binder instance for the Person class
1Binder<Person> binder = new Binder<>(Person.class);

// Create a TextField for the title
2TextField titleField = new TextField();

// Bind the titleField to the Person class
binder.forField(titleField)
    .bind(
        // Callback that loads the title from a person instance
3        Person::getTitle,
        // Callback that saves the title in a person instance
        Person::setTitle);

// Create a TextField for the name
4TextField nameField = new TextField();

// Shorthand for cases without extra configuration
5binder.bind(nameField, Person::getName,
Person::setName);- 1
- Create a Binder instance for the Person class.
- 2
- Create a TextField for the title.
- 3
- Bind the titleField to the Person class using method references.
- 4
- Create a TextField for the name.
- 5
- Bind the nameField to the Person class using method references.
Method references are one-linners to simplify code
Method references are used to simplify the code and make it more readable. Here are the key points:
Reference to an Instance Method of a Particular Object
- The method reference
binder.forField(titleField).bind(Person::getTitle, Person::setTitle)is used. Here,Person::getTitleandPerson::setTitlerefer to the instance methodsgetTitleandsetTitleof thePersonclass. This is equivalent to a lambda expression that calls these methods on aPersonobject.
Reference to an Instance Method of a Particular Object (Shorthand)
- The shorthand
binder.bind(nameField, Person::getName, Person::setName)is used, which is another example of referencing instance methodsgetNameandsetNameof thePersonclass.
Example Breakdown
This is equivalent to:
binder.forField(titleField)
      .bind(person -> person.getTitle(), (person, title) -> person.setTitle(title));
Similarly,
is equivalent to:
Method references here replace the need for explicit lambda expressions, making the code more concise and easier to read.
Server to Client: Reading & Writing Automatically
Writing automatically to business objects when the user makes changes in the UI is usually the most convenient option. You can bind the values directly to an instance by allowing Binder to save automatically values from the fields.
In the example here, field values are saved automatically:
Binder<Person> binder = new Binder<>();

// Field binding configuration omitted.
// It should be done here.

Person person = new Person("John Doe", 1957);

// Loads the values from the person instance.
// Sets person to be updated when any bound field
// is updated.
binder.setBean(person);

Button saveButton = new Button("Save", event -> {
    if (binder.validate().isOk()) {
        // Person is always up-to-date as long as
        // there are no validation errors.

        MyBackend.updatePersonInDatabase(person);
    }
});
2.3 Create Vaadin Views
To create the web interface of the system, create Vaadin views for each of the main functionalities. The views will be used to display the data and handle user interactions.
Vaadinallows you to create rich, interactive UIs usingJavacode. It provides a wide range of UI components and layouts that you can use to build your application’s interface.
Example of a simple Vaadin view:
@Route("menu")
public class MenuView extends VerticalLayout {
    private final MenuService menuService;

    public MenuView(MenuService menuService) {
        this.menuService = menuService;

        H1 title = new H1("Restaurant Menu");
        Grid<Menu> grid = new Grid<>(Menu.class);
        grid.setItems(menuService.getAllMenuItems());

        add(title, grid);
    }
}
This view creates a page with a title and a grid showing all menu items.
Key Vaadin Concepts:
Server-side Architecture: Vaadin primarily runs on the server, which means your business logic stays secure and you can leverage the full power of Java.
Component-based UI: Build UIs by combining and customizing existing components or creating your own.
Data Binding: Easily bind UI components to data sources, including JPA entities.
Themes and Styling: Customize the look and feel of your application using CSS and Vaadin’s theming capabilities.
Integration with Spring Boot: Vaadin integrates seamlessly with Spring Boot, allowing you to use Spring’s dependency injection and other features.
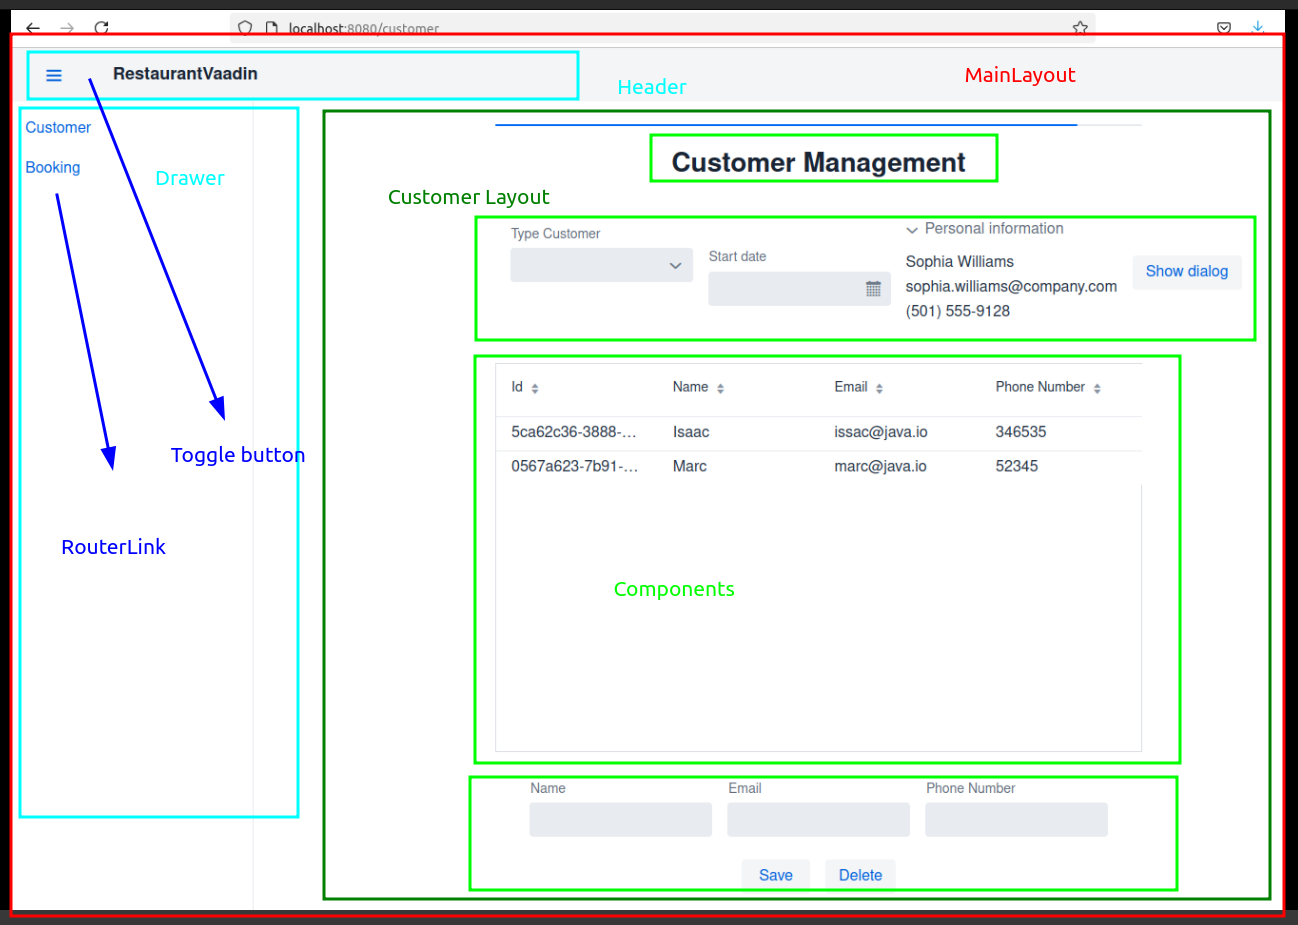
3 Code: CustomerView
The CustomerView class is a Vaadin-based web application view for managing customer information in a restaurant.

Key Components:
- Route: Default view of the application (
@Route("")). - Layout: Extends
VerticalLayoutfor vertical arrangement. - Grid: Displays customer data in a table format.
- Form Fields: Text fields for name, email, and phone number.
- Buttons: Save and Delete buttons for managing customers.
- Binder: For data binding between form fields and the
Customerobject.
Main Features:
- Layout Structure
- 3-column layout for responsive design.
- Center column contains interactive components.
- Customer Data Display
- Grid shows customer details (ID, name, email, phone number).
- Allows selection of customers from the grid.
- Form for Customer Management
- Input fields for customer information.
- Save button to add/update customers.
- Delete button to remove selected customers.
- Data Binding
- Uses Binder for two-way data binding.
- Updates form fields when a customer is selected.
- Event Handling
- Save button saves/updates customer data.
- Delete button removes the selected customer.
- Grid selection updates form with selected customer’s data.
- Repository Integration
- Uses
CustomerRepositoryfor CRUD operations.
- Uses
CustomerView public class methods:
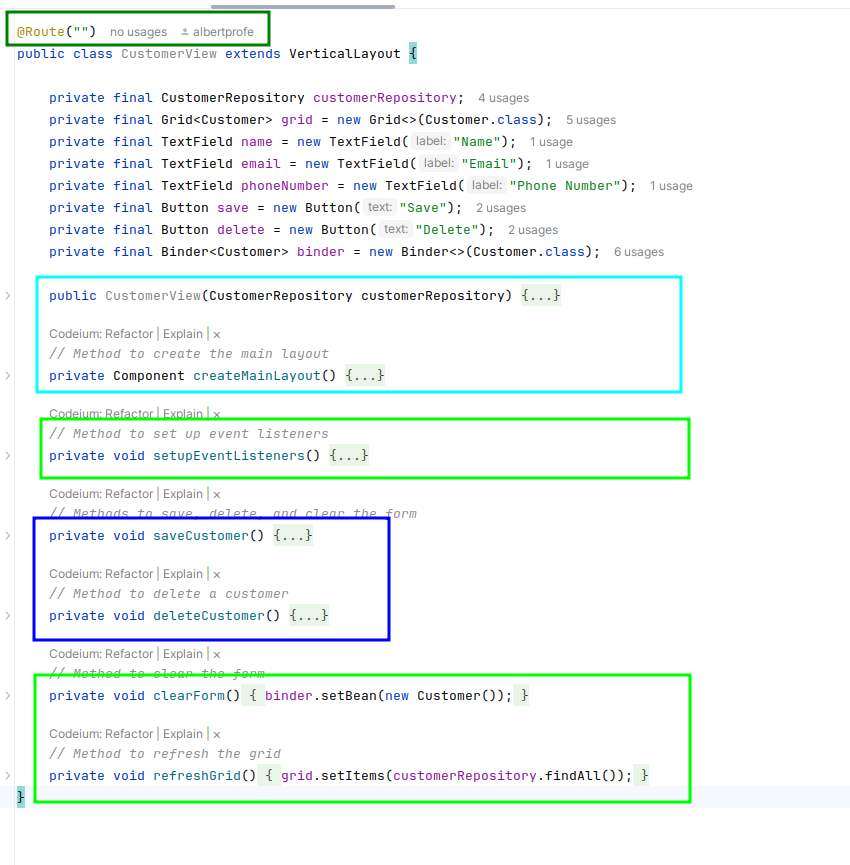
Key Methods:
createMainLayout(): Sets up UI components and layout.setupEventListeners(): Configures event handlers.saveCustomer(): Saves/updates customer records.deleteCustomer(): Deletes selected customer records.clearForm(): Resets form fields.refreshGrid(): Updates grid with latest customer data.
This view provides an easy-to-use interface for managing customer information in a restaurant domain.
Code CustomerView.java
CustomerView.java
package dev.example.restaurant.view;

import com.vaadin.flow.component.Component;
import com.vaadin.flow.component.button.Button;
import com.vaadin.flow.component.grid.Grid;
import com.vaadin.flow.component.html.H2;
import com.vaadin.flow.component.orderedlayout.HorizontalLayout;
import com.vaadin.flow.component.orderedlayout.VerticalLayout;
import com.vaadin.flow.component.textfield.TextField;
import com.vaadin.flow.data.binder.Binder;
import com.vaadin.flow.router.Route;
import dev.example.restaurant.model.Customer;
import dev.example.restaurant.repository.CustomerRepository;
import java.util.UUID;

@Route("")
public class CustomerView extends VerticalLayout {

    private final CustomerRepository customerRepository;
    private final Grid<Customer> grid = new Grid<>(Customer.class);
    private final TextField name = new TextField("Name");
    private final TextField email = new TextField("Email");
    private final TextField phoneNumber = new TextField("Phone Number");
    private final Button save = new Button("Save");
    private final Button delete = new Button("Delete");
    private final Binder<Customer> binder = new Binder<>(Customer.class);

    public CustomerView(CustomerRepository customerRepository) {
        this.customerRepository = customerRepository;

        // Set up the main view properties
        setSizeFull();
        setPadding(false);
        setSpacing(false);

        // Create and add the main layout
        add(createMainLayout());

        // Set up data binding
        binder.bindInstanceFields(this);

        // Set up event listeners
        setupEventListeners();

        // Initialize the view
        clearForm();
        refreshGrid();
    }

    // Method to create the main layout
    private Component createMainLayout() {
        // Create the 3-column layout
        HorizontalLayout mainLayout = new HorizontalLayout();
        mainLayout.setSizeFull();
        mainLayout.setPadding(false);
        mainLayout.setSpacing(false);

        // Left column (empty for spacing)
        VerticalLayout leftColumn = new VerticalLayout();
        leftColumn.setWidth("20%");

        // Center column (contains all the components)
        VerticalLayout centerColumn = new VerticalLayout();
        centerColumn.setWidth("60%");
        centerColumn.setAlignItems(Alignment.CENTER);

        // Right column (empty for spacing)
        VerticalLayout rightColumn = new VerticalLayout();
        rightColumn.setWidth("20%");

        // Set up the grid
        grid.setColumns("id", "name", "email", "phoneNumber");
        grid.setSizeFull();

        // Create a form layout
        HorizontalLayout formLayout =
            new HorizontalLayout(name, email, phoneNumber);
        formLayout.setWidth("100%");
        formLayout.setJustifyContentMode(JustifyContentMode.CENTER);

        // Create a button layout
        HorizontalLayout buttonLayout =
            new HorizontalLayout(save, delete);
        buttonLayout.setJustifyContentMode(JustifyContentMode.CENTER);

        // Add components to the center column
        centerColumn.add(
                new H2("Customer Management"),
                grid,
                formLayout,
                buttonLayout
        );

        // Add all columns to the main layout
        mainLayout.add(leftColumn, centerColumn, rightColumn);

        return mainLayout;
    }

    // Method to set up event listeners
    private void setupEventListeners() {
        save.addClickListener(e -> saveCustomer());
        delete.addClickListener(e -> deleteCustomer());

        grid.asSingleSelect().addValueChangeListener(event -> {
            if (event.getValue() != null) {
                binder.setBean(event.getValue());
            } else {
                clearForm();
            }
        });
    }

    // Methods to save, delete, and clear the form
    private void saveCustomer() {
        Customer customer = binder.getBean();
        if (customer == null) {
            customer = new Customer();
        }
        if (customer.getId() == null || customer.getId().isEmpty()) {
            customer.setId(UUID.randomUUID().toString());
        }
        binder.writeBeanIfValid(customer);
        customerRepository.save(customer);
        clearForm();
        refreshGrid();
    }

    // Method to delete a customer
    private void deleteCustomer() {
        Customer customer = binder.getBean();
        if (customer != null) {
            customerRepository.delete(customer);
            clearForm();
            refreshGrid();
        }
    }

    // Method to clear the form
    private void clearForm() {
        binder.setBean(new Customer());
    }

    // Method to refresh the grid
    private void refreshGrid() {
        grid.setItems(customerRepository.findAll());
    }
}
4 Security
Necessary Dependencies
The chat application is a Spring Boot application. Therefore, use Spring Security to secure it. Start by adding this dependency to your pom.xml file:
<dependency>
    <groupId>org.springframework.boot</groupId>
    <artifactId>spring-boot-starter-security</artifactId>
</dependency>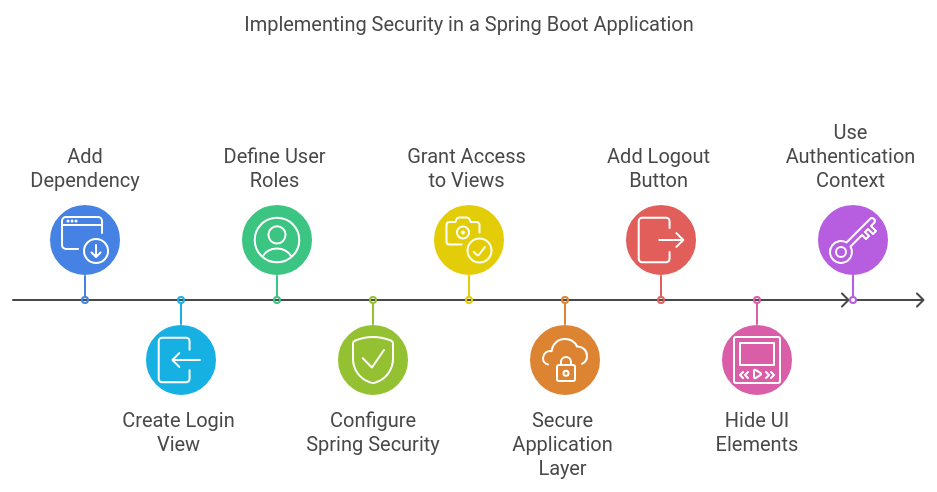
Key points about securing a Vaadin Flow application with Spring Security:
- Add the Spring Boot Security starter
dependency. - Create a
login viewusing Vaadin’sLoginFormcomponent. - Define user roles (e.g. USER and ADMIN).
- Configure
Spring Securityby extendingVaadinWebSecurity. Set up the login view and define users/roles. - Grant access to views using annotations like
@PermitAllor@RolesAllowed. - Secure the application layer (services) with
@RolesAllowedannotations. - Add a
logoutbutton to the main layout. - Hide UI elements (button
LogOut) based on user roles usingAuthenticationContext. - Use the authenticated
authenticationContext.getPrincipalName()as the valueLogOutbutton.
This setup restricts access to authenticated users, allows only admins to create channels, and personalizes the user experience. It integrates Vaadin’s built-in security features with Spring Security for a comprehensive security solution.
5 Test
Test the system
Test the system by running it and making sure that all the functionalities work as expected. This includes testing reservation creation, menu management, order processing, staff scheduling, and report generation.
6 Code and output
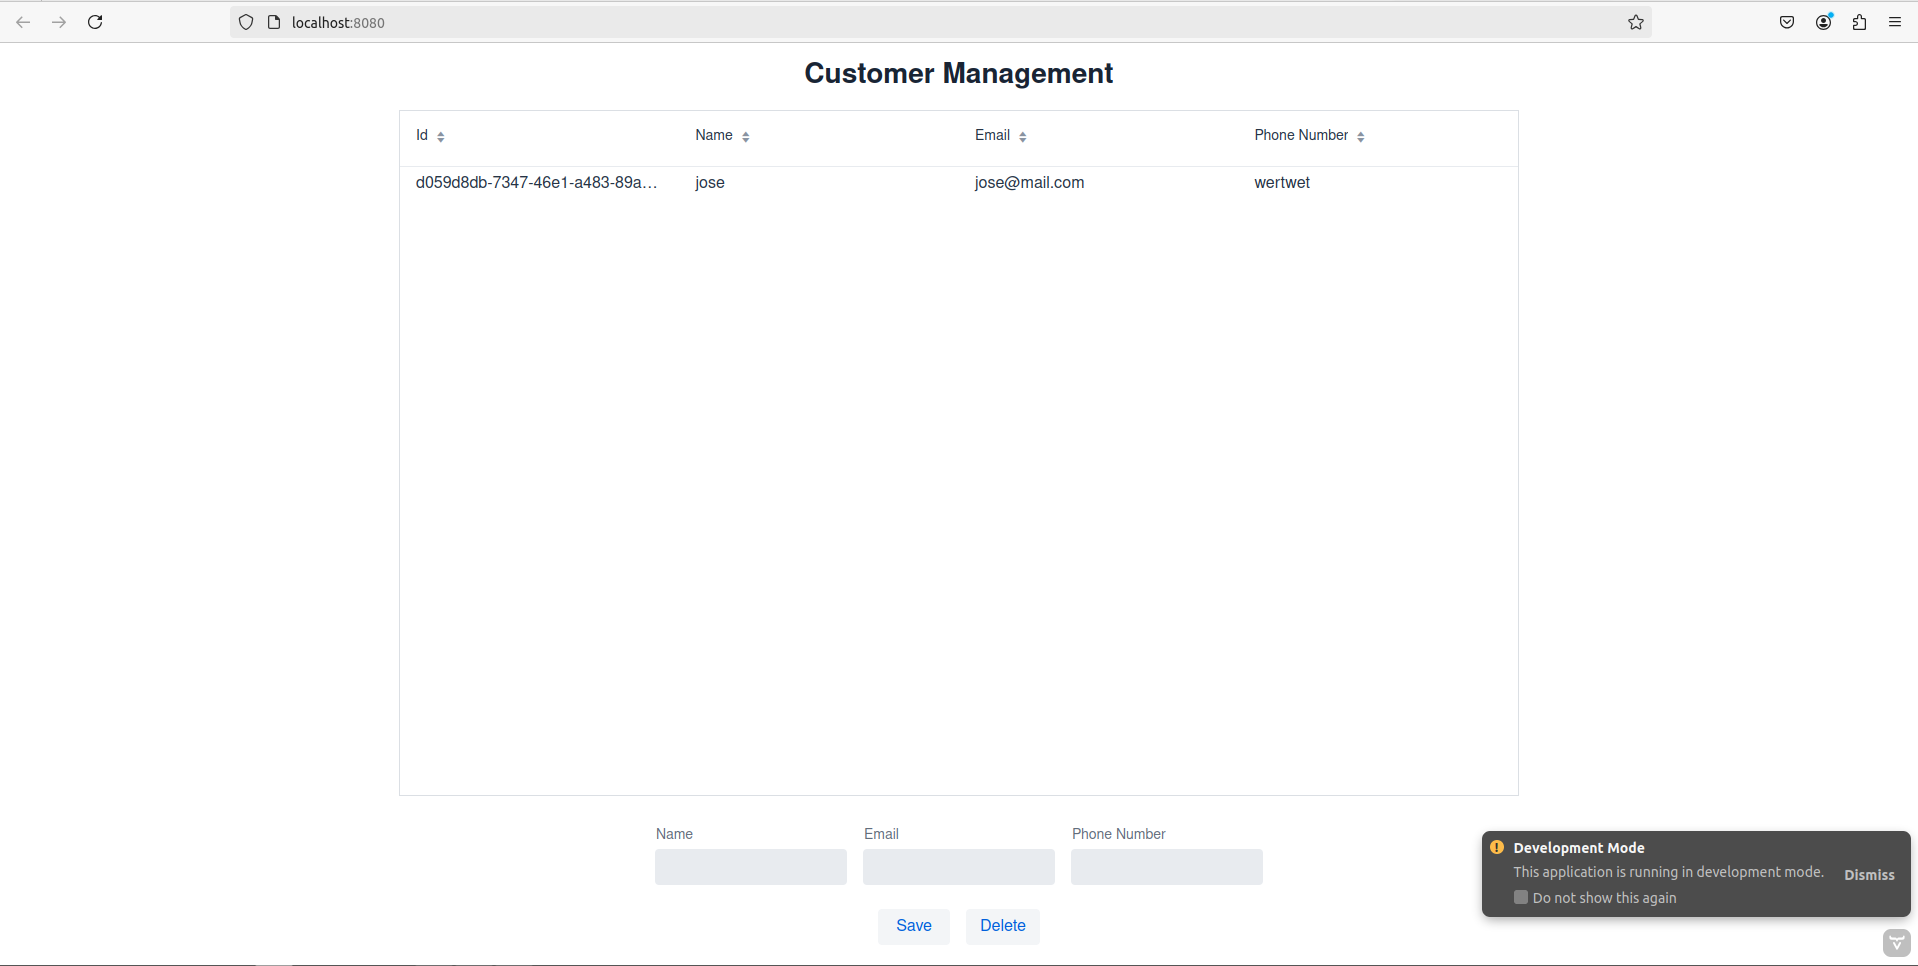
6.1 Commit 6a3c9f1
Commits on Oct 2, 2024:
- create project customer entity
- adding layout
- decoupling layout
- minor changes
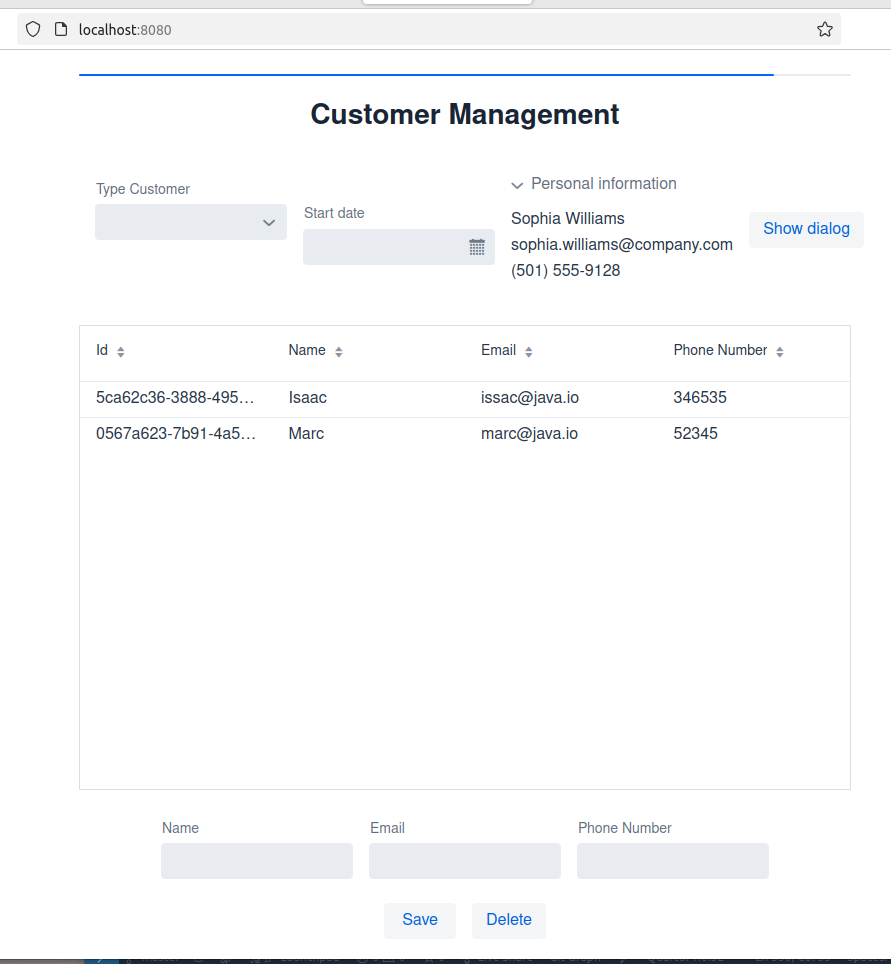
6.2 Commit 3333400
Commit on Nov 12, 2024: add UI components: data picker, dialog, combo, accordion
H2 LOCAL server

View
The new view Vaadin code defines a CustomerView class facilitates CRUD operations on customer data through a user interface that includes form fields for customer details (name, email, phonenumber), buttons for saving and deleting records, and a grid for displaying customer information.
The layout is structured into three columns, with a progress bar and additional components like a ComboBox for customer types and a DatePicker for selecting start dates.
Event listeners handle user interactions, ensuring data is saved or deleted as needed while maintaining synchronization with the underlying database via the CustomerRepository.
6.3 Commit 33b1284
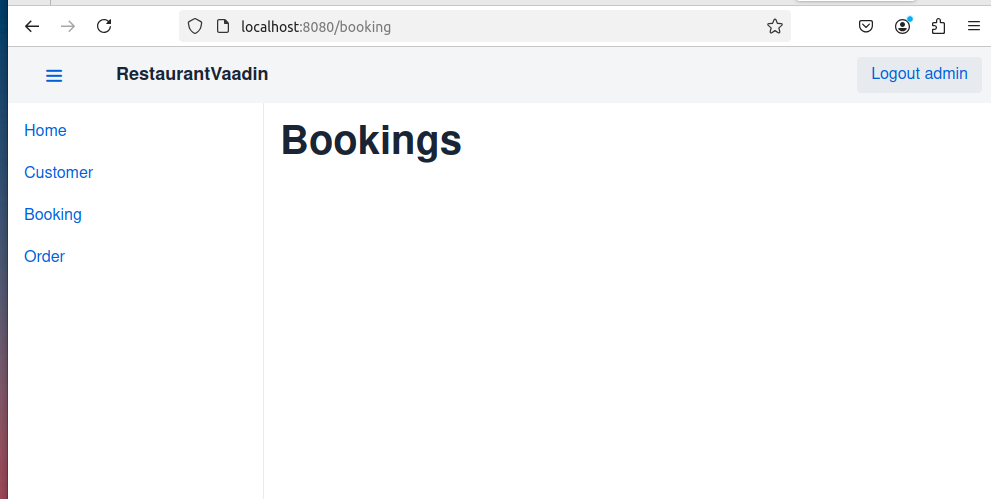
Commits on Nov 12, 2024: MainLayout, BookingView, RouterLink and drawer
This setup accomplishes the following:
- The
CustomerViewandBookingViewclasses are annotated with @Route, specifying their respective URL paths (“customer” and “booking”) and settingMainLayoutas their parent layout14. - The
MainLayoutclass extendsAppLayout, which provides a header and a responsive drawers. - In the
MainLayout, we create aheaderwith a logo and a drawertoggle button. - The
draweris populated withRouterLinkcomponents for both theCustomerandBookingviews, allowing for navigation between them. - The
setHighlightConditionmethod is used to highlight the current active link in the drawer.
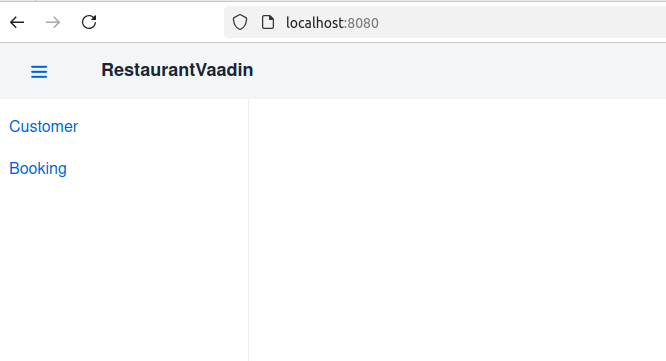
With this setup, users can navigate to /customer to see the Customer view and /booking to see the Booking view. The main layout provides a consistent structure across both views, with a header and a navigation drawer that can be toggled on smaller screens

6.4 Commit b67d768
Commits on Nov 13, 2024: Login, LoginView and Configuration
/home is public:

Any other view/page needs auth:
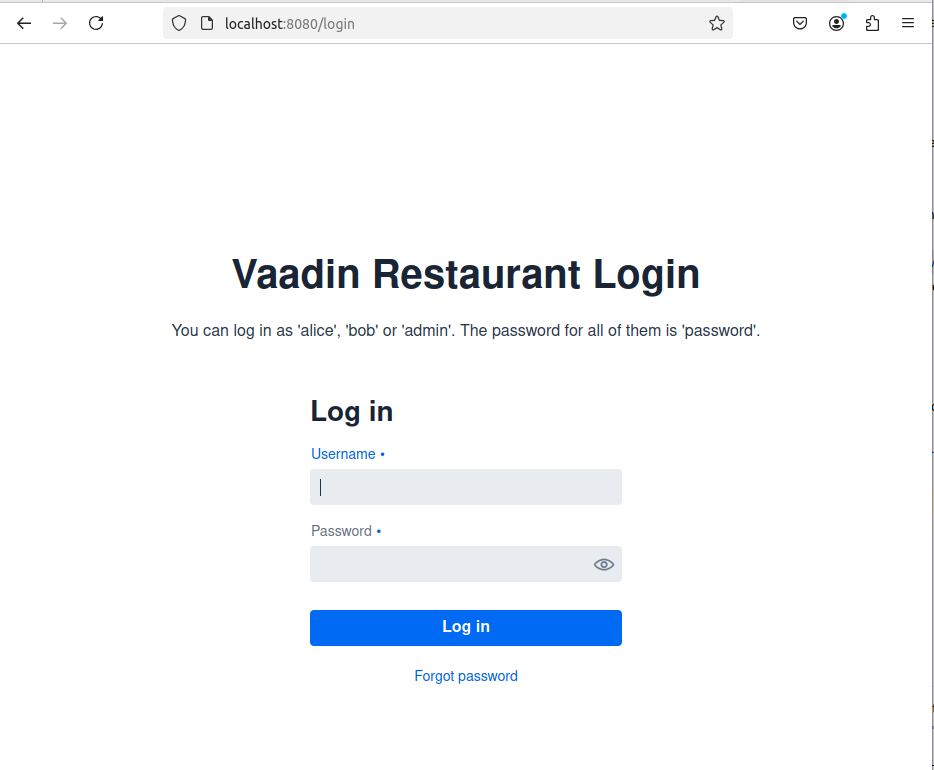
Bob may navigate with (USER_ROLE):

Once, Bob is logged (USER_ROLE), there are some view/page (/booking) with ADMIN_ROLE

ADMIN_ROLE & /booking:
7 Commit c0c2192
Commits on Nov 14, 2024: Icon, Drawer with Login button and fake user isaac-1234
We create a new user: isaac and encrypt the password with bcrypt:
@Bean
    public UserDetailsService users() {
        var alice = User.builder()
                .username("alice")
                // password = password with this hash, don't tell anybody :-)
                .password("{bcrypt}$2a$10$GRLdNijSQMUvl/au9ofL.eDwmoohzzS7.rmNSJZ.0FxO/BTk76klW")
                .roles(Roles.USER)
                .build();
        var bob = User.builder()
                .username("bob")
                // password = password with this hash, don't tell anybody :-)
                .password("{bcrypt}$2a$10$GRLdNijSQMUvl/au9ofL.eDwmoohzzS7.rmNSJZ.0FxO/BTk76klW")
                .roles(Roles.USER)
                .build();
        var isaac = User.builder()
                .username("isaac")
                // password = password with this hash, don't tell anybody :-)
                .password("{bcrypt}$2y$10$jaoj0Q2GRSxqwXaVB4yzSugTJJM8zuQf0NmLZU.iPhoC2CJBA.hsi")
                .roles(Roles.ADMIN, Roles.USER)
                .build();

        var admin = User.builder()
                .username("admin")
                // password = password with this hash, don't tell anybody :-)
                .password("{bcrypt}$2a$10$GRLdNijSQMUvl/au9ofL.eDwmoohzzS7.rmNSJZ.0FxO/BTk76klW")
                .roles(Roles.ADMIN, Roles.USER)
                .build();
        return new InMemoryUserDetailsManager(alice, bob, admin, isaac);
    }
Drawer with icons and login view in MainLayout:
![]()
LogOut button hidden
![]()
New User isaac-1234
![]()
isaac logged in:
![]()