Lab#RE03-4: API Rest Domains
ReactJS labs
📘 React JS Lab#RE03-4:API Rest Domains”
In this lab, we will be using:
- the
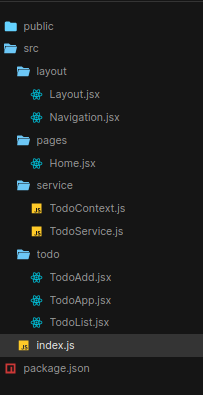
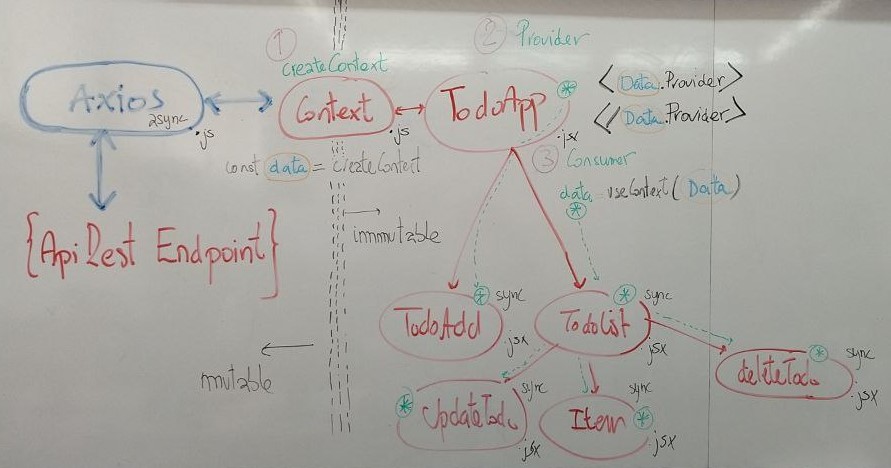
react-router-dom, which is a package with bindings for using React Router in web applications:decouplingthe communication layer by creating a separate service in ReactJSXandJS:service layer:TodoService.js, api Rest Axios functionsservice layer:TodoContext.js, creation of Context and repository of data and data-functionsUI components:todoApp.jsxand its components to render the App.
References:
- useContext
- async
todorefactored to domains:- one component and sevice layer, codesanbox todo-app-5-domain
todorefactored to domains:- three components and sevice layer, codesanbox todo-app-6
todorefactored to domains:- four components, sevice layer and context content list, codesanbox todo-app-7
1 Approach
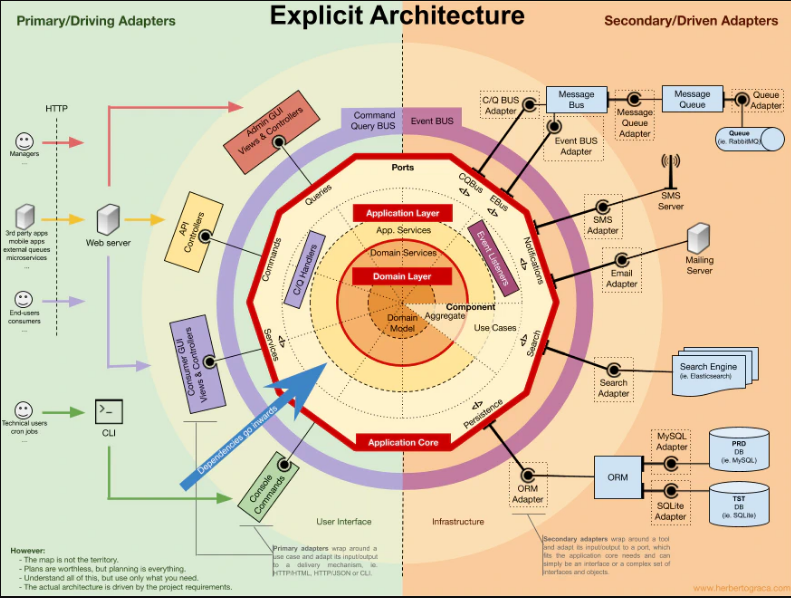
1.1 Hexagonal Architecture
The architecture by domains to decoupled concerns, with a service layer handling CRUD operations and using a provider and context in React, shares some similarities with the Hexagonal Architecture (also known as Ports and Adapters Architecture).
Onion architecture already used in other labs. Very similar to Hexagonal one.
In the Hexagonal Architecture, the core principle is to decouple the application’s business logic from its external dependencies, such as databases, APIs, or user interfaces.
It promotes the use of ports and adapters to isolate and abstract these dependencies.
In our architecture, the service layer acts as an adapter that interfaces with external dependencies (such as the API through Axios) and exposes a clean interface (the CRUD operations) for the application’s business logic (the React components) to interact with.
The provider and context in React provide a way to propagate this functionality throughout the component tree, decoupling it from individual component props.
Hexagonal Architecture?
While not an exact implementation of Hexagonal Architecture, the separation of concerns, decoupling of dependencies, and focus on clean interfaces align with the principles of Hexagonal Architecture.
This allows for better maintainability, testability, and flexibility in the application’s design.
1.2 Decoupling the communication layer
Decoupling the communication layer by creating a separate service in React JSX and JS architecture brings several benefits:
Separation of Concerns: By creating a dedicated service layer, you separate the concerns of handling API communication and data manipulation from the components that render the UI. This promotes a cleaner and more maintainable codebase.Reusability: The service layer can be reused across multiple components or even in different parts of your application. By encapsulating API calls and data handling in a service, you can easily reuse the same logic without duplicating code.Abstraction: The service layer abstracts the details of API communication, such as HTTP requests and error handling, from the components. This abstraction simplifies the component code, making it more focused on rendering the UI and managing local state.Testability: Separating the communication layer as a service makes it easier to write unit tests. You can write tests specifically for the service functions, mocking the API calls and asserting the expected behavior, without the need to render the entire component hierarchy.Maintainable and Scalable: By centralizing the API communication logic in a service, it becomes easier to manage and update as your application grows. If the API changes or new features are added, you only need to update the service layer without affecting the components.
1.3 mutable & immutable
Regarding the separation of mutable and immutable code:
- The
service layer(TodoService.js) handles mutable code related to API requests and updates the server-side data.- It performs actions like creating, updating, and deleting todos by interacting with the server.
- The component layer, specifically the
TodoContext.jsandUI components, deals withimmutablecode.- It manages the local state, such as the list of todos, and provides an interface for components to interact with the service layer.
- The components use the provided functions to update the state or trigger API calls when necessary.
1.4 Context API
React API Context provides a way to share data across the component tree without passing props explicitly at each level. It allows you to create a context object that can be accessed by components nested within a Provider component. Context is primarily used for managing immutable data and state.
The context itself is immutable because it provides a fixed value that can’t be modified directly. The data or state it holds should be treated as immutable to maintain the unidirectional data flow and ensure predictable updates.
However, the components consuming the context can read the data from the context and use it to update their state or trigger actions. The components can then propagate the changes back to the context by using the provided functions or callbacks.
The concept of immutability is crucial in React as it helps ensure predictable rendering and state management. Immutable data allows for efficient change detection and can optimize rendering performance, as React can easily determine when to re-render components based on changes in immutable data.
1.5 Using React context
When using React context, it’s important to follow best practices to make the most of this concept:
Define the context:Create a context object using React.createContext(), providing an initial value. This value should typically be an immutable object or state.Wrap components with the Provider: Wrap the relevant components with the Provider component, passing the desired value as a prop. This will make the value accessible to the nested components.Access the context value:Components that need access to the context can consume it using either useContext or by wrapping the component with the Context.Consumer component.Manage mutable state locally:Components consuming the context can manage their own local state using useState, useReducer, or any other state management technique. They can update the state based on the context data and trigger actions accordingly.Propagate changes back to the context:If components need to update the context data or trigger actions that affect the context, they can use functions or callbacks provided by the context. These functions should handle the necessary updates and ensure immutability is maintained.
1.6 fetching data: abort
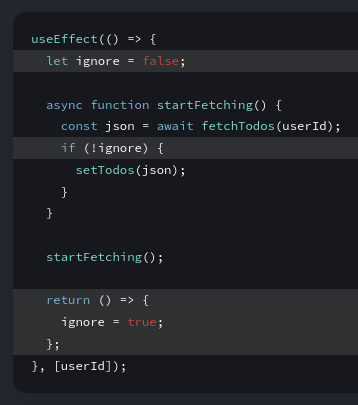
If your Effect fetches something, the cleanup function should either abort the fetch or ignore its result:
You can’t “undo” a network request that already happened, but your cleanup function should ensure that the fetch that’s not relevant anymore does not keep affecting your application. If the userId changes from ‘Alice’ to ‘Bob’, cleanup ensures that the ‘Alice’ response is ignored even if it arrives after ‘Bob’.
1.7 async/sync: passing down async functions
Passing asynchronous functions as props can lead to some drawbacks and is generally not considered a good practice. Here are a few reasons why it’s not recommended:
Prop Drilling: If you pass asynchronous functions as props to deeply nested components, it requires you to propagate these props through each intermediate component. This leads to a concept known as “prop drilling,” where components that do not directly need the asynchronous function still have to receive and pass it down. This can make your code more complex and harder to maintain.Coupling Components: By passing asynchronous functions as props, you tightly couple the components together. This means that if you decide to change the implementation of the asynchronous function or replace it with a different approach (e.g., using a different library, refactoring the code), you will have to update all the components that rely on that function. This can introduce unnecessary dependencies and make your codebase less flexible.Code Duplication: If multiple components require access to the same asynchronous function, passing it as a prop to each component results in code duplication. You’ll need to repeat the prop declaration and handling in each component, leading to redundant code. This can make it more difficult to maintain and update the codebase.
1.7.1 using Context
Instead of passing asynchronous functions as props, using a shared context and provider pattern, such as React Context, allows you to decouple the components and provide a centralized location for managing and accessing shared state and functions.
By using a context, you can avoid prop drilling and provide a clean and efficient way to access the asynchronous functions from any component within the context’s scope.
- Additionally, using a
providerandcontextpattern allows for better separation of concerns.- The
providerhandles the implementation details and provides the necessary functions, while the components consuming the context can focus on rendering and utilizing the shared data and functionality without worrying about how it is implemented or passed down through props.
- The
- Using
contextallows you to create a central place to manage and access the asynchronous function, making it available to any component that needs it within the context’s scope.- This avoids the need for prop drilling, where you would have to pass the function down through multiple levels of components as props.
Propagating the asynchronous function via props can work, but it may lead to some issues.
Asynchronous operations like API requests typically have a delay in fetching data, and the results may not be available immediately.
If you pass the function as a prop and try to execute it synchronously within a component, you won’t be able to wait for the response or handle any errors properly.
It can lead to unpredictable behavior and may cause the component to render with incomplete or incorrect data.
By using context, you can handle the asynchronous behavior appropriately, whether it’s using async/await or promises, and ensure that the components consuming the context can work with the asynchronous function correctly.
2 step-by-step todo api rest domains
2.1 Service: TodoService.js
The TodoService is a JavaScript object that provides methods for performing various operations related to managing TODO items.
It is defined using object literal notation in JavaScript.
Object literal notation is a way to define objects directly in the code without using a class or constructor function.
In the code, the TodoService object is created using curly braces {} and contains properties that are assigned arrow functions as their values.
Each property represents a different operation related to managing TODO items.
The methods defined within the TodoService object can be called as functions, such as TodoService.getAllTodos(), TodoService.createTodo(), TodoService.updateTodo(), and TodoService.deleteTodo().
It utilizes the Axios library to make HTTP requests to a specified API base URL. The data handled by the TodoService:
Get All Todos: This method retrieves all the TODO items from the API and returns the response data, which represents a collection of TODO items.Create Todo: This method sends a POST request to the API with a new TODO item as the payload. It expects the response data to represent the newly created TODO item.Update Todo: This method sends a PUT request to the API, updating an existing TODO item with the provided data. It expects the response data to represent the updated TODO item.Delete Todo: This method sends a DELETE request to the API, deleting the TODO item with the specified ID. It expects the response data to indicate the success of the deletion operation.
The data handled by TodoService consists of TODO items and their associated properties, such as ID, title, description, status, etc. The specific structure and format of the TODO data are determined by the API being used.
ToDoService.js
import axios from "axios";

///`${API_URL}/todo`
// https://github.com/mockapi-io/docs/wiki/Quick-start-guide
// API_URL mockapi.io
const API_BASE_URL = "https://645.mockapi.io/v1";

const TodoService = {
  getAllTodos: async () => {
    try {
      const response =
        await axios.get(`${API_BASE_URL}/todo`);
      //console.log("retrieving todos:", response.data);
      return response.data;
    } catch (error) {
      console.error("Error retrieving todos:", error);
      throw error;
    }
  },

  createTodo: async (todo) => {
    try {
      const response =
        await axios.post(`${API_BASE_URL}/todo`, todo);
      return response.data;
    } catch (error) {
      console.error("Error creating todo:", error);
      throw error;
    }
  },

  updateTodo: async (todo) => {
    try {
      const response =
        await axios.put(`${API_BASE_URL}/todo/${todo.id}`, todo);
      return response.data;
    } catch (error) {
      console.error("Error updating todo:", error);
      throw error;
    }
  },

  deleteTodo: async (todoId) => {
    try {
      const response =
        await axios.delete(`${API_BASE_URL}/todo/${todoId}`);
      return response.data;
    } catch (error) {
      console.error("Error deleting todo:", error);
      throw error;
    }
  }
};

export default TodoService;
2.2 Service: TodoContext.js
The TodoContext is a React context created using the createContext function.
It serves as:
- a repository of data related to TODO items in the React domain.
- a provider access to the
TodoServicefunctions, which utilizeAxiosto interact with an external API for data operations. - a state manager, the
TodoProvidercomponent is responsible for managing the state of the TODO items using theuseStatehook.
| Code | Description |
|---|---|
| useEffect | is used to fetch the initial TODO items when the component mounts. The fetchTodos function makes an asynchronous call to TodoService.getAllTodos() and updates the state with the retrieved data. |
| createTodo | adds a new TODO item by making a request to TodoService.createTodo() and updates the state by appending the created TODO item. |
| updateTodo | updates an existing TODO item by calling TodoService.updateTodo(), modifying the corresponding TODO item in the state. |
| deleteTodo | deletes a TODO item by invoking TodoService.deleteTodo() and removes the deleted item from the state. |
| TodoContext.Provider | wraps the children components, providing the todos state and the CRUD functions (createTodo, updateTodo, deleteTodo) through the context’s value. |
The TodoContext and TodoProvider facilitate the management of TODO data in the React application by utilizing the TodoService functions to interact with an API, and provide the data and functions through the context to be consumed by JSX components in an immutable domain.
fetchTodos
ToDoContext.js
import React, { createContext, useState, useEffect }
  from "react";
import TodoService from "./TodoService";

const TodoContext = createContext();

const TodoProvider = ({ children }) => {
  const [todos, setTodos] = useState([]);

  //
  useEffect(() => {
    fetchTodos();
  }, []);

  //
  const fetchTodos = async () => {
    try {
      const todos = await TodoService.getAllTodos();
      setTodos(todos);
      //console.log("todos:", todos);
    } catch (error) {
      console.error("Error fetching todos:", error);
    }
  };
createTodo
ToDoContext.js
updateTodo
ToDoContext.js
 //
  const updateTodo = async (todoToUpdate) => {
    try {
      const updatedTodo = {
        ...todoToUpdate,
        completed: !todoToUpdate.completed
      };
      await TodoService.updateTodo(updatedTodo);
      setTodos((prevTodos) => {
        const updatedTodos = [...prevTodos];
        const todoIndex = updatedTodos.findIndex(
          (todo) => todo.id === updatedTodo.id
        );
        updatedTodos[todoIndex] = updatedTodo;
        return updatedTodos;
      });
    } catch (error) {
      console.error("Error updating todo:", error);
    }
  };
deleteTodo
ToDoContext.js
  //
  const deleteTodo = async (todoId) => {
    try {
      await TodoService.deleteTodo(todoId);
      setTodos((prevTodos) =>
        prevTodos.filter((todo) => todo.id !== todoId));
    } catch (error) {
      console.error("Error deleting todo:", error);
    }
  };

  //
  return (
    <TodoContext.Provider
      value={{ todos, createTodo, updateTodo, deleteTodo }}>
      {children}
    </TodoContext.Provider>
  );
};

export { TodoContext, TodoProvider };
2.3 Main Component: ToDoApp.jsx
The main component is TodoApp, which renders a:
header,- a
TodoAddcomponent for creating new TODO items, and - a
TodoListcomponent for displaying the list of TODO items.
Within TodoApp, the useContext hook is used to access the TodoContext and retrieve the todos, createTodo, updateTodo, and deleteTodo functions from the context.
Handlers:
- The
handleCreateTodofunction calls createTodo when a new TODO item is created in theTodoAddcomponent. - The
handleUpdateTodofunction invokes updateTodo when a TODO item is updated in theTodoListcomponent. - The
handleDeleteTodofunction calls deleteTodo when a TODO item is deleted in theTodoListcomponent.
The App component wraps the TodoApp component with the TodoProvider, providing the necessary context and functions to manage the TODO items.
The code-architecture establishes a connection between the TODO data management in TodoProvider and the rendering of components in TodoApp using the TodoContext. It allows for seamless communication and manipulation of TODO items within the React application.
ToDoApp.jsx
import React, { useContext } from "react";
import TodoAdd from "./TodoAdd";
import TodoList from "./TodoList";
import { TodoContext, TodoProvider }
  from "../service/TodoContext.js";

const TodoApp = () => {
  const { todos, createTodo, updateTodo, deleteTodo } =
    useContext(TodoContext);

  const handleCreateTodo = (todo) => {
    createTodo(todo);
  };

  const handleUpdateTodo = (todo) => {
    updateTodo(todo);
  };

  const handleDeleteTodo = (todoId) => {
    deleteTodo(todoId);
  };

  return (
    <div>
      <h1>Todo App</h1>
      <TodoAdd onCreate={handleCreateTodo} />
      <TodoList
        todos={todos}
        onDelete={handleDeleteTodo}
        onUpdate={handleUpdateTodo}
      />
    </div>
  );
};

const App = () => {
  return (
    <TodoProvider>
      <TodoApp />
    </TodoProvider>
  );
};

export default App;
2.4 Component: ToDoAdd.jsx
ToDoAdd.jsx is used for creating new todo items.
It renders a form with input fields for entering the text, author, and due date of a new todo item. It uses React’s useState hook to manage the state of the input values. When the form is submitted, the onCreate function is called with an object containing the entered values.
The component exports the TodoAdd component using the export default statement, allowing it to be imported and used in other files.
ToDoAdd.jsx
import React from "react";

// CRUD: create
const TodoAdd = ({ onCreate }) => {
  const [text, setText] = React.useState("");
  const [author, setAuthor] = React.useState("");
  const [due, setDue] = React.useState("");

  const handleSubmit = () => {
    onCreate({
      text: text,
      author: author,
      due
    });
  };

  return (
    <>
      <hr />
      <h2>Create new Todo</h2>
      <hr />
      <form onSubmit={handleSubmit}>
        <p>
          <label> Text</label>
          <br />
          <input
            type="text"
            value={text}
            onChange={(e) => setText(e.target.value)}
            placeholder="Enter author name"
          />
        </p>
        <p>
          <label> Author</label>
          <br />
          <input
            type="text"
            value={author}
            onChange={(e) => setAuthor(e.target.value)}
            placeholder="Enter author name"
          />
        </p>
        <p>
          <label> Due</label>
          <br />
          <input
            type="date"
            value={due}
            onChange={(e) => setDue(e.target.value)}
          />
        </p>

        <button type="submit">Add Todo</button>
      </form>
      <br />
      <hr />
    </>
  );
};

export default TodoAdd;
2.5 Component: ToDoList.jsx
The ToDoList.jsx consists of two components:
TodoItem: this component renders a single todo item with its details such as text, id, due date, author, and completion status.- It also provides options to delete the item and update its completion status.
TodoList: this component renders a list of todo items.- It maps over the todos array and renders a TodoItem component for each item. It also handles the loading state when the todos array is null.
The components are exported using the export default statement, indicating that they can be imported and used in other files.
ToDoList.jsx
import React from "react";

// CRUD: read and render item from list
const TodoItem = ({ todo, onDelete, onUpdate }) => {
  const handleDelete = () => {
    onDelete(todo.id);
  };

  const handleUpdate = () => {
    onUpdate(todo);
  };

  return (
    <>
      <h4> {todo.text}</h4>
      <p>
        Id: {todo.id},
        Date: {todo.due},
        by <strong>{todo.author} </strong>
      </p>

      <div style={{ display: "flex",
                    justifyContent: "space-between" }}>
        <button onClick={handleDelete}>Delete</button>
        <div>
          Completed:{" "}
          <input
            type="checkbox"
            value={todo.completed}
            onChange={handleUpdate}
          ></input>
        </div>
      </div>

      <br />
      <br />
      <hr />
    </>
  );
};

//....
ToDoList.jsx
// CRUD: read and create list
const TodoList = ({ todos, onDelete, onUpdate }) => {
  //console.log("todos list", todos);
  if (todos === null) {
    return <p>Loading...</p>;
  }

  return (
    <>
      <h2>Todos List</h2>
      <hr />
      {todos.map((todo) => (
        <TodoItem
          key={todo.id}
          todo={todo}
          onDelete={onDelete}
          onUpdate={onUpdate}
        />
      ))}
    </>
  );
};

export default TodoList;
3 Versions
| Code Version | Commit | Folder-Tree | Screeshoots |
|---|---|---|---|
| todoApp 0.4 | ToDoGrid decoupling with domains: todoApp 0.4 | - | - |


