Spring Boot: Thymeleaf
Spring Boot View Thymeleaf
📘 Thymeleaf
Thymeleaf is a modern server-side Java template engine for both web and standalone environments.

1 Overview
![]()
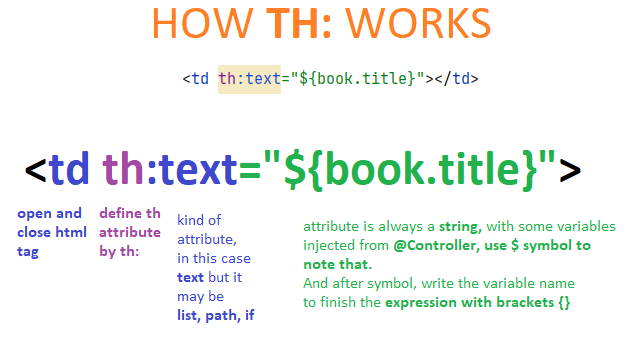
Thymeleaf uses HTML attributes to add functionality and dynamic behavior to web pages, allowing for server-side rendering and template processing.
Here Thymeleaf will process the text inside the th:text attribute, and replace the contents of the <p> tag with it.
Thymeleaf works by replacing the contents of the tags that its attributes are defined on. so the final in the browser output will be:
Notice that the special attributes are now gone, as well as the text “text” which is now replace with the contents of the Thymeleaf attribute.
A more complicated example:
<tr th:each="prod : ${prods}">
    <td th:text="${prod.name}">Onions</td>
    <td th:text="${prod.price}">2.41</td>
<tr>
Here Thymeleaf will repeat the <tr> with the list of products, this is defined by the attribute th:each, it will also remove the dummy content in both the <td> tags, and replace them with the content that is evaluated from th:text="${prod.name}" and th:text="${prod.price}".
2 Configuration
In order to use thymeleaf in a project, we need to add the following starter to the dependency:
<dependency>
    <groupId>org.springframework.boot</groupId>
    <artifactId>spring-boot-starter-thymeleaf</artifactId>
</dependency>
The starter spring-boot-starter-thymeleaf added to the project, thanks to the auto-configuration mechanism. Default values include:
HTMLtemplates should be in theresources/templatesdirectory (this is the so-calledroot)- files should have the
htmlextension (so we won’t have to duplicate this information in the code) viewResolverhas an appropriate implementation (thymeleafViewResolver)
3 Passing data to views: @Controller and View
The @Controller will return a String object: it will display an HTML view with the appropriate message at the address:
http://localhost:8080/
Thymeleaf allows you to define templates of HTML views. In order to be able to use additional Thymeleaf functionalities we need to add the appropriate **namespace** to the HTML document (and the html tag):
xmlns:th=“http://www.thymeleaf.org”
in the tag we indicate the attribute that should be replaced with the name. We precede this attribute with the name namespace and the character :, e.g.:
<p th:text=...></p>
indicate the value to be replaced inside the braces and precede it with a dollar sign, e.g. ${myCustomAttributeName}
4 Messages
Thymeleaf by default allows you to define such messages in the messages.properties file, which by default should be located directly in the resources directory.
In this file we store the keys and the corresponding values. In the HTML template, we refer to the key using the # sign:
hi.msg=Hi there!
<!DOCTYPE html>
<html lang="en" xmlns:th="http://www.thymeleaf.org">
<body>
    <p th:text="#{hi.msg}"></p

    <a href="?lang=fr">Français</a>

</body>
</html>
In application.properties, we should define locale:
spring.mvc.locale=
en
We could add another language by creating a new file named messages_fr.properties (messages_cat.properties, messages_es.properties, messages_ja.properties) in the same directory.
This approach also allows the implementation of internationalization by means of the so-called interceptors:
@Bean
public LocaleResolver localeResolver() {
    SessionLocaleResolver resolver = new SessionLocaleResolver();
    resolver.setDefaultLocale(Locale.ENGLISH);
    return resolver;
}

@Bean
public LocaleChangeInterceptor localeChangeInterceptor() {
    LocaleChangeInterceptor interceptor = new LocaleChangeInterceptor();
    interceptor.setParamName("lang");
    return interceptor;
}

@Override
public void addInterceptors(InterceptorRegistry registry) {
    registry.addInterceptor(localeChangeInterceptor());
}
5 ThymeLeaf Templates Engine
Most Thymeleaf attributes allow their values to be set as or containing expressions, which we will call Standard Expressions because of the dialects they are used in. These can be of five types:
- ${…} : Variable expressions.
- *{…} : Selection expressions.
- #{…} : Message (i18n) expressions.
- @... : Link (URL) expressions.
- ~{…} : Fragment expressions.
- __{…} : use an element inside another
Attributes th:
- message:
<p th:text="#{msg.welcome}">Welcome everyone!</p> - list:
<li th:each="book : ${books}" th:text="${book.title}">En las Orillas del Sar</li> - link:
<form th:action="@{/createOrder}"> - action:
<input type="button" th:value**="#{form.submit}" /> - path:
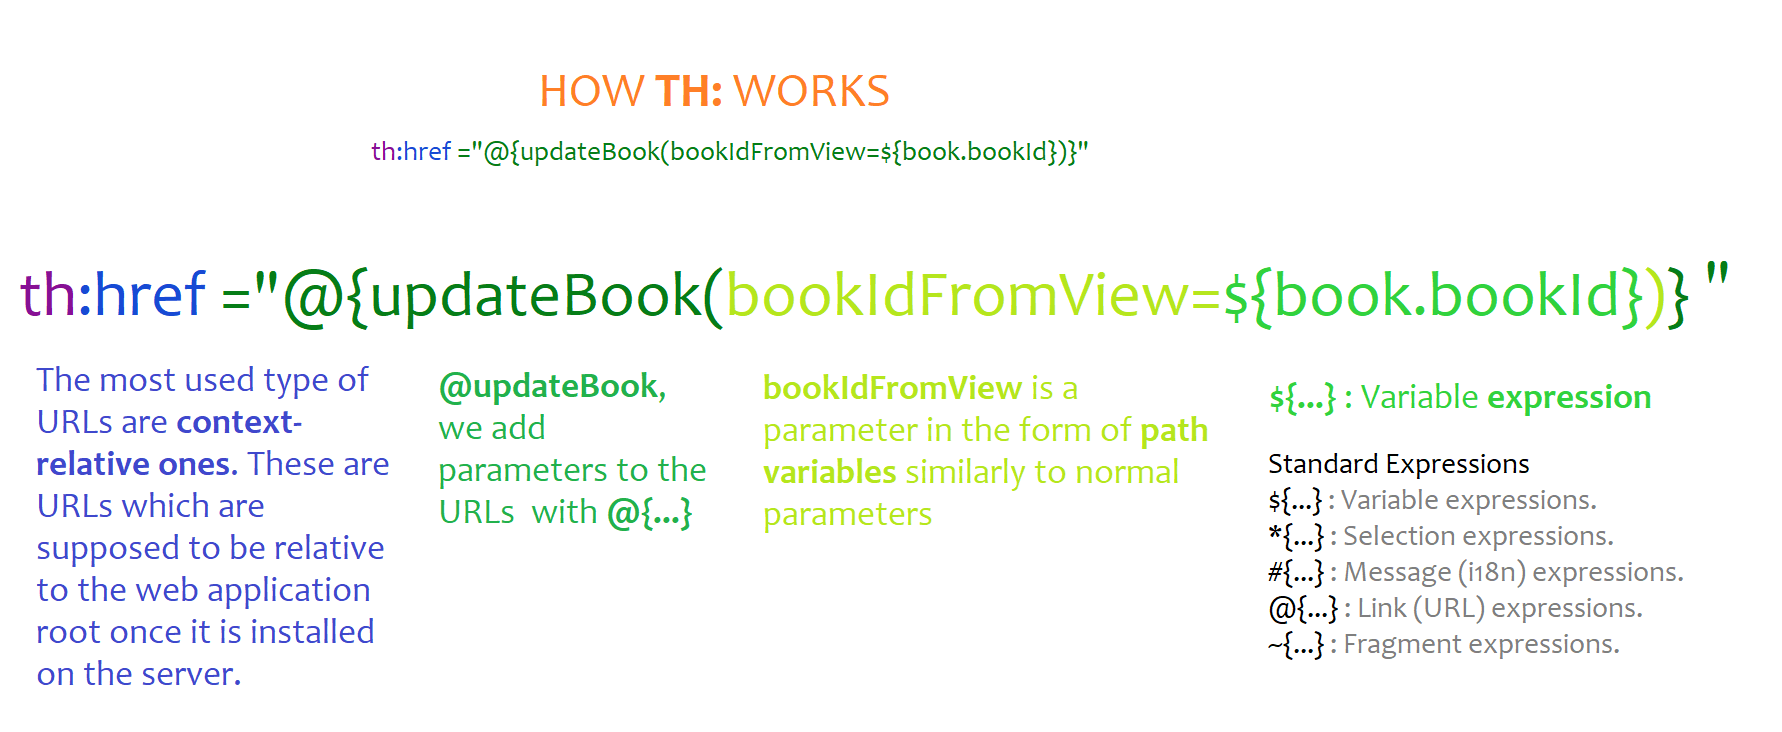
<a th:href="@{/admin/users}">
How to write th:
6 Fragments
Using fragments in Thymeleaf can make it easier to maintain and update web pages, as changes to a fragment will be reflected in all pages that include it.
In Thymeleaf, a fragment is a reusable piece of a web page that can be included in multiple pages. It can contain HTML markup, Thymeleaf expressions, and other Thymeleaf features.
Fragments are defined in Thymeleaf using the th:fragment attribute, which is added to any HTML element.
The value of the attribute is the name of the fragment. For example:
This defines a fragment called “header” that contains a heading element. This fragment can then be included in other pages using the th:replace or th:include attributes.
For example:
<html>
   <body>
      <div th:replace="fragments/header :: header"></div>
      <p>This is the content of my page.</p>
   </body>
</html>
This code includes the “header” fragment in the page using the th:replace attribute. The :: syntax is used to specify the fragment name, and the fragments/header prefix specifies the location of the fragment file.
7 Layout
Using the Layout Dialect can make it easier to maintain a consistent layout across your web pages, and simplify the process of creating new pages.
Thymeleaf Layout Dialect is a third-party dialect that provides a way to define a common layout for a set of web pages in Thymeleaf.
With the Layout Dialect, you can define a template that contains the common structure and layout of your web pages, and then include the content of each page in the appropriate section of the template.
To use the Layout Dialect, you need to add the dialect dependency (for Maven):
<dependency>
   <groupId>nz.net.ultraq.thymeleaf</groupId>
   <artifactId>thymeleaf-layout-dialect</artifactId>
   <version>2.5.1</version>
</dependency>
Once you have added the dependency, you can use the Layout Dialect in your Thymeleaf templates. Here’s an example of how to define a layout:
<!DOCTYPE html>
<html>
   <head>
      <title>My Website</title>
   </head>
   <body>
      <header th:replace="fragments/header :: header"></header>
      <div layout:fragment="content"></div>
      <footer th:replace="fragments/footer :: footer"></footer>
   </body>
</html>
This template defines a layout that includes a header and a footer. The layout:fragment attribute is used to define a section where the content of each page will be included.
To use this layout in a page, you can create a new template that includes the layout and defines the content:
<!DOCTYPE html>
<html xmlns:layout="http://www.ultraq.net.nz/thymeleaf/layout">
   <head>
      <title>My Page</title>
   </head>
   <body>
      <div layout:decorator="layout/template">
         <div layout:fragment="content">
            <p>This is the content of my page.</p>
         </div>
      </div>
   </body>
</html>
This page includes the layout by setting the layout:decorator attribute to the path of the layout template. The content of the page is defined inside the layout:fragment attribute.
8 CheatSheet
| Feature | Description | Syntax |
|---|---|---|
| th:text | Sets the text of an element | <p th:text="${someValue}">Default Text</p> |
| th:if | Conditionally renders an element | <p th:if="${someCondition}">Visible when condition is true</p> |
| th:each | Loops over a collection and renders an element for each item | <ul><li th:each="item : ${items}" th:text="${item}">Default Text</li></ul> |
| th:object | Binds a form to an object and sets its properties | <form th:object="${user}"><input th:field="*{name}" /></form> |
| th:action | Sets the URL for a form’s submission | <form th:action="@{/submit}" method="post"> |
| th:href | Sets the URL for an anchor tag | <a th:href="@{/page}">Link Text</a> |
| th:src | Sets the source URL for an image tag | <img th:src="@{/image.jpg}" alt="Alt Text" /> |
| th:value | Sets the value of an input field | <input th:value="${someValue}" /> |
| th:selected | Conditionally selects an option in a select field | <select><option th:selected="${isSelected}">Option Text</option></select> |
| th:disabled | Conditionally disables an input field | <input th:disabled="${isDisabled}" /> |
| th:readonly | Conditionally sets an input field as read-only | <input th:readonly="${isReadOnly}" /> |
| th:classappend | Conditionally appends a CSS class to an element | <div class="default" th:classappend="${additionalClass}"></div> |
| th:style | Sets the style attribute of an element | <div th:style="'background-color:' + ${bgColor} + ';'"></div> |
| th:attr | Sets any attribute of an element | <input th:attr="data-id=${itemId}" /> |
| th:replace | Replaces an element with another | <div th:replace="fragments/header :: header"></div> |
| th:include | Includes a fragment of a template | <div th:include="fragments/footer :: footer"></div> |
| th:unless | Conditionally renders an element when a condition is false | <p th:unless="${someCondition}">Visible when condition is false</p> |
| th:inline | Sets the inline mode of an element | <script th:inline="javascript">alert([[${message}]]);</script> |
| th:textappend | Appends text to an element | <span th:textappend="${additionalText}">Default Text</span> |
| th:with | Sets a local variable in the current context | <div th:with="varName=${someValue}"></div> |
9 Example1: Model
<!DOCTYPE html>
<html xmlns:th="http://www.thymeleaf.org">
<head>
    <title>Home</title>
</head>
<body>
    <h1 th:text="${message}">Hello, World!</h1>
</body>
</html>
In this template, the th:text attribute is used to set the text of the <h1> tag to the value of the message attribute in the model. The expression ${message} evaluates to the value of the message attribute.
Assuming that this template is saved in a file named home.html in your application’s templates directory, the HomeController will render a message that says:
“Welcome to my Spring Boot app!”
when you visit theURL /
The value of the message attribute is set in the home() method of the controller.
10 Example2: @PathVariable and @RequestBody
Thymeleaf templates that can be used with the hello(), createUser(), and getUserById() methods:
hello.html
<!DOCTYPE html>
<html xmlns:th="http://www.thymeleaf.org">
<head>
    <title>Hello</title>
</head>
<body>
    <h1 th:text="${message}">Hello, World!</h1>
</body>
</html>
In this template, the th:text attribute is used to set the text of the <h1> tag to the value of the message attribute in the model. The value of message is set in the hello() method of the controller.
user.html
<!DOCTYPE html>
<html xmlns:th="http://www.thymeleaf.org">
<head>
    <title>User</title>
</head>
<body>
    <h1 th:text="${user.name}">User</h1>
    <p th:text="${user.email}"></p>
</body>
</html>
In this template, the th:text attribute is used to set the text of the <h1> tag to the value of the name property of the user object in the model.
The th:text attribute of the <p> tag is used to set its text to the value of the email property of the user object in the model.
Assuming that these templates are saved in files named hello.html and user.html, respectively, in your application’s templates directory, the hello() method will render a message that says:
“Hello, World!”
when you visit the URL /hello
The createUser() method doesn’t return a view, so it doesn’t need a Thymeleaf template.
Finally, the getUserById() method will render a page that displays the details of a user when you visit the URL /users/{id}, where {id} is the ID of the user.
The details of the user are passed to the template using the model.addAttribute() method.
The th:text attribute is used to set the text of the <h1> tag to the name of the user, and the th:text attribute of the <p> tag is used to set its text to the email of the user.
11 Example3: @RequestParam
<!DOCTYPE html>
<html xmlns:th="http://www.thymeleaf.org">
<head>
    <title>Example</title>
</head>
<body>
    <h1 th:text="'Hello, ' + ${message}">Hello, World!</h1>
</body>
</html>
In this template, the th:text attribute is used to set the text of the <h1> tag to the value of the message attribute in the model.
The expression 'Hello, ' + ${message} concatenates the string "Hello, " with the value of the message attribute.
Assuming that this template is saved in a file named hello.html in your application’s templates directory, the ExampleController will render a message that says:
For example, if you visit the URL /hello?name=John, the message will say “Hello, John!”.
“Hello, {name}!”
when you visit the URL:
/hello?name=John
where {name} is the value of the name parameter in the query string.
12 Thymeleaf
12.1 ThymeLeaf Templates Engine
Most Thymeleaf attributes allow their values to be set as or containing expressions, which we will call Standard Expressions because of the dialects they are used in. These can be of five types:
- ${…} : Variable expressions.
- *{…} : Selection expressions.
- #{…} : Message (i18n) expressions.
- @... : Link (URL) expressions.
- ~{…} : Fragment expressions.
- __{…} : use an element inside another
Attributes th:
- message:
<p th:text="#{msg.welcome}">Welcome everyone!</p> - list:
<li th:each="book : ${books}" th:text="${book.title}">En las Orillas del Sar</li> - link:
<form th:action="@{/createOrder}"> - action:
<input type="button" th:value**="#{form.submit}" /> - path:
<a th:href="@{/admin/users}">
How to write th: