Lab#RE07-1: traffic lights simulation
ReactJS labs
📘 React JS Lab#RE07-1: Traffic Lights Simulation
In this lab, we’ll delve into building a traffic lights simulation using React.js. Here’s an overview of what we’ll cover:
Project Setup: We’ll kick off by creating a new React project using Vite, a modern build tool.
- With Vite’s fast build times, we’ll set up our project environment swiftly.
CSS Inline Styling: Instead of separate CSS files, we’ll utilize inline styling for our components.
- This approach keeps our styling concise and localized within each component.
JSX Components: We’ll dive into JSX, a syntax extension for JavaScript often used with React. JSX allows us to write HTML-like code within JavaScript, making it seamless to create UI components.
Business Logic Management with Hooks, Literal Objects & timout:
- We’ll leverage
literal objectsfor organized state management. - We’ll manage our
form state using React hooks like (these hooks empower us to handle stateful logic effectively within functional components): useState,useMemo,useContext,- and
useEffect
Timeouts for Simulation Logic: We’ll incorporate timeouts to control the simulation flow.- Timeouts allow us to delay certain actions, such as changing traffic light colors or updating pedestrian movements, adding an interactive and dynamic element to our traffic lights simulation.
- We’ll leverage
Form Management: We’ll dive into forms to manage user data
- Axios: we will use
axiosto persist our data at fake-server mockapi
- Axios: we will use
By the end of this lab, you’ll have gained hands-on experience in React.js development, mastering essential concepts like state management, JSX rendering, component styling, and integrating timeouts for simulation logic. This project serves as an engaging introduction to building dynamic web applications with React.
1 References
1.1 Scripts and tools
React.dev scripts
Implement a traffic light
Here is a crosswalk light component that toggles when the button is pressed:
Fix a request counter
You’re working on an art marketplace app that lets the user submit multiple orders for an art item at the same time. Each time the user presses the “Buy” button, the “Pending” counter should increase by one. After three seconds, the “Pending” counter should decrease, and the “Completed” counter should increase.
However, the “Pending” counter does not behave as intended. When you press “Buy”, it decreases to -1 (which should not be possible!). And if you click fast twice, both counters seem to behave unpredictably.
Why does this happen? Fix both counters.
Treat state as read-only
In other words, you should treat any JavaScript object that you put into state as read-only.
This example holds an object in state to represent the current pointer position. The red dot is supposed to move when you touch or move the cursor over the preview area. But the dot stays in the initial position:
Copying objects with the spread syntax
In the previous example, the position object is always created fresh from the current cursor position. But often, you will want to include existing data as a part of the new object you’re creating. For example, you may want to update only one field in a form, but keep the previous values for all other fields.
These input fields don’t work because the onChange handlers mutate the state:
Updating Arrays in State
Arrays are mutable in JavaScript, but you should treat them as immutable when you store them in state. Just like with objects, when you want to update an array stored in state, you need to create a new one (or make a copy of an existing one), and then set state to use the new array.
Initial SPA projects codesandbox
- Basic business logic: trafficlights SPA 1.0.1
Axiosand ApiRest: trafficlights SPA 1.2.1useContextto decoupleaxiosfrom render: trafficlights SPA 1.3.0- implement CRUD delete operation with
axios&useContext: trafficlights SPA 1.4.0 - implement CRUD create/update operations with
axios&useContext: trafficlights SPA 1.4.1 - implement CRUD close button
edit&API_URL: trafficlights SPA 1.4.2
2 Create project
2.1 Vite
Next Generation Frontend Tooling: Get ready for a development environment that can finally catch up with you.
To create a new Vite project, open your terminal and run the following command:
Select React framework:
bash.sh
And js:
Output:
Exposing port
npm run dev –host network: not exposed
Shortcuts
3 Mock-up
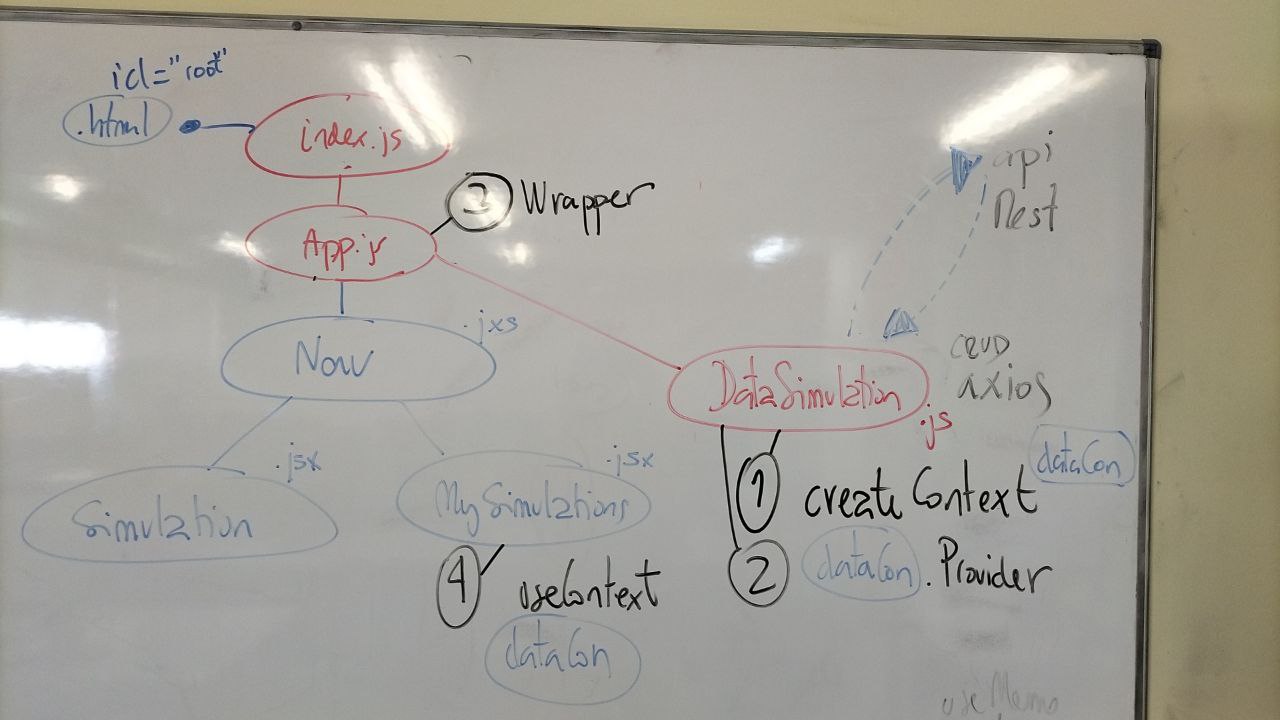
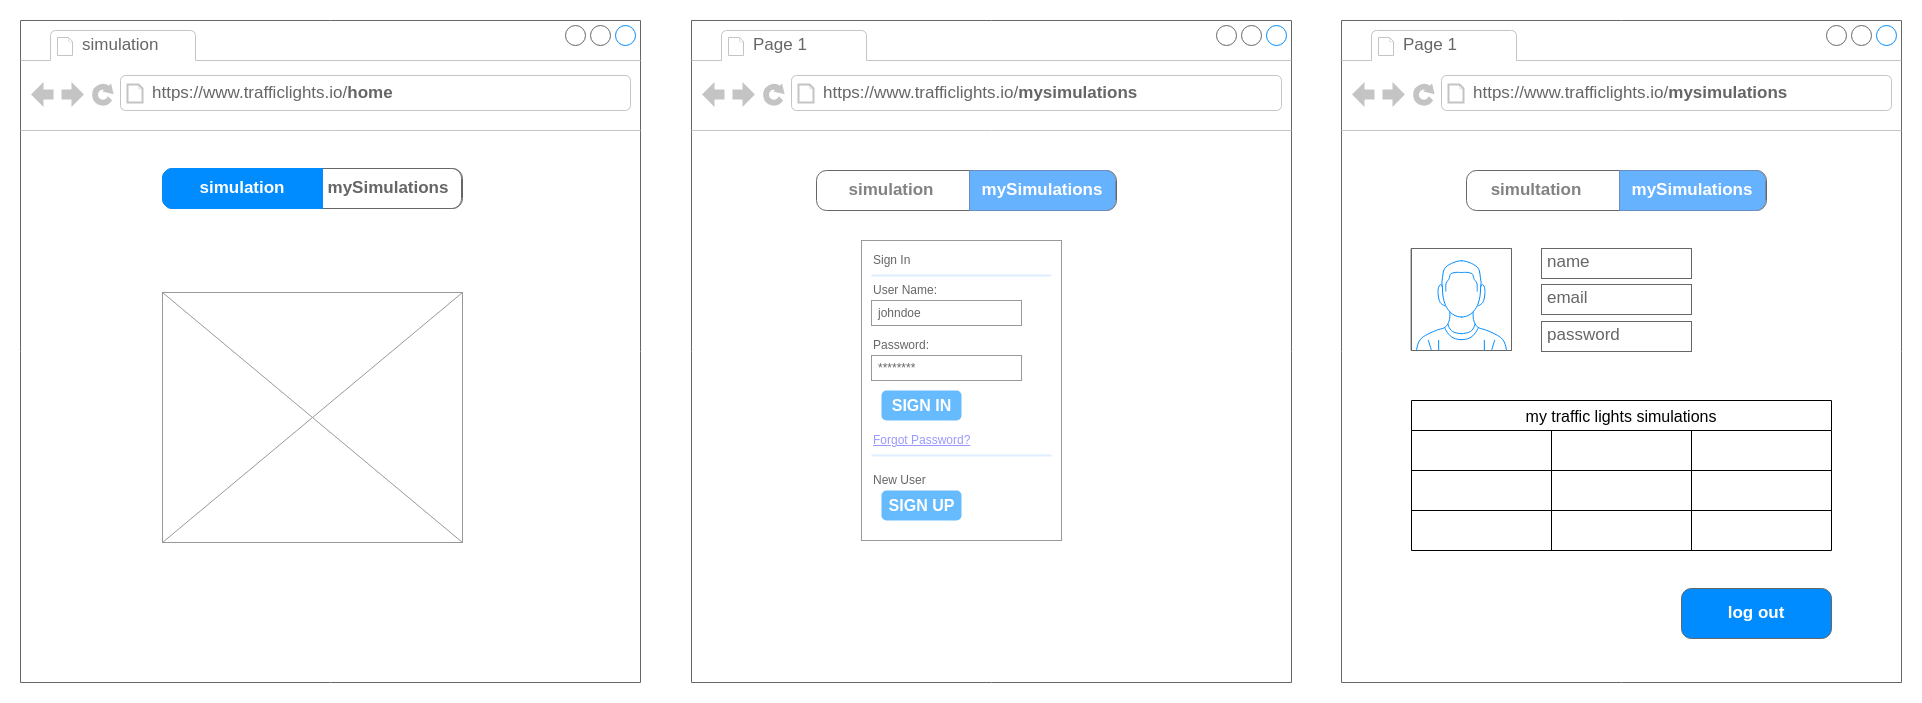
Whe should evolve the project from a SPA to multi-page react-router-dom site.
From these basic mockup SPA versions:
- Basic business logic: trafficlights SPA 1.0.1
Axiosand ApiRest: trafficlights SPA 1.2.1useContextto decoupleaxiosfrom render: trafficlights SPA 1.3.0- implement CRUD delete operation with
axios&useContext: trafficlights SPA 1.4.0 - implement CRUD create/update operations with
axios&useContext: trafficlights SPA 1.4.1 - implement CRUD close button
edit&API_URL: trafficlights SPA 1.4.2
To a multi-page two domains site:
- home/simulation
- and user/mySimulations
4 Step-by-step code
4.1 React functions & components
4.2 Core Business logic & use case
This first iteration defines a React functional component called RequestTracker, which simulates a traffic light and tracks pedestrian crossings.
It uses the useState hook to manage four state variables:
- pending (number of pedestrians waiting),
- walking (number of pedestrians crossing),
- completed (number of completed crossings),
- and light (status of the traffic light).
The UI displays the current counts of pending, walking, and completed pedestrians, and the color of the text changes based on the status of the traffic light. The button’s color also changes to reflect the traffic light’s color.
When the user clicks the “Traffic Light” button, the handleTrafficLightClick function is triggered. It decrements pending, increments walking, and sets the light to green. After a delay of 5 seconds, it decrements walking, increments completed, and sets the light to red.
The code uses the <> (fragment) syntax to group multiple elements without introducing an additional parent node.
App.jsx
import { useState } from "react";

export default function RequestTracker() {
  const [pending, setPending] = useState(100);
  const [walking, setWalking] = useState(0);
  const [completed, setCompleted] = useState(0);
  const [light, setLight] = useState(false);

  /*
  useEffect(() => {
    console.log("pending effect:", pending);
  }, [pending]);
  */

  function handleTrafficLightClick() {
    //console.log("before", pending);
    setPending((p) => p - 10);
    //console.log("after", pending);
    setWalking((w) => w + 10);
    setLight(true); // Set light to green when walking starts
    setTimeout(() => {
      setWalking((w) => w - 10);
      setCompleted((c) => c + 10);
      setLight(false); // Set light to red when walking is completed
    }, 5000); // Delay for 3000 milliseconds (5 seconds)
  }

  return (
    <>
      <h3 style={{ color: light ? "grey" : "white" }}>
        Pending: {pending} </h3>
      <h3 style={{ color: light ? "white" : "grey" }}>
        Walking: {walking} {light ? " . . . . ." : ""}
      </h3>
      <h3 style={{ color: light ? "green" : "grey" }}>
        Completed: {completed}
      </h3>
      <button
        onClick={handleTrafficLightClick}
        style={{
          backgroundColor: light ? "green" : "red",
          padding: "10px 24px",
          borderRadius: "8px",
          border: "none",
          color: "white",
          fontSize: "20px",
        }}
      >
        Taffic Light
      </button>
    </>
  );
}
4.3 Adding graphics & improving business logic
use case: pedestrians crossing a traffic light
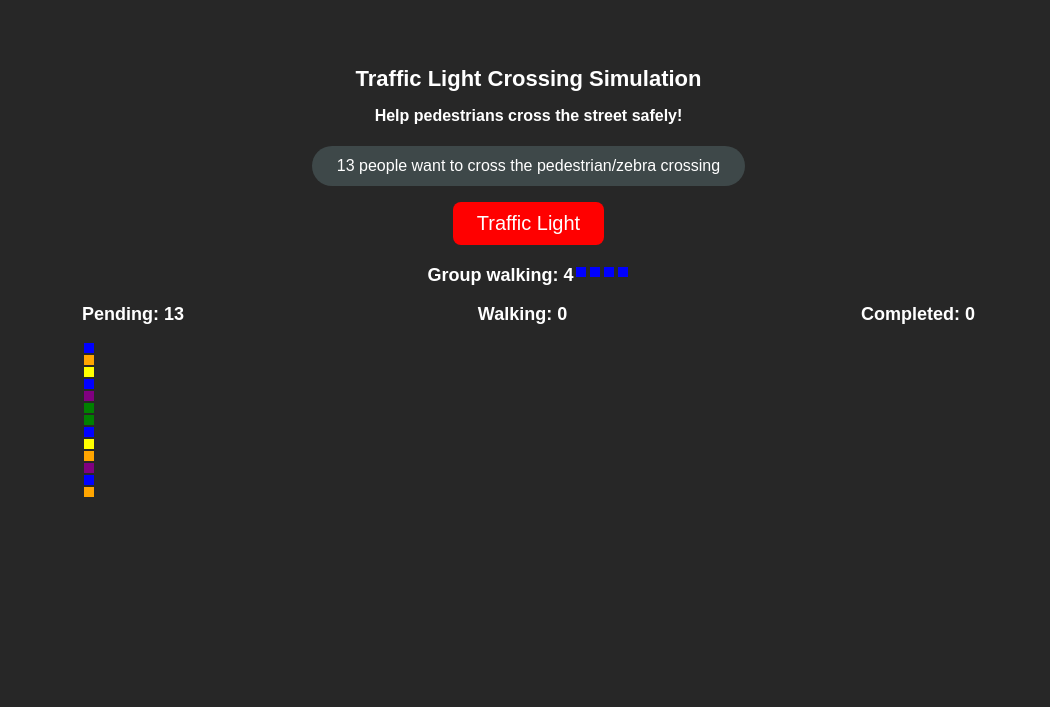
React component called TrafficLightSimulation: It simulates a pedestrian crossing at a traffic light.
The code provides an interactive simulation of a traffic light pedestrian crossing using React.
The component initializes with a random number of people waiting to cross (peopleToWalk) and a random number of people allowed to cross in each group (groupWalking).
When the traffic light is clicked, it turns green, and pedestrians start crossing in groups according to the groupWalking limit.
The component visually represents pending pedestrians, walking pedestrians, and completed crossings. When all pedestrians have crossed, a “Play Again” button appears to refresh the page and start the simulation again./
The useMemo hook ensures that the initial values for peopleToWalk and groupWalking remain constant throughout the component’s lifecycle.
The useState hook manages the state of the crossing simulation.
App.jsx with graphics
App.jsx
import { useState, useMemo } from "react";

function getRandomInt(min, max) {
  return Math.floor(Math.random() * (max - min + 1)) + min;
}

function getRandomColor() {
  const colors =
        ["red", "blue", "green", "yellow", "purple", "orange"];
  return colors[getRandomInt(0, colors.length - 1)];
}

function refreshPage() {
  window.location.reload(false);
}

export default function TrafficLightSimulation() {

  // total people to walk, to cross  the traffic lights
  const initPeopleToWalk =
        useMemo(() => getRandomInt(10, 20), []);
        // Initialize peopleToWalk with a
        //random value that remains constant
  const peopleToWalk =
        useMemo(() => initPeopleToWalk, []);
        // peopleToWalk does not change along all the execution

  // people will cross by gropus, the value is random each time
  // each time traffic ights are green the group
  // will cross one by one to complete the lights cycle
  const initGroupWalking = getRandomInt(2, 6);

  const [crossing, setCrossing] = useState({
    pending: peopleToWalk,
    walking: 0,
    completed: 0,
    groupWalking: initGroupWalking,
    light: false,
  });

  function handleTrafficLightClick() {
    setCrossing((prevState) => ({
      ...prevState,
      light: true,
    }));

    let walked = 0;
    let maxToWalk = 0;
    const walkingInterval = setInterval(() => {
      const { pending, groupWalking } = crossing;
      if (groupWalking >= pending) maxToWalk = pending;
      else maxToWalk = groupWalking;

      if (walked < maxToWalk) {
        setCrossing((prevState) => ({
          ...prevState,
          walking: prevState.walking + 1,
          pending: prevState.pending - 1,
        }));
        walked++;
      } else {
        clearInterval(walkingInterval);
        setCrossing((prevState) => ({
          ...prevState,
          completed: prevState.completed + walked,
          walking: 0,
          light: false,
          groupWalking: initGroupWalking,
        }));
      }
    }, 1000);
  }

  const { pending, walking, completed, groupWalking, light } = crossing;

  return (
    <>
      <div style={{ textAlign: "center" }}>
        <h1>Traffic Light Crossing Simulation</h1>
        <h4>Help pedestrians cross the street safely!</h4>{" "}
        <div className="chip">
         {peopleToWalk} people want to cross the pedestrian/zebra crossing
         </div><p></p>
        {completed === peopleToWalk ? (
          <button
            onClick={refreshPage}
            style={{
              backgroundColor: "black",
              padding: "10px 24px",
              borderRadius: "8px",
              border: "none",
              color: "white",
              fontSize: "20px",
              marginBottom: "20px",
            }}
          >
            Play Again (refresh page)
          </button>
        ) : (
          <>
            <button
              onClick={handleTrafficLightClick}
              style={{
                backgroundColor: light ? "green" : "red",
                padding: "10px 24px",
                borderRadius: "8px",
                border: "none",
                color: "white",
                fontSize: "20px",
                marginBottom: "20px",
              }}
            >
              Traffic Light
            </button>

            <div
              style={{
                display: "flex",
                flexDirection: "row",
                justifyContent: "center",
              }}
            >
              <h3>Group walking: {groupWalking} </h3>
              {Array.from({ length: groupWalking }).map((_, index) => (
                <div
                  key={index}
                  style={{
                    backgroundColor: "blue",
                    width: "10px",
                    height: "10px",
                    margin: "2px",
                  }}
                />
              ))}
            </div>
          </>
        )}
        <div style={{ display: "flex", justifyContent: "space-between" }}>
          <div>
            <h3>Pending: {pending}</h3>
            {Array.from({ length: pending }).map((_, index) => (
              <div
                key={index}
                style={{
                  backgroundColor: getRandomColor(),
                  width: "10px",
                  height: "10px",
                  margin: "2px",
                }}
              />
            ))}
          </div>
          <div>
            <h3>Walking: {walking}</h3>
            {Array.from({ length: walking }).map((_, index) => (
              <div
                key={index}
                style={{
                  backgroundColor: "blue",
                  width: "10px",
                  height: "10px",
                  margin: "2px",
                }}
              />
            ))}
          </div>
          <div>
            <h3>Completed: {completed}</h3>
            {Array.from({ length: completed }).map((_, index) => (
              <div
                key={index}
                style={{
                  backgroundColor: "green",
                  width: "10px",
                  height: "10px",
                  margin: "2px",
                }}
              />
            ))}
          </div>
        </div>
      </div>
    </>
  );
}
Consolidation and merge: literal object

literal objectThe operation of consolidating multiple state variables into a single object using the useState hook and the spread operator can be referred to as state consolidation or state merging.
Here’s a breakdown:
- State Consolidation: This term emphasizes the process of bringing together multiple individual state variables into a single, cohesive object. It highlights the idea of simplifying state management by grouping related pieces of state.
- State Merging: This term underscores the use of the spread operator (…) to merge the previous state with the updated state when setting the state. It emphasizes the technique used to update multiple properties of the state object simultaneously.
code: setInterval
The handleTrafficLightClick function sets up an interval using setInterval, which repeatedly executes a specified function (() => { ... }) with a fixed time delay between each execution.
In this case, the function inside setInterval acts as a loop with a delay.

setInterval acts as a loop with a delayHere’s how it works:
When
handleTrafficLightClickis called, it sets thelightproperty of thecrossingstate totrueusingsetCrossing.It then initializes variables
walkedandmaxToWalkto keep track of the number of pedestrians walking and the maximum number of pedestrians allowed to walk, respectively.Inside the interval function, it calculates
maxToWalkbased on the number of pending pedestrians and the maximum number of pedestrians allowed to walk simultaneously (groupWalking).If the number of
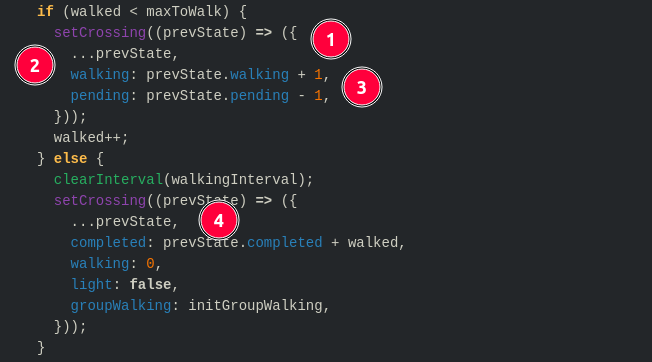
walkedpedestrians is less thanmaxToWalk, it increments thewalkingproperty by 1 and decrements thependingproperty by 1 in the state usingsetCrossing. It then increments thewalkedcounter.If the maximum number of pedestrians have walked (
walked >= maxToWalk), it clears the interval usingclearInterval(walkingInterval)to stop the loop. It then updates the state with the number of completed pedestrians (completed), resets thewalkingcounter to 0, sets thelightproperty back tofalse, and resets thegroupWalkingproperty to its initial value usingsetCrossing.The interval function repeats this process every 1000 milliseconds (1 second) until it is stopped by calling
clearInterval.
This loop effectively controls the flow of pedestrians crossing the street, incrementally allowing them to walk within the specified time intervals until the maximum number of pedestrians have crossed, at which point it resets the state and ends the loop.
code: prevState
prevState is used as an argument in the functional update form of the setCrossing function, which is part of React’s useState hook.
This functional form allows you to access the previous state of the component’s state variable (in this case,
crossing) and perform updates based on that previous state.
App.jsx with graphics
App.jsx
// functions ...

export default function TrafficLightSimulation() {

// code ...

  const [crossing, setCrossing] = useState({
    pending: peopleToWalk,
    walking: 0,
    completed: 0,
    groupWalking: initGroupWalking,
    light: false,
  });

  function handleTrafficLightClick() {
    setCrossing((prevState) => ({
      ...prevState,
      light: true,
    }));

    let walked = 0;
    let maxToWalk = 0;
    const walkingInterval = setInterval(() => {
      const { pending, groupWalking } = crossing;
      if (groupWalking >= pending) maxToWalk = pending;
      else maxToWalk = groupWalking;

      if (walked < maxToWalk) {
        setCrossing((prevState) => ({
          ...prevState,
          walking: prevState.walking + 1,
          pending: prevState.pending - 1,
        }));
        walked++;
      } else {
        clearInterval(walkingInterval);
        setCrossing((prevState) => ({
          ...prevState,
          completed: prevState.completed + walked,
          walking: 0,
          light: false,
          groupWalking: initGroupWalking,
        }));
      }
    }, 1000);
  }

  return (
    <>
    </>
  );
}
prevState to access updated state- When updating the state using
setCrossing, the code utilizes the functional form(prevState) => { ... }.- This function receives the previous state (
prevState) as an argument and returns the new state based on that previous state.
- This function receives the previous state (
- Inside the function, the spread operator (
...prevState) is used to create a shallow copy of the previous state object.- This ensures that you are not mutating the original state directly, which is important for maintaining the immutability of React state.
- The properties of the state object are then modified according to the logic defined in the function.
- In the first part of the code block,
walkingis incremented by 1 andpendingis decremented by 1. - In the second part of the code block (the
elseblock), various properties of the state object are updated based on some condition.
- In the first part of the code block,
prevStateis not a reserved word in React; rather, it’s a variable name used conventionally to refer to the previous state in functional updates when using theuseStatehook.- It’s a common practice in React to use
prevStateas the parameter name in functional updates, but it’s not enforced by React itself. - You could technically use any valid variable name in its place, but using
prevStatemakes the code more readable and understandable for other developers who are familiar with React conventions.
- It’s a common practice in React to use
By using prevState in this manner, the code ensures that the state updates are based on the previous state, rather than relying on the current state directly. This is important because React’s state updates may be asynchronous, and accessing the previous state via the functional form ensures that the updates are based on the most recent state at the time the update is applied.
4.4 Adding domains: react-router-dom
Remember to install the dependency:
App.jsx with Routes
App.jsx
import { BrowserRouter, Routes, Route } from "react-router-dom";
import Layout from "./layout/Layout";
import MySimulations from "./mysimulatons/MySimulations";
import Simulation from "./simulation/Simulation";

export default function App() {
  return (
    <BrowserRouter>
      <Routes>
        <Route path="/" element={<Layout />}>
          <Route index element={<Simulation />} />
          <Route path="simulation" element={<Simulation />} />
          <Route path="mysimulations" element={<MySimulations />} />
          <Route path="*" element={<Simulation />} />
        </Route>
      </Routes>
    </BrowserRouter>
  );
}Layout.jsx with Layout
/layout/Layout.jsx
import Footer from './Footer.jsx'
import Header from "./Header.jsx";
import { Outlet, Link } from "react-router-dom";

export default function Layout () {

  return (
    <>
      <nav>
        <div>
          <Header />
        </div>
        <div >
          <Link to="/simulation">Simulation</Link>
          <br/>
          <Link to="/mysimulations">MySimulations</Link>
          <br />
          <br />
        </div>
      </nav>

      <div style={{ width: "80%" }}>
        <Outlet />
      </div>

      <div>
        <Footer />
      </div>
    </>
  );
}
4.5 Data: simulation
In React.js, unlike in Java or Spring Boot, there isn’t a built-in model framework.
However, for our purposes, we can define our model using a literal object in JavaScript. Here’s an example of how we can define a model in React.js:
MyApp.jsx
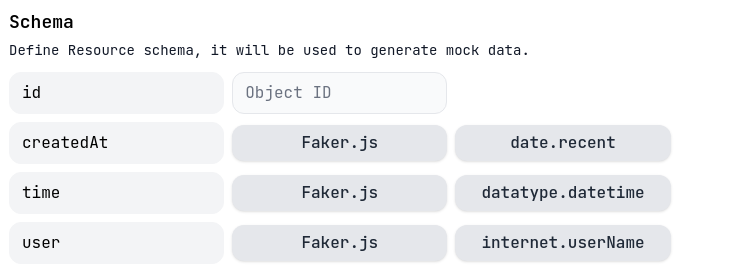
In this code snippet, we’ve created a simulation object which represents our model.
It has properties such as id, user, createdAt, and time. This object can serve as a model for organizing and manipulating data within our React.js application.
simulation object4.6 Fetching data: fake server
References:
mockapi
There’s a vast array of free web services available that offer APIs for developers to use in their projects.
These services, like mockapi.io or jsonplaceholder.typicode.com, provide developers with simulated data or temporary endpoints to test their applications without the need to set up their own backend servers or databases.
For instance, in our lab, you’re using mockapi.io with a real endpoint to test our applicationrk
This allows to mimic real-world scenarios and interactions without having to invest in creating a backend infrastructure from scratch.
However, it’s important to note that these services typically offer temporary solutions for testing purposes. Once our testing phase is complete and our application is ready for production, relying on such external services might not be feasible or reliable in the long term.
For instance, in our lab, we’re using mockapi.io with a real endpoint to test our application.
MockAPI.iois a web service that allows developers to create and simulate RESTful APIs for testing and development purposes.

With MockAPI.io, developers can easily generate custom API endpoints and define the responses they want to receive when those endpoints are called. It provides a user-friendly interface to create, manage, and configure mock APIs, making it simple to simulate different scenarios and test how an application interacts with an API.
MockAPI.io supports various HTTP methods, request headers, query parameters, and response types, allowing developers to mimic real API behavior. It’s a valuable tool for rapid prototyping, integration testing, and mocking data during development.
Axios
Axiosis a JavaScript library used for making HTTP requests in React applications.
It provides an easy-to-use and consistent API for performing asynchronous operations, such as fetching data from an API.
Axios supports features like interceptors, automatic request/response transformation, and error handling. It works both in the browser and Node.js environments and offers support for various request methods (GET, POST, PUT, DELETE, etc.).
Axios simplifies the process of making HTTP requests by providing a higher-level abstraction and allowing developers to handle responses and errors more efficiently
useEffect
In React, the useEffect hook is used to perform side effects in function components.
This includes data fetching, subscriptions, or manually changing the DOM. When dealing with API calls using Axios, it’s essential to handle cleanup to prevent memory leaks and unexpected behavior. Below is a clear function demonstrating how to cancel an Axios API call using the useEffect hook:
DataSimulation.jsx CRUD Axios
import React, { useState, useEffect } from 'react';
import axios from 'axios';

const DataSimulation = () => {
  const [data, setData] = useState(null);
  const [error, setError] = useState(null);

  useEffect(() => {
    const source = axios.CancelToken.source();

    const fetchData = async () => {
      try {
        const response = await axios.get('https://api.example.com/data', {
          cancelToken: source.token,
        });
        setData(response.data);
      } catch (error) {
        if (axios.isCancel(error)) {
          console.log('Request canceled:', error.message);
        } else {
          setError(error);
        }
      }
    };

    fetchData();

    return () => {
      source.cancel('Component unmounted - Cancelling API request');
    };
  }, []); // Empty dependency array means this effect will only run once

  return (
    <div>
      {data && <p>Data: {data}</p>}
      {error && <p>Error: {error.message}</p>}
    </div>
  );
};

export default DataSimulation;
data component: axios & useContext
DataSimulation.jsx CRUD Axios
DataSimulation.js
import React, { useState, useEffect, createContext } from "react";
import axios from "axios";

const SimulationsContext = createContext();
const API_URL = "https://65e82ef64bb72f0a9c4e7caf.mockapi.io/v1/todo";

const DataSimulations = ({ children }) => {
  const [simulations, setSimulations] = useState([]);
  const [isLoading, setIsLoading] = useState(true);

  useEffect(() => {
    const fetchSimulations = async () => {
      try {
        const response = await axios.get(
          "https://65e82ef64bb72f0a9c4e7caf.mockapi.io/v1/todo"
        );
        setSimulations(response.data);
      } catch (error) {
        console.error("Error fetching data:", error);
      } finally {
        setIsLoading(false);
      }
    };
    fetchSimulations();
  }, []);

  const deleteSimulation = async (id) => {
    try {
      const response = await axios.delete(
        `https://65e82ef64bb72f0a9c4e7caf.mockapi.io/v1/todo/${id}`
      );
      setSimulations(simulations.filter((simulation) => simulation.id !== id));
    } catch (error) {
      console.error("Error deleting simulation:", error);
    }
  };

  const addSimulation = async (simulation) => {
    try {
      const response = await axios.post(
        "https://65e82ef64bb72f0a9c4e7caf.mockapi.io/v1/todo",
        simulation
      );
      setSimulations([...simulations, response.data]);
    } catch (error) {
      console.error("Error adding simulation:", error);
    }
  };

  const updateSimulation = async (simulation) => {
    try {
      const response = await axios.put(
        `https://65e82ef64bb72f0a9c4e7caf.mockapi.io/v1/todo/${simulation.id}`,
        simulation
      );
      setSimulations(
        simulations.map((s) => (s.id === simulation.id ? response.data : s))
      );
    } catch (error) {
      console.error("Error updating simulation:", error);
    }
  };

  return (
    <SimulationsContext.Provider
      value={{
        simulations,
        isLoading,
        deleteSimulation,
        addSimulation,
        updateSimulation,
      }}
    >
      {children}
    </SimulationsContext.Provider>
  );
};

export { DataSimulations, SimulationsContext };
This code sets up a context provider component for managing simulation data and provides functions for CRUD operations on that data. Other components in the React application can consume this context to access and manipulate simulation data.

The code DataSimulations manages simulation data.
It utilizes React hooks such as useState and useEffect for state management and side effects. Additionally, it creates a context named SimulationsContext to provide simulation data and related functions to its child components. Here’s a breakdown of what the code does:
- Import Statements:
- It imports necessary modules from React and Axios.
- Context Creation:
- It creates a context named
SimulationsContextusingcreateContext()from React.
- It creates a context named
- DataSimulations Component:
- This is the main component that handles simulation data.
- It initializes state variables using the
useStatehook:simulationsto hold simulation data andisLoadingto track whether data is loading. - It uses the
useEffecthook to fetch simulation data from a mock API endpoint when the component mounts. - Inside
useEffect, it defines an asynchronous functionfetchSimulations()to make a GET request to the API endpoint and update the state accordingly. - It defines functions to perform CRUD operations on simulation data:
deleteSimulation: Deletes a simulation by its ID.addSimulation: Adds a new simulation.updateSimulation: Updates an existing simulation.
- It returns a JSX element wrapping its children with
SimulationsContext.Provider, providing simulation data and related functions as context values.
- Export:
- It exports
DataSimulationscomponent andSimulationsContextcontext. - Be careful: do not use
default. A file can only have one default export, but it can have numerous named exports!
- It exports
Exporting and importing multiple components from the same file
- Exporting and importing a component.
To reduce the potential confusion between default and named exports, some teams choose to only stick to one style (default or named), or avoid mixing them in a single file. Do what works best for you!
4.7 Rendering data: MySimulations
totally coupled MySimulations.jsx
We should create a draft version to test the imported data from mockapi fake server by API Rest axios.
This draft will place all CRUD operations in just one component, business logic and render:
- importing Axios functions via
useContextfromDataSimulation - importing data:
simulationsviauseContext - creating the handlers for the CRUD operations.
- creating the hoooks we wil need to manage state.
- creating the JSX code to render the html elements
Then, we will decouple it into several components with a better organized structure.
MySimulations.jsx just one component to render simulations
MySimulations.jsx
import React, { useContext, useState } from "react";
import { SimulationsContext } from "../middleware/DataSimulations";

const MySimulations = () => {
  const {
    simulations,
    isLoading,
    deleteSimulation,
    addSimulation,
    updateSimulation,
  } = useContext(SimulationsContext);

  const [newSimulationData, setNewSimulationData] = useState({
    user: "",
    createdAt: new Date().toString(),
    time: "",
  });
  const [editingSimulationId, setEditingSimulationId] = useState(null);
  const [editingSimulationData, setEditingSimulationData] = useState({
    user: "",
    createdAt: new Date().toString(),
    time: 0,
  });

  // ...
  // Create simulation
  // ...

  // Add new simulation onClick with newSimulationData state
  // using addSimulation function with axios request
  // and reset input fields after creating the simulation
  const handleCreate = () => {
    // Assuming newSimulationData contains the data for the new simulation
    addSimulation(newSimulationData);
    // Reset input fields after creating the simulation
    setNewSimulationData({
      user: "",
      createdAt: new Date().toString(),
      time: "",
    });
  };

  // Handle changes in input fields for adding new simulation
  // using setNewSimulationData state
  const handleAddChange = (e) => {
    // Get the name and value of the input field
    const { name, value } = e.target;
    // Update the newSimulationData state
    setNewSimulationData((prevData) => ({
      // Spread the previous data
      ...prevData,
      // Set the value of the input field to the new value
      [name]: value,
    }));
  };

  // ...
  // Edit simulation
  // ...

  // Edit simulation onClick with editingSimulationId state
  // using updateSimulation function with axios request
  // and reset editing state after editing the simulation
  const handleUpdate = () => {
    // Update the simulation with the new data
    updateSimulation(editingSimulationData);
    // Reset editing state
    setEditingSimulationId(null);
    // Reset editing data
    setEditingSimulationData({
      user: "",
      createdAt: new Date().toString(),
      time: "",
    });
  };

  // Handle starting edit of a simulation onClick edit button
  // with editingSimulationId state equal to the id of the simulation
  // being edited and setEditingSimulationData state
  // with the current data of the simulation being edited
  const handleEditSelectId = (id) => {
    // Find the simulation being edited
    const simulationToEdit = simulations.find(
      (simulation) => simulation.id === id
    );
    // Set the ID of the simulation being edited
    setEditingSimulationId(id);
    // Populate the editing data with the current data of the simulation
    setEditingSimulationData(simulationToEdit);
  };

  // Handle changes in input fields for editing simulation
  // using setEditingSimulationData state
  const handleEditChange = (e) => {
    const { name, value } = e.target;
    setEditingSimulationData((prevData) => ({
      ...prevData,
      [name]: value,
    }));
  };

  return (
    <>
      <br />
      <h1>Simulations</h1>
      <hr />
      <h2>Add Simulation</h2>
      <div>
        <label>User</label>
        <br />
        <input
          className="simulationInput"
          type="text"
          name="user"
          value={newSimulationData.user}
          onChange={handleAddChange}
        />
      </div>
      <div>
        <label>Time</label>
        <br />
        <input
          className="simulationInput"
          type="text"
          name="time"
          value={newSimulationData.time}
          onChange={handleAddChange}
        />
      </div>
      <button
        className="crudButton"
        style={{
          backgroundColor: "#ff5733",
        }}
        onClick={handleCreate}
      >
        Create
      </button>
      <br />
      <br />
      <hr />
      <h2>Simulations list</h2>
      {isLoading ? (
        <p>Loading...</p>
      ) : (
        <>
          <ul style={{ listStyleType: "none" }}>
            {simulations.map((simulation) => (
              <li key={simulation.key}>
                <strong>User:</strong> {simulation.user} <br />
                id: {simulation.id} <br />
                Created: {simulation.createdAt} <br />
                Time: {simulation.time} <br />
                <br />
                {editingSimulationId === simulation.id ? (
                  <>
                    <div>
                      <label>User</label>
                      <br />
                      <input
                        className="simulationInput"
                        type="text"
                        name="user"
                        value={editingSimulationData.user}
                        onChange={handleEditChange}
                      />
                    </div>

                    <div>
                      <label>Time</label>
                      <br />
                      <input
                        className="simulationInput"
                        type="text"
                        name="time"
                        value={editingSimulationData.time}
                        onChange={handleEditChange}
                      />
                    </div>
                    <button
                      style={{
                        backgroundColor: "#ff5733",
                      }}
                      className="crudButton"
                      onClick={handleUpdate}
                    >
                      Save
                    </button>
                    <button
                      style={{
                        backgroundColor: "black",
                      }}
                      className="crudButton"
                      onClick={() => setEditingSimulationId(null)}
                    >
                      Close
                    </button>
                  </>
                ) : (
                  <>
                    <button
                      className="crudButton"
                      style={{
                        backgroundColor: "black",
                      }}
                      onClick={() => deleteSimulation(simulation.id)}
                    >
                      Delete
                    </button>
                    <button
                      className="crudButton"
                      style={{
                        backgroundColor: "#8A9A5B",
                      }}
                      onClick={() => handleEditSelectId(simulation.id)}
                    >
                      Edit
                    </button>
                  </>
                )}
                <br /> <br /> <br /> <br />
              </li>
            ))}
          </ul>
        </>
      )}
    </>
  );
};

export default MySimulations;
semi-coupled MySimulations.jsx CRUD
Breaking down the React component into smaller, focused components enhances code readability and maintainability.
Decoupling the code into smaller React components represents a halfway point in separating concerns, laying a foundation for a cleaner and more manageable codebase. This approach not only improves developer productivity but also enhances the overall quality and stability of the application.
By creating separate components for tasks like simulation creation and listing, the code becomes more modular and easier to understand. This modular approach allows for better organization and reuse of code, promoting scalability and reducing duplication.
Moreover, decoupling rendering from business logic aligns with best practices, improving code maintainability over time.
Each component can focus on a specific aspect of functionality, making it easier to debug and update. Additionally, smaller components are more flexible and adaptable, enabling easier integration of new features or modifications.
MySimulations.jsx rendering data. It is just the render decoupled, not the business logic
MySimulations.jsx
import { useContext, useState } from "react";
import { SimulationsContext } from "../middleware/DataSimulations";
import ListSimulations from "./ListSimulation"
import CreateSimulation from "./CreateSimulation"


const MySimulations = () => {
  const {
    simulations,
    isLoading,
    deleteSimulation,
    addSimulation,
    updateSimulation,
  } = useContext(SimulationsContext);

  const [newSimulationData, setNewSimulationData] = useState({
    user: "",
    createdAt: new Date().toString(),
    time: "",
  });
  const [editingSimulationId, setEditingSimulationId] = useState(null);
  const [editingSimulationData, setEditingSimulationData] = useState({
    user: "",
    createdAt: new Date().toString(),
    time: 0,
  });

  const handleCreate = () => {
    addSimulation(newSimulationData);
    setNewSimulationData({
      user: "",
      createdAt: new Date().toString(),
      time: "",
    });
  };

  const handleAddChange = (e) => {
    const { name, value } = e.target;
    setNewSimulationData((prevData) => ({
      ...prevData,
      [name]: value,
    }));
  };

  const handleUpdate = () => {
    updateSimulation(editingSimulationData);
    setEditingSimulationId(null);
    setEditingSimulationData({
      user: "",
      createdAt: new Date().toString(),
      time: "",
    });
  };

  const handleEditSelectId = (id) => {
    const simulationToEdit = simulations.find(
      (simulation) => simulation.id === id
    );
    setEditingSimulationId(id);
    setEditingSimulationData(simulationToEdit);
  };

  const handleEditChange = (e) => {
    const { name, value } = e.target;
    setEditingSimulationData((prevData) => ({
      ...prevData,
      [name]: value,
    }));
  };

  return (
    <>
      <br />
      <h1 style={{ textAlign: "center" }}>Simulations</h1>
      <hr />
      <CreateSimulation
        newSimulationData={newSimulationData}
        handleAddChange={handleAddChange}
        handleCreate={handleCreate}
      />
      <br />
      <hr />
      <ListSimulations
        simulations={simulations}
        isLoading={isLoading}
        handleEditSelectId={handleEditSelectId}
        deleteSimulation={deleteSimulation}
        handleEditChange={handleEditChange}
        handleUpdate={handleUpdate}
        setEditingSimulationId={setEditingSimulationId}
        editingSimulationId={editingSimulationId}
        editingSimulationData={editingSimulationData}
      />
    </>
  );
};

export default MySimulations;
totaly decoupled MySimulations.jsx CRUD
Decoupled components CRUD in React promotes modularity, reusability, maintainability, and scalability, making it a preferred choice for building robust and adaptable applications.
Decoupled components CRUD in React offers significant advantages over tightly coupled implementations.
By breaking down functionality into modular components, developers can achieve: greater reusability, scalability, better maintenance and flexibility.
Each component focuses on a specific task, promoting separation of concerns and simplifying maintenance. With decoupled components, testing becomes more straightforward as each unit can be isolated and tested independently.
Additionally, performance optimizations can be applied at the component level, leading to better overall application performance. This approach fosters cleaner codebases and facilitates collaboration among team members.
4.8 Backend: Spring Boot

4.9 Adding user: login & fake-token
to-do
5 Code
| Code Version | Commit | Folder-Tree | Output |
|---|---|---|---|
| GitHub code v0.0 | create project (React Vite) and core business logic | Basic Structure | render v0.0 render(1), render v0.0 render(2), render v0.0 render(3) |
| GitHub code v0.1 | adding graphics, simulation ending, refresh button, groups crossing and random values |
render v0.1 render(1), render v0.1 render(2), render v0.1 render(3), render v0.1 render(4) | |
GitHub code v0.3 integrationcruddata |
integration: adding react-router-dom, two routes: simulation and mySimulations and data: axios, DataSimulation & useContext |
branch mySimulations, project structure |
render v0.3 render(1), render v0.3 render(2), render v0.3 render(3), |
GitHub code v0.4 integrationcruddata |
decoupling mySimulations |
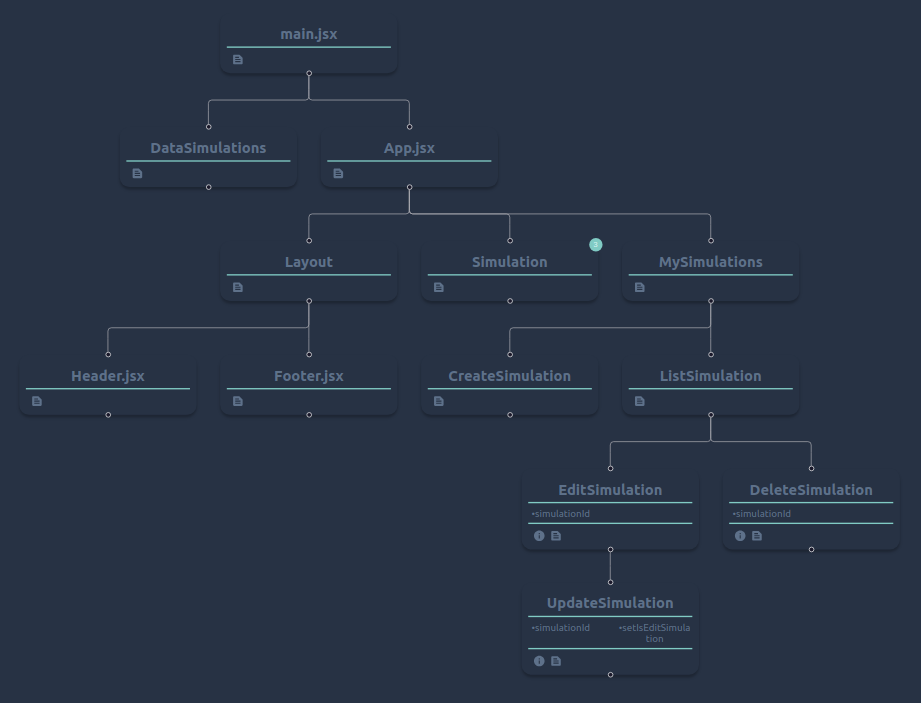
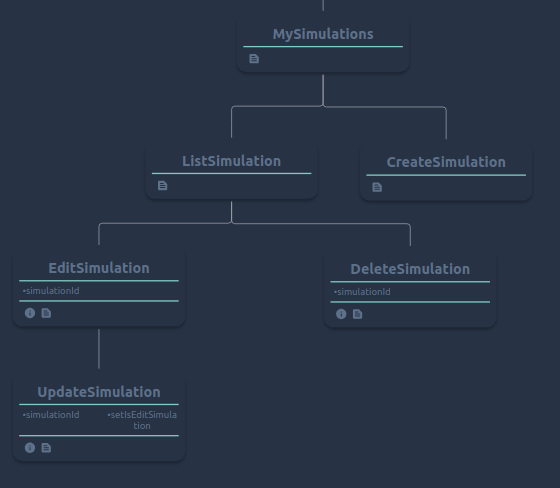
components tree | |
| GitHub code v0.5 | server: spring boot for mockapi |