Lab#MD01-1: Create and publish by Quarto
Lab
1 Overview
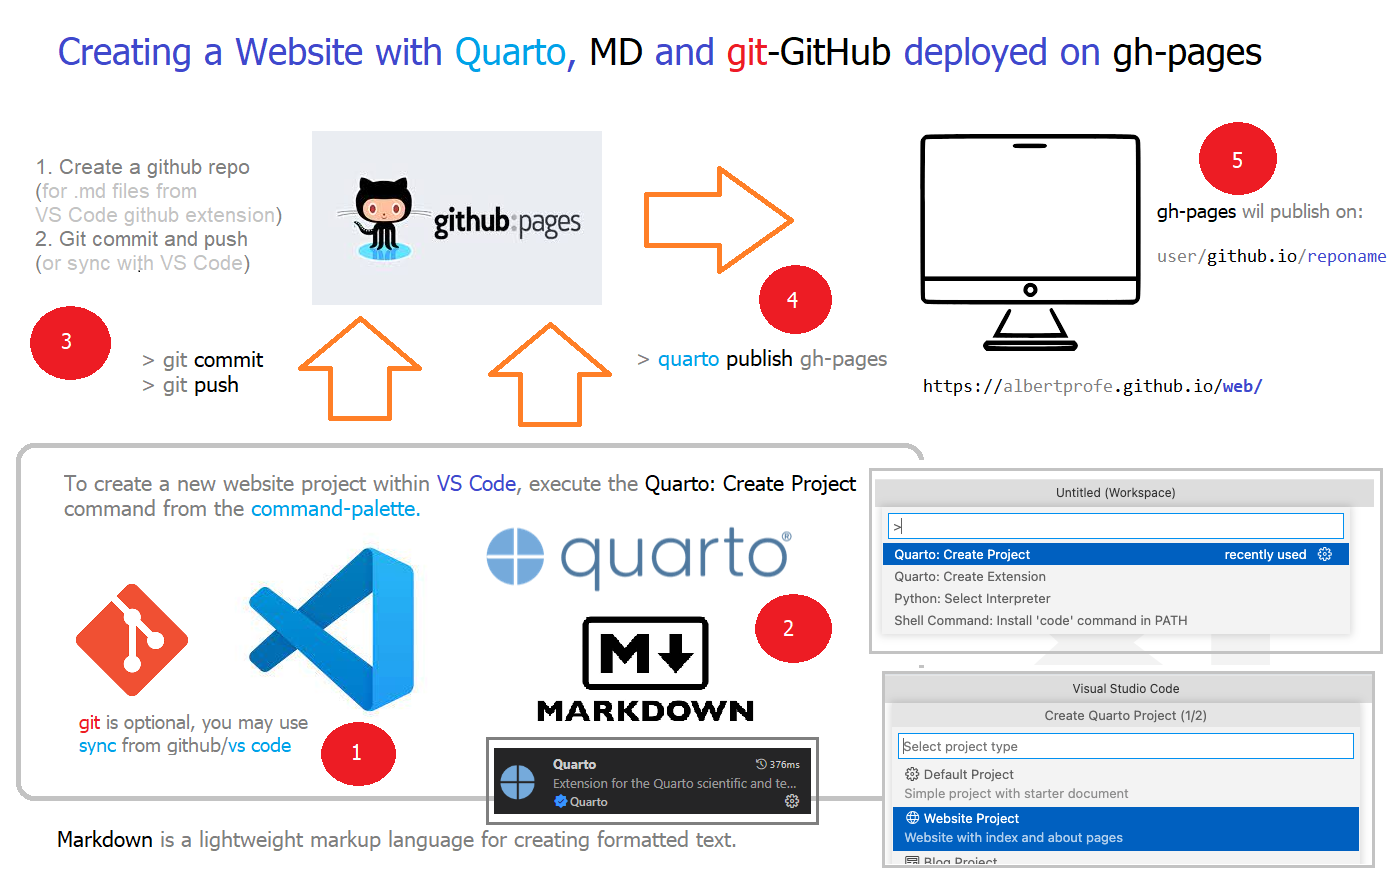
Create and publish a website on GitHub pages (Git on cloud and deploy pipeline) with Visual (IDE) Code and Quarto (publishing system/engine)
💻 Lab#MD01-1: Publishing website by Quarto engine
Students will need to have a basic understanding of web development, including HTML, CSS, and JavaScript.
In this project, students will be required to create a web application using basically Markdown, flavour Quarto, and when it is necessary HTML, JS and CSS.
Additionally, they will need to use GitHub and Visual Code** to manage their project’s code and collaborate with their peers.
The tasks involved in this project include:
- In the first part of the project, students will create a basic web page using markdown and publish it on Github repository using Visual Code. This will involve creating a new repository on Github and learning how to use markdown to format text and create links.
- In the second part of the project, students will learn how to publish their website on gh-pages, a service provided by Github for hosting static websites. This will involve learning how to use the gh-pages service and how to deploy their website to the internet.
You should check your website on user/github.io/repo.
As an optional study, students may also want to learn about using callouts in their markdown documentation. The following links provide useful information on the topic:
- markdown-callouts
- Callout Blocks Quarto
- Getting Started with RDMD
- Divs and spans
- codepen.io HTML+CSS
- How TO - Tabs W3.CSS HTML+CSS+JS
Using callouts, links, tabs and CSS can help to improve the readability and organization of a markdown document, making it easier for readers to understand and navigate the content.
To take their project to the next level, students may also choose to connect to an API (Application Programming Interface) to retrieve data and render charts using JavaScript. This will require an understanding of how to make HTTP requests and how to manipulate data in JavaScript.
The Quarto website project is a great opportunity for students to develop their skills in web development, markdown, and version control using GitHub and Visual Code.
2 Step-by-step
- Install some software and Sign in:
- Install Visual Code
- Install GitHub Extension and Source Control if they don’t come with new installation
- Install Quarto Extension in Visual Code
- Sign in GitHub from Visual Code (wizard)
- Install Quarto in your OS (download from Quarto site - Get started)
- Install Visual Code
- Create Quarto Project
- GitHub tasks:
- Create repository, commit and push files to repository with Sync tool. To write our repository you need to:
Create Token on GitHub.com: Creating a personal access token
Use this token on your Visual Code - Git, link:
- Activate gh-pages service
- Create repository, commit and push files to repository with Sync tool. To write our repository you need to:
quarto renderandquarto publish gh-pages/quarto publishon Visual Code’s terminal- Go to published web:
user/github.io/repo
3 Screen-shoots (2022-12-12): installing Quarto and cloning project from GitHub.com
Step-by-step Quarto Creation project (install Quarto) in Visual Code (and Quarto Extension) and publishing to gh-pages (log in to GitHub, Sync tool)
4 Screen-shoots (2022-12-08): pushing Quarto project to GitHub and publishing on gh-pages
.png)
.png)
.png)
.png)
.png)
.png)
.png)
.png)
.png)
.png)
.png)
.png)
.png)
.png)
.png)
.png)
.png)
.png)
.png)
.png)
.png)
.png)
.png)
.png)
.png)
.png)
.png)
.png)
.png)