Lab#RE03-1: to-do app
ReactJS labs
📘 React JS Lab#RE03-1: to-do app
In this lab, we will be using:
- the
react-router-dom, which is a package with bindings for using React Router in web applications. - We will use the Semantic React library to paint some
CSS. - We could use HighCharts to represent data.
- Hooks we are going to use:
- to create the basic app:
useReducer,useContext, - to persist the state values between renders:
useEffect,useRef. - to manage others states o variables:
useState.
- to create the basic app:
The lab will demonstrate how to use a react-router-dom with React to build a functional web application.
Reference:
1 user-story & mock-up
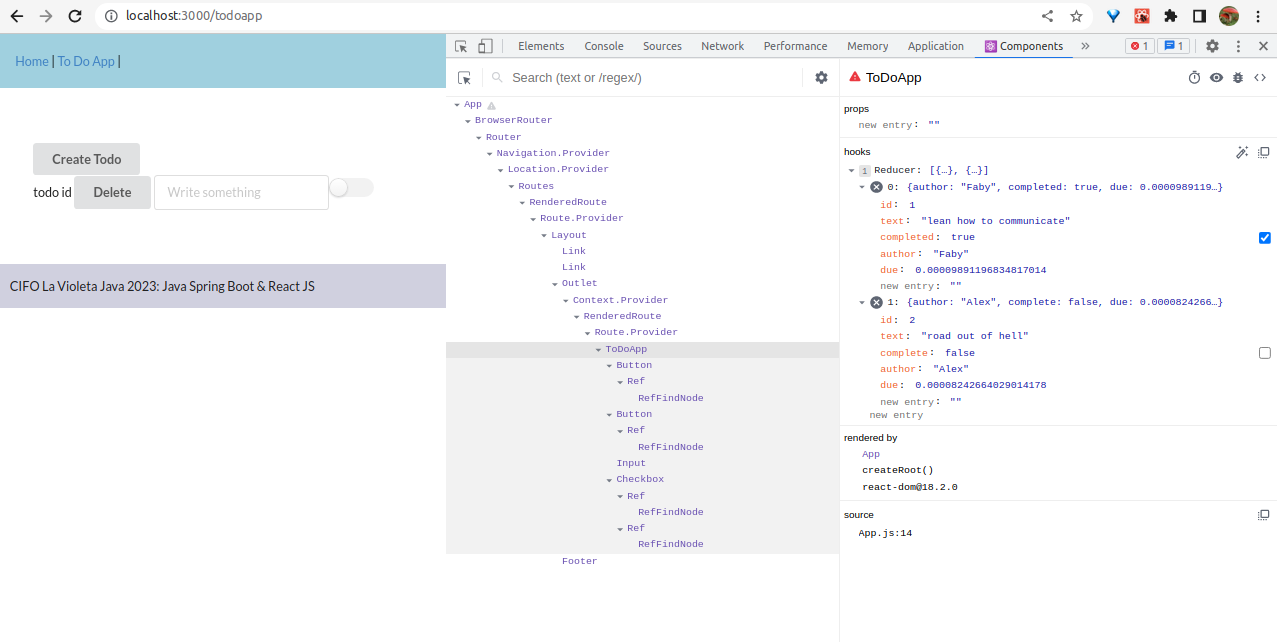
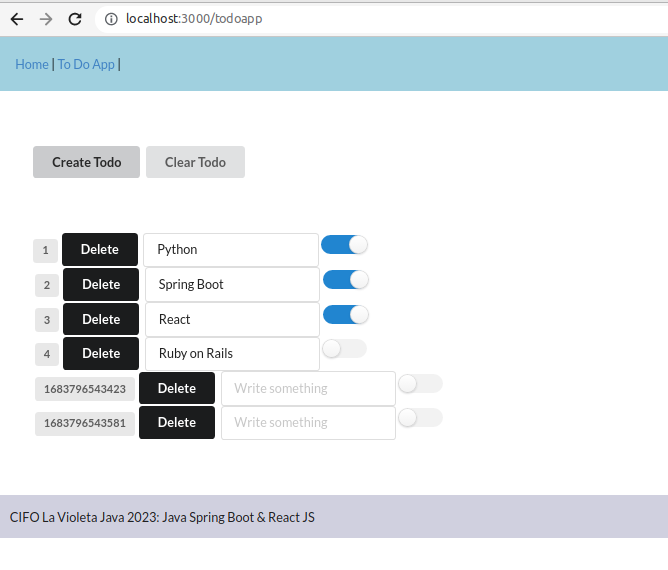
This lab is a basic implementation of a Todo List application using React. It utilizes React hooks such as useReducer and useContext for state management.
We will define an initial set of todos and a reducer function that handles various actions like adding a new todo, deleting a todo, marking a todo as completed, and resetting the list.
Actions definition:
addaction: Adds a new todo item to the list.deleteaction: Removes a todo item from the list.completedaction: Toggles the completed status of a todo item.resetaction: Resets the todo list to its initial state.
const initialTodos = [
  {
    id: 1,
    text: "lean how to comunicate",
    completed: true,
    author: "Faby",
    due: 1 / 5 / 2022
  },
  {
    id: 2,
    text: "road out of hell",
    complete: false,
    author: "Alex",
    due: 1 / 6 / 2022
  }
];
The Object type represents one of JavaScript’s data types. It is used to store various keyed collections and more complex entities. Objects can be created using the Object() constructor or the object initializer / literal syntax.
The TodoApp component uses the useReducer hook to manage the state of todos and dispatch actions based on user interactions. It renders a header, a button to create new todos, and a TodosList component that displays the list of todos.
2 step-by-step code
2.1 Project creation
First at all we create the React project with Route and Semantic css Library.
Then, the reducer component: <ToDoApp />.
It uses React’s useReducer hook to manage the state of the todo items. The initial todos are predefined, and the app supports actions like adding a new todo, deleting a todo, and marking a todo as completed. The state of the todos is stored in an array.
We crete a placeholder useReducer:
import { Button, Input, Checkbox } from "semantic-ui-react";
import { useReducer } from "react";
const initialTodos = [
{
id: 1,
text: "lean how to comunicate",
completed: true,
author: "Faby",
due: 1 / 5 / 2022
},
{
id: 2,
text: "road out of hell",
complete: false,
author: "Alex",
due: 1 / 6 / 2022
}
];
function reducer(state, action) {
switch (action.type) {
case "bla": {
return;
}
case "blabla": {
return;
}
default: {
return state;
}
}};
export default function ToDoApp(){
const [state, dispacher] = useReducer (reducer, initialTodos);
return (
<>
<br />
<span>ToDo</span>
<Button>Delete</Button>
<Input placeholder="Write something" />
<Checkbox toggle />
<br />
</>
);
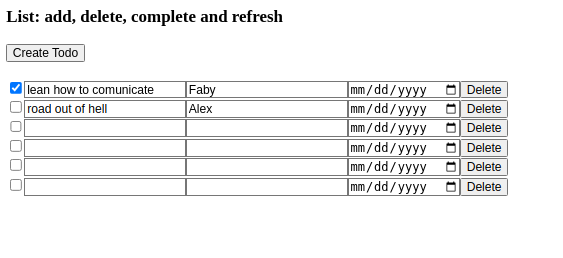
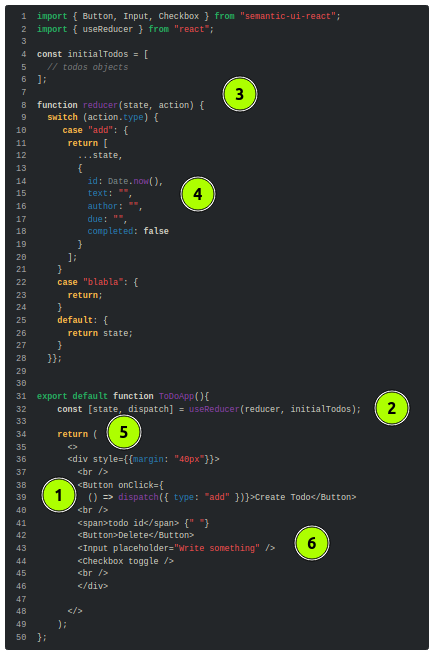
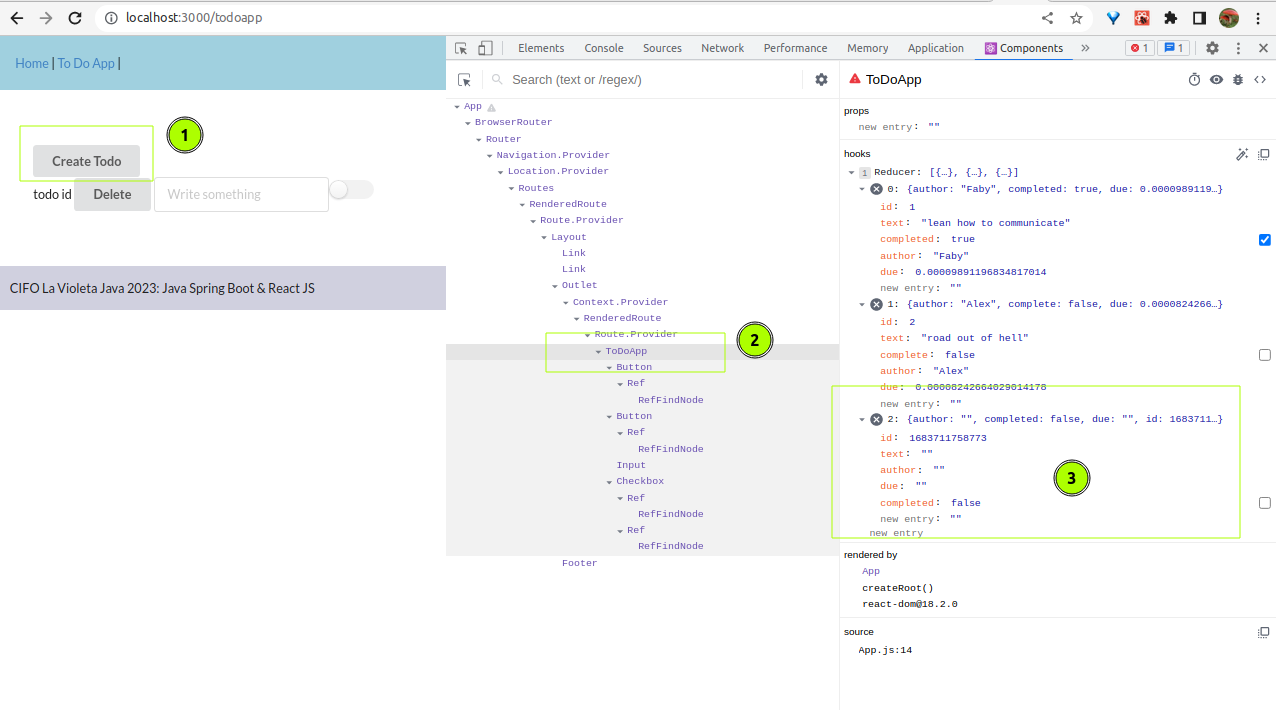
};2.2 create new todo
Step-by-step new todo creation:
- The
<Button>component is rendered with an onClick event handler, - when the button is clicked, it dispatches an action of type
"add"using thedispatchfunction - and calls the
reducer. - The
reducerexecutes a caseaddcreating a new state. - As a new state is created,
- a new render is painted.
import { Button, Input, Checkbox } from "semantic-ui-react";
import { useReducer } from "react";

const initialTodos = [
  // todos objects
];

function reducer(state, action) {
  switch (action.type) {
     case "add": {
      return [
        ...state,
        {
          id: Date.now(),
          text: "",
          author: "",
          due: "",
          completed: false
        }
      ];
    }
    case "blabla": {
      return;
    }
    default: {
      return state;
    }
  }};


export default function ToDoApp(){
    const [state, dispatch] = useReducer(reducer, initialTodos);

    return (
      <>
      <div style={{margin: "40px"}}>
        <br />
        <Button onClick={
          () => dispatch({ type: "add" })}>Create Todo</Button>
        <br />
        <span>todo id</span> {" "}
        <Button>Delete</Button>
        <Input placeholder="Write something" />
        <Checkbox toggle />
        <br />
        </div>

      </>
    );
};
The <Button> component is rendered with an onClick event handler. When the button is clicked, it dispatches an action of type "add" using the dispatch function and calls the reducer.
In the reducer, the spread operator (...state) is used to create a new array that includes all the existing elements without mutating the original state.
import { Button, Input, Checkbox } from "semantic-ui-react";
import { useReducer } from "react";

const initialTodos = [
  // todos objects
];

function reducer(state, action) {
  switch (action.type) {
     case "add": {
      return [
        ...state,
        {
          id: Date.now(),
          text: "",
          author: "",
          due: "",
          completed: false
        }
      ];
    }
    case "blabla": {
      return;
    }
    default: {
      return state;
    }
  }};


export default function ToDoApp(){
   // render
};
The spread operator (...state) is used to create a new array that includes all the elements from the existing state array. This is done to avoid mutating the original state.
A new object is created with the following properties:
id: A unique identifier generated usingDate.now(). This will ensure that each new item has a unique identifier.text: An empty string.author: An empty string.due: An empty string.completed: A boolean value set to false, indicating that the item is not completed.
The new object is then added to the end of the new array created at initial load using the spread operator (…state).
This ensures that the new item is appended to the existing items in the state array.
Finally, the updated array is returned from the reducer function, representing the new state with the newly added item.
2.3 read and render todo
import React, { useReducer } from "react";
const initialTodos = [
// todos initial
];
function appReducer(state, action) {
switch (action.type) {
// cases
}
export default function TodoApp() {
const [state, dispatch] = useReducer(appReducer, initialTodos);
return (
<>
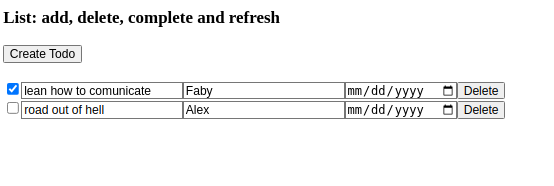
<h3>List: add, delete, complete and refresh</h3>
<button onClick={() => dispatch({ type: "add" })}>
Create Todo
</button>{" "}
<button>Clear Todo</button>
<br /> <br />
<div style={{ margin: "20px" }}>
{state.map((item) => (
<>
<input type="checkbox"/>
<input type="text" defaultValue={item.text} />{" "}
<input type="text" defaultValue={item.author} />{" "}
<input type="date" defaultValue={item.due} />{" "}
<button>
Delete
</button>
<br />
</>
))}
</div>
</>
);
}We are going to map over our state and generating a list of htmml elements based on its contents.
Within the mapping function, each item in the state array is rendered as a set of elements enclosed within an empty fragment (<>...</>).
(<>...</>): this is a common technique in React to group multiple elements without adding unnecessary wrapper elements to the DOM.
For each item in the state array, the code generates the following elements:
<input type="checkbox">:This is acheckboxinput element.- The checked attribute is bound to the item.completed property, which presumably determines whether the
checkboxshould be checked or not.
- The checked attribute is bound to the item.completed property, which presumably determines whether the
<input type="text">: Two text input elements are rendered, each with thedefaultValueattribute bound:- to
item.textand item.authorrespectively.- These inputs display the default values of the corresponding text and author properties of the
itemobject.
- to
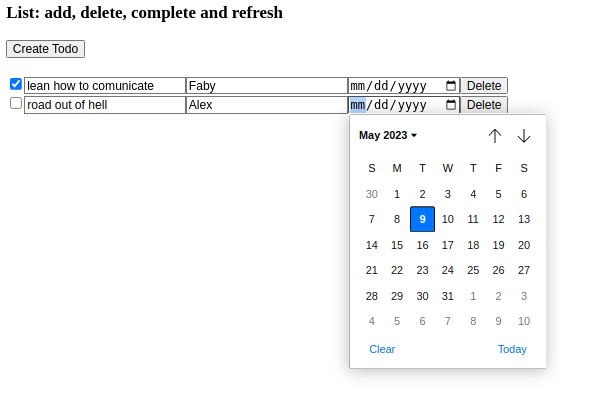
<input type="date">: This is a date input element with thedefaultValueattribute bound toitem.due.- It displays the default due date value of the item object.
<button>: A button element is rendered with the label “Delete”.
2.4 delete todo
We define the operation delete:
- event
onClickon button - case
deleteon reducer - reducer creates new state which triggers new render with new state
The button element, when clicked, triggers an action to delete an item. It uses an onClick event handler that dispatches a “delete” action with the item’s ID as the payload, allowing the application to handle the deletion logic based on the dispatched action.
The reducer case statement for handling the “delete” action filters the state array based on the item’s ID, removing the item with the matching ID from the state.
2.5 update chekbox todo
Keys tell React which array item each component corresponds to, so that it can match them up later. This becomes important if your array items can move (e.g. due to sorting), get inserted, or get deleted. A well-chosen key helps React infer what exactly has happened, and make the correct updates to the DOM tree.
For example, React.Fragment and a key for our list:
We could update the complete field by using a event onChange that dispatchs as a payload the item.id with the completed type:
 <input
    type="checkbox"
    checked={item.completed}
    onChange={
      () => dispatch({ type: "completed", payload: item.id })}
/>
And the reducer with the completed action:
2.6 update input todo
We could update the input common fields -text, author, due- by creating a handler function handleUpdate:
const handleUpdate = (id, field, value) => {
    dispatch({
      type: "update",
      payload: {
        id,
        field,
        value
      }
    });
};
The inputs onChange, now, will call the handleUpdate function with the field:
<input
  type="text"
  value={item.text}
  onChange={(e) => handleUpdate(item.id, "text", e.target.value)}
/>{" "}
<input
  type="text"
  value={item.author}
  onChange={(e) => handleUpdate(item.id, "author", e.target.value)}
/>{" "}
<input
  type="date"
  value={item.due}
  onChange={(e) => handleUpdate(item.id, "due", e.target.value)}
/>{" "}
And the reducer with the update action:
function appReducer(state, action) {
  switch (action.type) {
    // other cases
    case "update": {
      const { id, field, value } = action.payload;
      return state.map((item) => {
        if (item.id === id) {
          return {
            ...item,
            [field]: value
          };
        }
        return item;
      });
    }
    // default case
}
An object initializer is a comma-delimited list of zero or more pairs of property names and associated values of an object, enclosed in curly braces {}.
const { id, field, value } = action.payload;
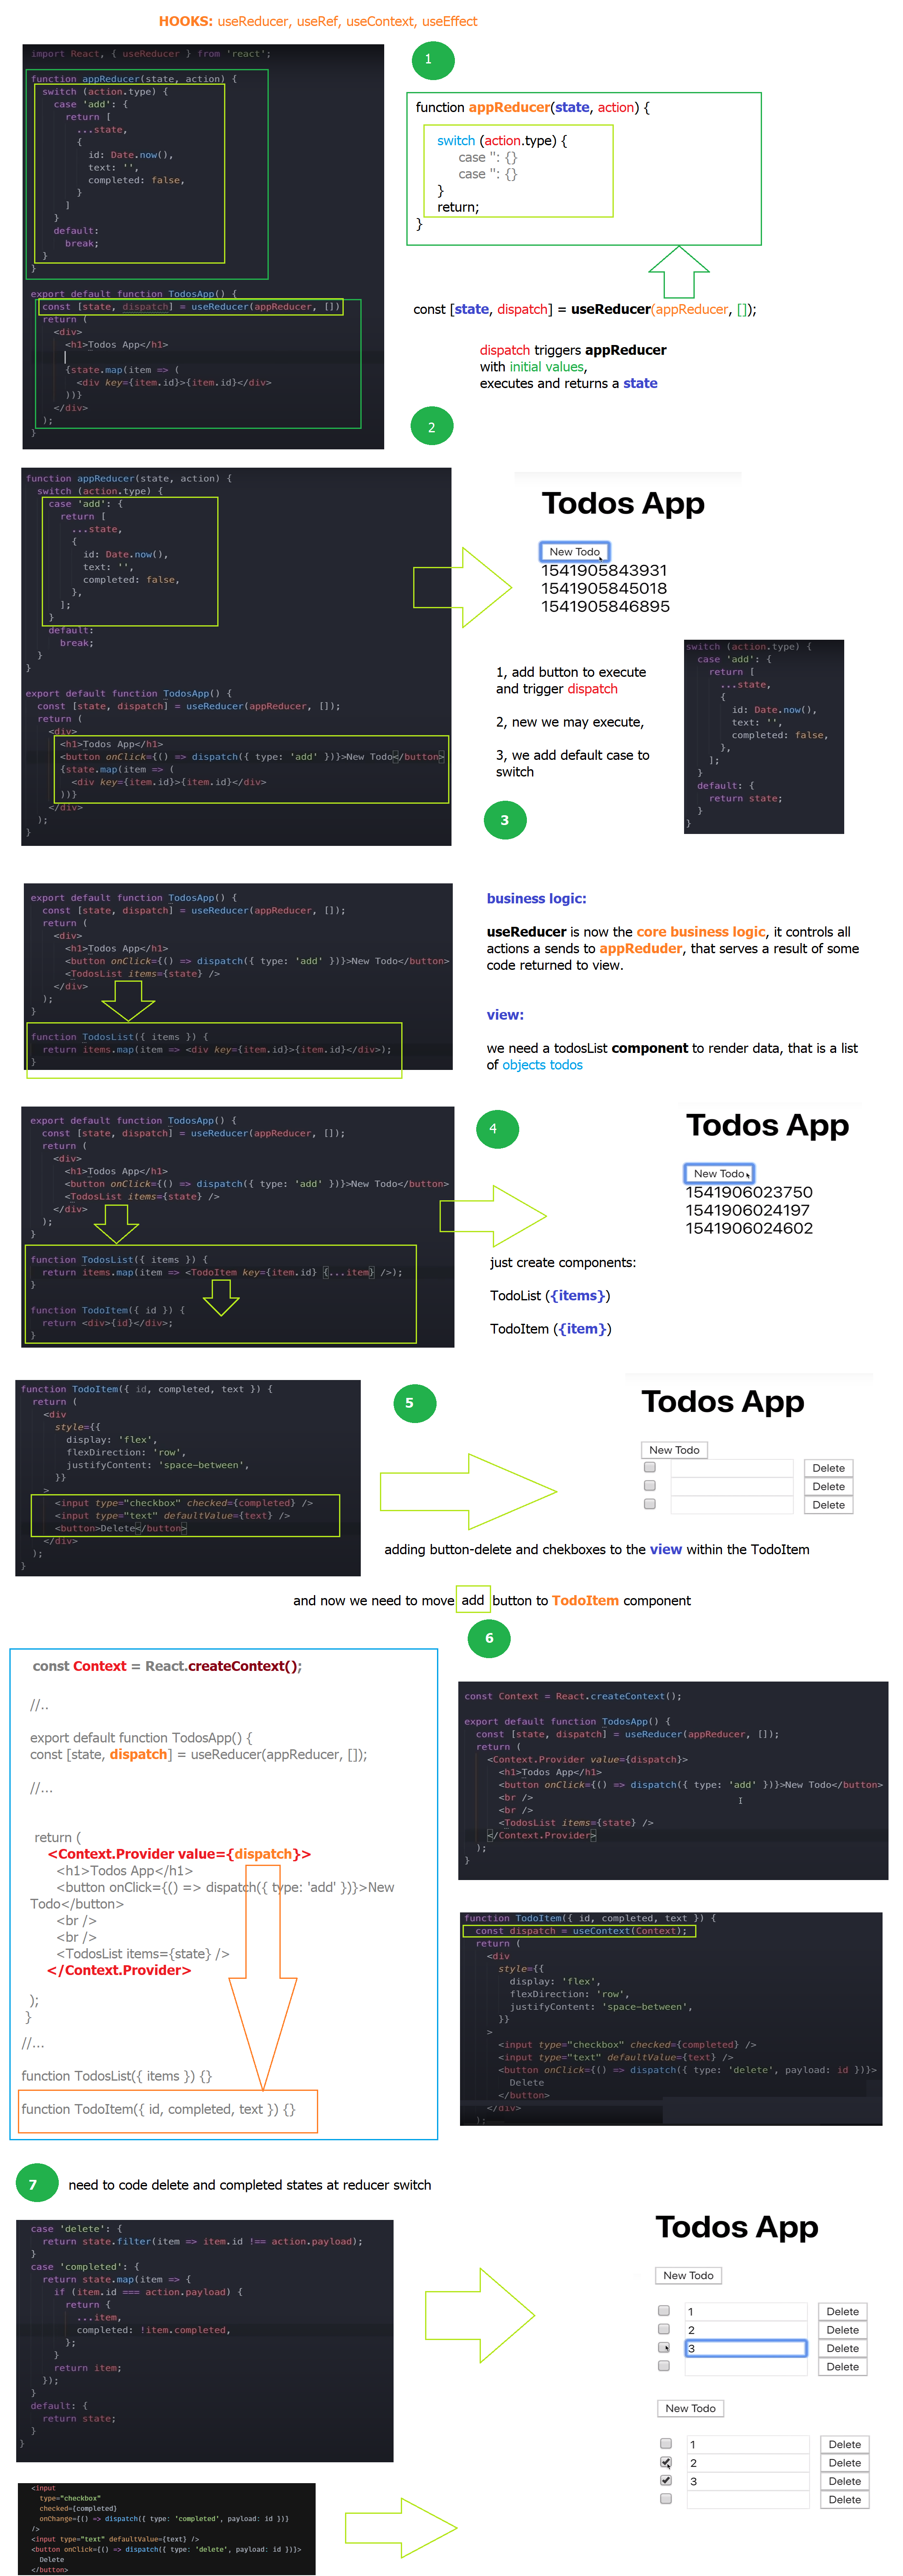
2.7 useContext, useEffect, useRef todo
The useEffect, useRef, and useContext hooks are used to handle different aspects of state management and render lifecycle.
useEffect: is used to update thestateRef.currentvalue whenever the state changes.- It ensures that the stateRef always holds the latest value of state.
- The effect is triggered whenever the state dependency changes, which means it will run after every state update.
useRef: thestateRefvariable is created usinguseRef. It creates a mutable reference that persists across renders.stateRefis used to hold the current value of state.- By using useRef, the value can be updated without causing a re-render, and it can be accessed inside the useEffect hook.
useContext: the Context is created usingReact.createContext(), and it is used to share the dispatch function with child components.- By wrapping the components inside
<Context.Provider value={dispatch}>, the dispatch function is made available to all components within theContext.Providerscope. - The child component,
TodosList, accesses thedispatchfunction using theuseContexthook.
- By wrapping the components inside
function appReducer(state, action) {
  // ---
}

const Context = React.createContext();


export default function TodoApp() {
  const [state, dispatch] = useReducer(appReducer, initialTodos);
  const stateRef = useRef(state);

  useEffect(() => {
    stateRef.current = state;
  }, [state]);

  return (
    <Context.Provider value={dispatch}>
      <h3>List: add, delete, complete and refresh</h3>
      <button onClick={
        () => dispatch({ type: "add" })}>Create Todo</button>
      <br />
      <br />
      <TodosList items={stateRef.current} />
    </Context.Provider>
  );
}

function TodosList({ items }) {
  return items.map((item) => <TodoItem key={item.id} {...item} />);
}

}

function TodoItem({ id, completed, author, text, due }) {
  const dispatch = useContext(Context);
  //..
}
3 Versions
| Code Version | Commit | Folder-Tree | Screeshoots |
|---|---|---|---|
| todoApp 0.0 | create project with route: todoApp 0.0 | initial tree-folder | render home |
| todoApp 0.1 | create new todo: todoApp 0.1 | - | initial render - todo created render |
| todoApp 0.2 | render todos, clear, delete todo: todoApp 0.2 | - | initial render - todo created render |