Spring Boot: H2 DB and Thymeleaf
Spring Boot
📘 Create a Spring Boot Project
- Create a Maven Spring Project
- Install
H2 DB - Define Application.properties
- Create Model: @Entity
Bookand JPA @Repository - Create @Controller and @Service
- Create
HTMLtemplate with Thymeleaf
1 Maven Project
Be careful with this.

1.1 POM.xml and dependencies
Check the base project, Library5.
POM.xml and dependencies: The POM.xml file manages the dependencies of a project in Maven.
- The first two dependencies,
spring-boot-starter-thymeleafandspring-boot-starter-web, are starter dependencies for Spring Boot and include libraries for building web applications using the Thymeleaf template engine. - The
spring-boot-devtoolsdependency provides development-time tools to improve the development experience, such as automatic application restarts and enhanced debugging capabilities. javafakeris a library used to generate random data for testing purposes, andlombokis a library that simplifies Java code by reducing boilerplate code.- The
spring-boot-starter-testdependency includes the necessary libraries for testing Spring Boot applications, and thejunit-jupiter-apidependency provides theJUnit 5 testing framework. - The
spring-boot-starter-jdbcandspring-boot-starter-data-jpadependencies provide libraries for accessing and manipulating databases in a Spring Boot application. - Finally, the
h2 dependencyis a lightweight in-memory database used for testing and development purposes.
The groupId and artifactId attributes uniquely identify each dependency, while the version attribute specifies the version of the library to use.
The scope attribute defines the visibility of the dependency at different stages of the application’s lifecycle, and the optional attribute indicates that the dependency is not strictly required for the application to function.
2 Model
2.1 @Entity book
A persistence entity is a lightweight Java class with its state typically persisted to a table in a relational database.
Instances of such an entity correspond to individual rows in the table.
Entities typically have relationships with other entities, and these relationships are expressed through object/relational mapping (ORM) metadata.
This metadata may be specified directly in the entity class file by using annotations (or in a separate XML descriptor file distributed with the application).
DemoApplication.java
@Getter @Setter @NoArgsConstructor @AllArgsConstructor
@Entity(name="Book")
@Table(name="BOOK_TABLE")
public class Book {

    @Id
    @GeneratedValue(strategy = GenerationType.AUTO)
    @Column(name="BOOK_ID")
    private long bookId;
    @Column(name="BOOK_TITLE")
    private String title;
    @Column(name="AUTHOR")
    private String author;
    private int pages;
    @Column(name="PUBLISHED_YEAR")
    private int publishedYear;
    @Column(name="ISBN")
    private String isbn;
}Spring MVC was the original web framework in the Spring ecosystem, and it relied heavily on XML-based configuration.
Over time, Spring MVC evolved to become more annotation-driven, which made it simpler and more concise to work with.
With the advent of Spring Boot, the Spring ecosystem became even more streamlined, with convention-over-configuration and a focus on out-of-the-box features that made it easier to build and deploy Spring-based applications.
In the domian of database access, Spring evolved from using plain JDBC to providing support for Object-Relational Mapping (ORM) frameworks such as Hibernate and JPA.
Spring also provides transaction management capabilities through the Spring Transaction module, which allows developers to define transaction boundaries declaratively using annotations or XML configuration.
By using Spring, developers can build robust, scalable, and maintainable web applications that leverage modern technologies and best practices.
2.2 H2 DB creation: step-by-step
Download the
H2 database: Go to theH2 databasewebsite at H2 DB{external} and download the latest version of the H2 database for Linux. You can download either the ZIP or the TAR package.Extract the downloaded file: Open the terminal and navigate to the folder where you downloaded the
H2 database.Extract the contents of the downloaded file using the following command:
- Start the H2 database server: Navigate to the
H2 databasedirectory and start theH2 databaseserver by running the following command:
This will start the H2 database server and display the URL where the H2 database can be accessed.
Connect to the
H2 database: Open a web browser and enter the URL displayed in the terminal. The H2 database web interface will open in the browser.- Other option is to execute the app and then clik “Create a new database” from the H2 Icon


- Create a new database: In the
H2 databaseweb interface, click on the “Create a new database” button and follow the prompts to create a new database.
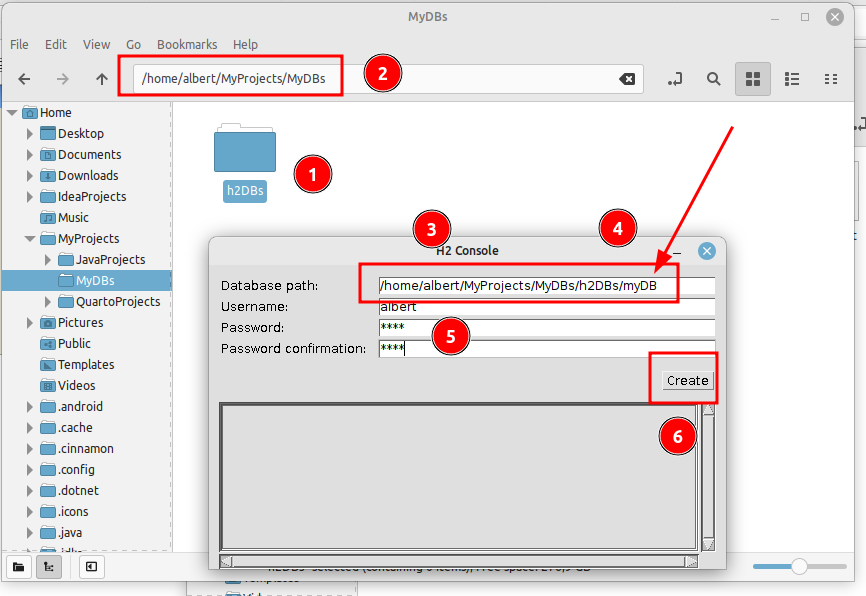


Name your database: jdbc:h2:/home/albert/MyProjects/MyDBs/h2DBs/myDB
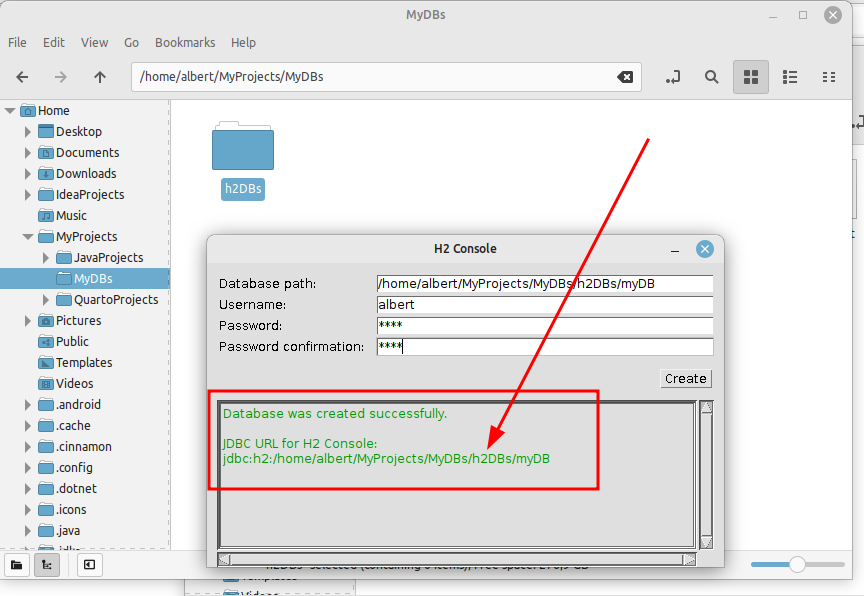
- Connect to the new database: Once the new database is created, click on the “Connect” button in the
H2 databaseweb interface and introduce the right parameters.
Saved Settings: Generic H2 (Server)
Setting Name: Generic H2 (Server)
Driver Class: org.h2.Driver
JDBC URL: jdbc:h2:/home/albert/MyProjects/MyDBs/h2DBs/myDB
User Name: albert
Password: ••••

- Use the
H2 database: Now you can start using theH2 database. You can create tables, insert data, and perform queries using SQL commands.
2.3 JPA
JPA: Jakarta Persistence, formerly Java Persistence API
JPA is a application programming interface specification that describes the management of relational data.
This code is defining a Java interface named BookRepository that extends the CrudRepository interface.
The CrudRepository interface is a built-in interface in the Spring Framework that provides generic CRUD (Create, Read, Update, Delete) operations for working with entities in a database.
The BookRepository interface is being used to define a repository for managing Book entities, where Book is likely a Java class representing a book object in the application.
The Long parameter in CrudRepository<Book, Long> specifies the type of the primary key for the Book entity. In this case, the primary key is a Long type.
By extending CrudRepository, the BookRepository interface will inherit methods such as save(), findById(), findAll(), and deleteById(), among others, which can be used to perform database operations on Book entities.
This allows for efficient and standardized data access and management within the application. Otherwise, we should use a DAO:
The public keyword specifies that the interface can be accessed from other classes, and the interface name should be in camelCase to follow Java naming conventions.
2.4 Application.Properties
Application.Properties: the application.properties file contains configuration properties for a Spring Boot application.
#H2 DATASOURCE
spring.datasource.url=jdbc:h2:tcp://localhost/~/dataBaseH2/library5
spring.datasource.username=albert
spring.datasource.password=1234
spring.datasource.driver-class-name=org.h2.Driver

#JPA
#spring.jpa.properties.hibernate.dialect=org.hibernate.dialect.MySQL5Dialect
spring.jpa.properties.hibernate.dialect=org.hibernate.dialect.H2Dialect
3 Controller
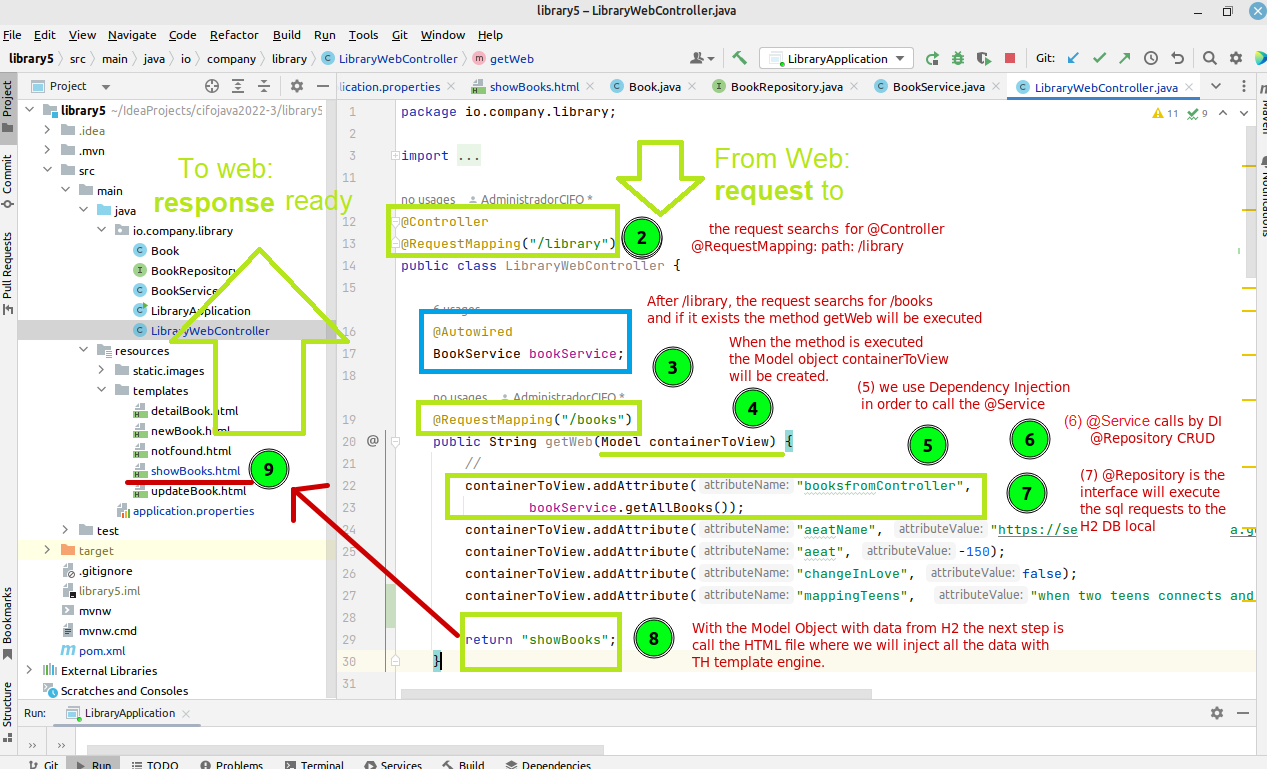
3.1 @Controller Web
DemoApplication.java
The method getWeb() is handling a GET request to the “/library/books” URL path and adding a list of books retrieved from the BookService to the Model attribute “booksfromController”.
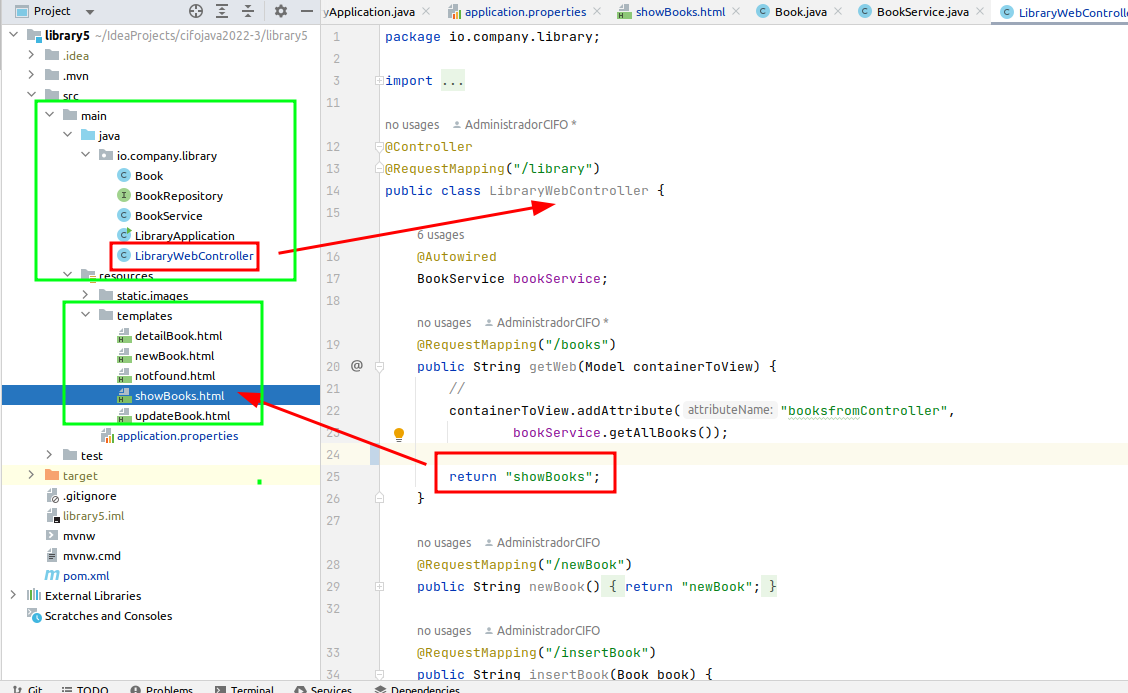
Finally, it returns the name of the view that will be used to render the response.
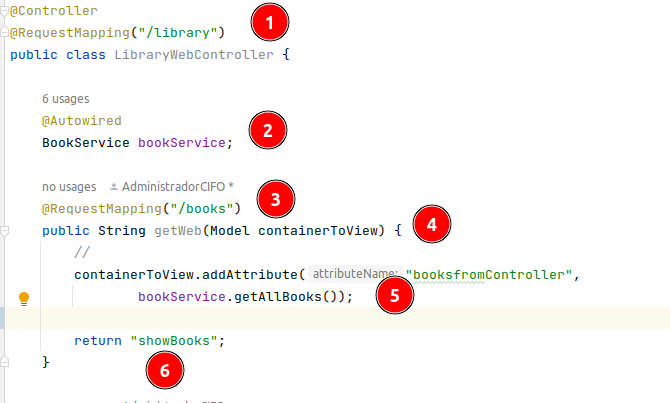
- Java Class and annotations:
@Controller: This is an annotation that identifies the class as a Spring MVC controller.@RequestMapping("/library"): This annotation maps the controller to the URL path"/library".
@Autowired BookService bookService;: This annotation injects an instance of the BookService into the controller.@RequestMapping("/books"): This annotation maps the method to the URL path"/library/books".public String getWeb(Model containerToView): This is the method declaration for the GET request handler.containerToView.addAttribute("booksfromController", bookService.getAllBooks());: This adds a list of books retrieved from the BookService to the model attribute"booksfromController".return "showBooks;: This returns the name of the view that will be used to render the response.
4 View: Thymeleaf
In Spring Boot, the @Controller returns the name of the HTML file (also known as the view) that should be rendered to display the response.
The view is then resolved by the ViewResolver and the corresponding HTML template file is located.
The data that the @Controller wants to send to the view is stored in a Model object. The Model object is passed to the view as a parameter and can be accessed from the HTML template.
Using template engines like Thymeleaf, the view can then use expressions and tags to inject the data from the Model object into the HTML file.
FreeMarker. Apache FreeMarker™ is a template engine: a Java library to generate text output (HTML web pages, e-mails, configuration files, source code, etc.) based on templates and changing data.
Finally, the rendered HTML file with the injected data is sent as the response to the client’s request.
Thyemeleaf builds the HTML table injecting data from Model object. This model objects comes from @Controller.
It builds a <table></table> with a header and multiple rows <tr></tr>
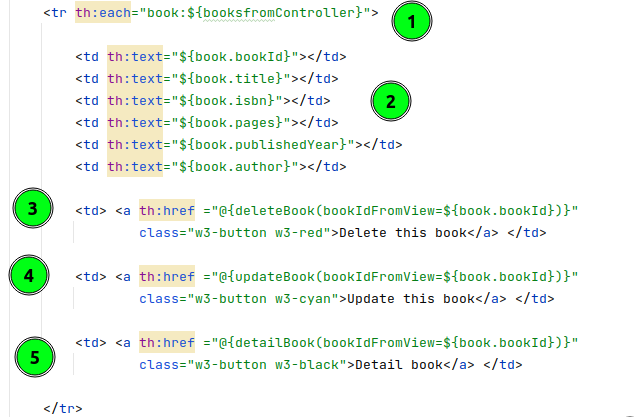
[1] A java forEach wirtten in Thymeleaf iterates over a list of books booksfromController using the trth:each attribute.
The th:each attribute on <tr> scope starts in <tr> and finishes in </tr>
[2] For each book, it creates a table cell <td> and displays different attributes of the book, such as bookId, title, isbn, pages, publishedYear, and author.
There are also three links in the row, each represented by an anchor <a> tag.
These links use Thymeleaf’s URL syntax @{...} to generate URLs that invoke Spring MVC @Controller methods.
[3] [4] [5] The deleteBook(), updateBook(), and detailBook() methods will be called with the bookId parameter set to the book.bookId value of the cu Open a web browser and enter the URL dirrent iteration.
The links are styled using CSS classes from the W3.CSS framework.
5 Example: Library5
5.0.1 Tree-folder Project root
Collapsed tree-folder:
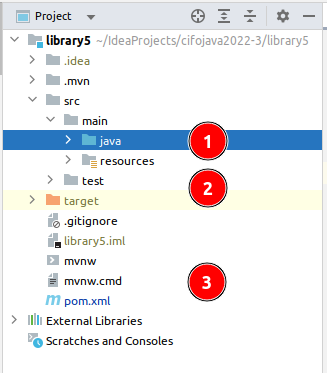
scr/main: This directory contains two subdirectories - java and resources - which respectively hold the Java source code and resource files for the application.- java
- resources
scr/test: This directory contains unit test code and resources that can be used to test the application.targetandfiles:target: This directory is the output directory where compiled classes and artifacts are stored.fileson root: This directory holds any additional files or resources needed by the application that are not directly related to the code or tests: POM.xml is the most important.
5.0.2 Tree-folder Project
All files in our tree-folder:
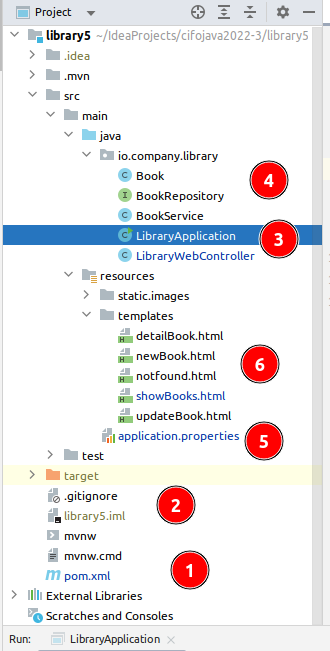
The Spring Boot tree-folder structure includes various components such as POM.xml, Git, Java classes, application.properties, and HTML templates that help manage dependencies, version control, database access, configuration, and dynamic content generation.
- POM.xml and dependencies: The POM.xml file manages the dependencies of a project in Maven.
- Git and .gitignore: Git is a version control system that helps manage code changes, while .gitignore is a file that specifies which files and directories should be excluded from version control.
- Main: The main method is the entry point for a Java application, where the program starts execution.
- Java Classes:
@Entity: A Java class annotated with@Entityis mapped to a database table.@Controller: A Java class annotated with@Controllerhandles incoming web requests and returns a response.@Repository: A Java class annotated with@Repositoryprovides database access to other classes in the application.
- Application.Properties: The application.properties file contains configuration properties for a Spring Boot application.
- Templates HTML: HTML templates are used in a web application to generate dynamic content on the server-side.
6 Execution

6.1 Auto-reload compiler
Spring Boot Dev Tools
Any changes to views or resources can be seen in the browser directly, no need restarts, just refresh the browser. As wwll, any changes to the code that will restart the Spring container automatically.
<dependency>
    <groupId>org.springframework.boot</groupId>
    <artifactId>spring-boot-devtools</artifactId>
    <scope>runtime</scope>
    <optional>true</optional>
</dependency>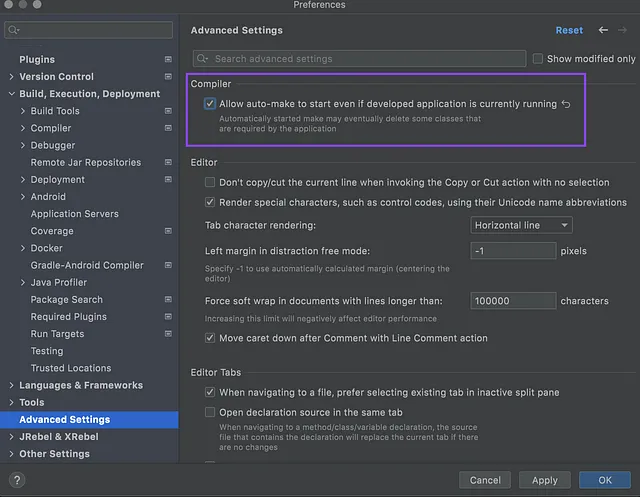
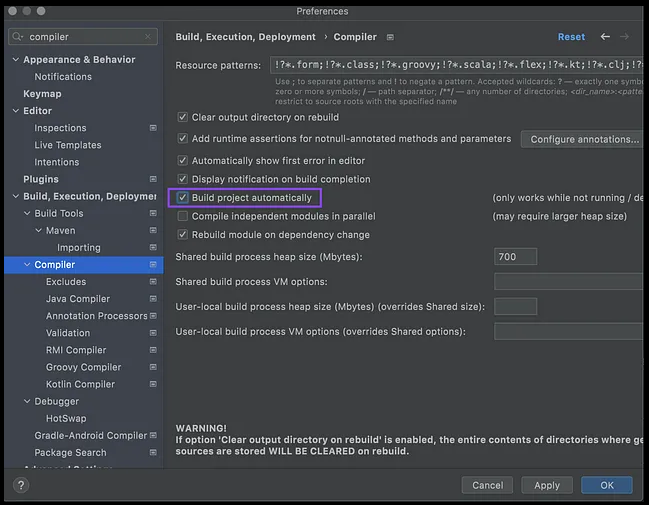

compiler.automake.allow.when.app.runningIn Menu -> Build -> Build Project
CTRL + F9