Lab#SB00-5: Rest & JPA-H2
Spring Boot Library Management API Rest and JPA H2
📘 Spring Boot Lab#SB00-5: API Rest and JPA H2
H2 database is a lightweight, open-source, and fast in-memory database that can be easily integrated with Spring Boot applications.
Spring Boot is a popular framework for building enterprise-grade applications quickly and easily.
We will walk through the steps to set up a H2 database in Linux Spring Boot, create a local server, define a User entity, and expose RESTful APIs to perform CRUD operations on the User entity using Postman.
1 Install and create a H2 DB
References:
Install Java and Spring Boot on your Linux machine or start from previous project:
- Download and install Java JDK from the official Oracle website.
- Download and install Spring Boot from the official Spring website.
- Download the H2 database from the official H2 website.
- Extract the downloaded file to a location on your Linux machine.
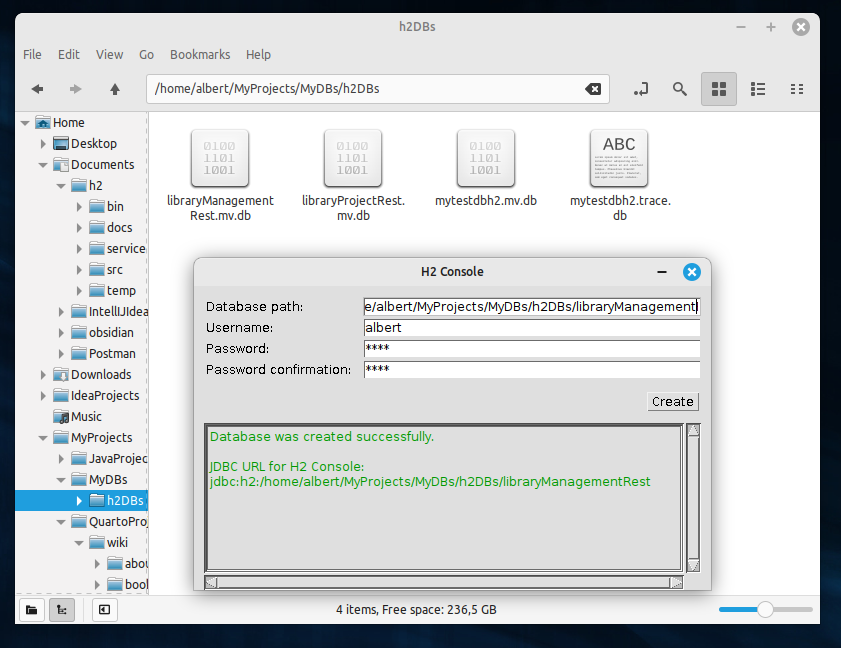
- Execute H2 Desktop app and create a local H2 DB.
2 LibraryManagmentRest using H2
2.1 Configure H2 DB
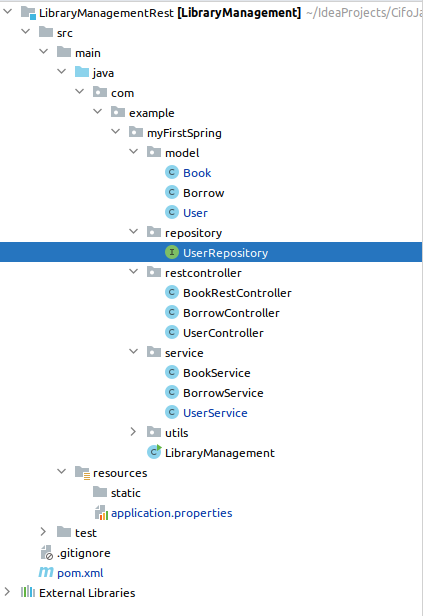
pom.xml: dependencies H2 and JPAUserRepositoryinterfaceUserclass @Entityapplication.properties- modify
serviceto create a user object from API Rest and save it to H2 DB
2.2 application.properties
- Open the
application.propertiesfile located in thesc/main/resourcesdirectory of your Spring Boot project. - Add the following configuration to use the
H2 database:
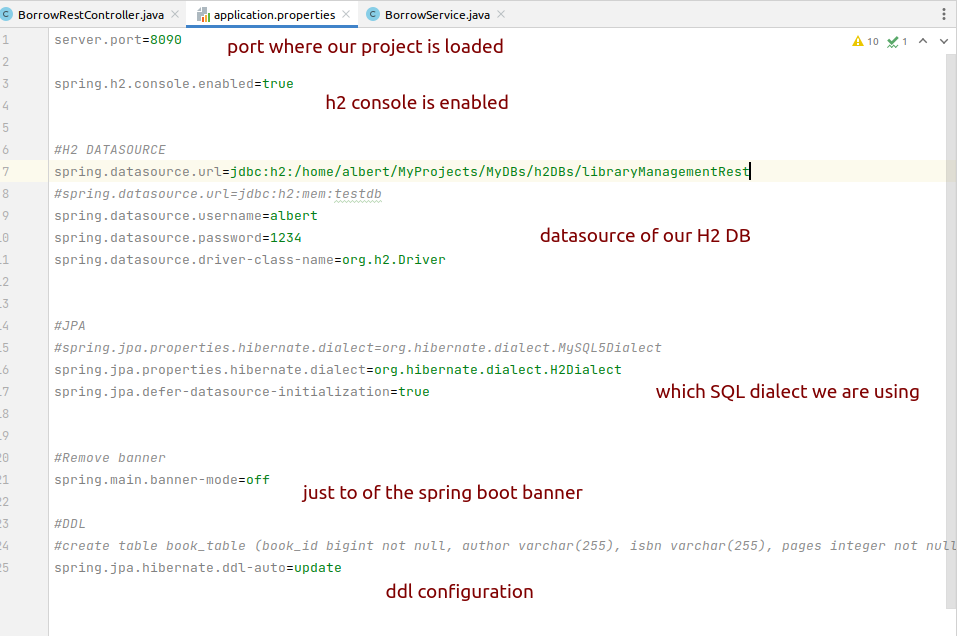
server.port=8090

spring.h2.console.enabled=true

#H2 DATASOURCE
spring.datasource.url=jdbc:h2:/home/albert/MyProjects/MyDBs/h2DBs/libraryManagementRest
#spring.datasource.url=jdbc:h2:mem:testdb
spring.datasource.username=albert
spring.datasource.password=1234
spring.datasource.driver-class-name=org.h2.Driver

#JPA
#spring.jpa.properties.hibernate.dialect=org.hibernate.dialect.MySQL5Dialect
spring.jpa.properties.hibernate.dialect=org.hibernate.dialect.H2Dialect
spring.jpa.defer-datasource-initialization=true

#Remove banner
spring.main.banner-mode=off

#DDL
#example: create table book_table (book_id bigint not null, author varchar(255), isbn varchar(255), pages integer not null, published_year integer, book_title varchar(255), primary key (book_id))
spring.jpa.hibernate.ddl-auto=update
This is a configuration file in the application.properties format for a Spring Boot application. It specifies various settings related to the H2 database, JPA, and the application’s server port.
- The
server.portsetting sets the port number for the application’s server to8090. spring.h2.console.enabled=trueenables the H2 database console, which allows you to interact with the database from a web interface.- The
spring.datasourcesettings specify the URL, username, password, and driver class name for the H2 database. - The
spring.jpasettings specify the Hibernate dialect to be used for the database, and set defer-datasource-initialization to true to delay database connection until necessary. spring.main.banner-mode=offdisables the Spring Boot banner during application startup.spring.jpa.hibernate.ddl-auto=updateinstructs Hibernate to automatically update the database schema based on changes to JPA entity classes. In this case, it specifies a single table named book_table with columns for book_id, author, isbn, pages, published_year, and book_title.
2.3 DDL
DDL stands for Data Definition Language. It is a subset of SQL (Structured Query Language) used to define, modify and delete the structure of database objects like tables, indexes, views, and procedures.
DDL commands are used to create or alter the schema of a database, which defines the layout of the data and the relationships between the tables. Some examples of DDL statements include CREATE TABLE, ALTER TABLE, DROP TABLE, CREATE INDEX, and CREATE PROCEDURE.
spring.jpa.hibernate.ddl-auto
Specifically, the spring.jpa.hibernate.ddl-auto property is used to control how Hibernate generates or updates the database schema.
The available options are create, create-drop, update, validate, and none.
The available options are:
- If set to
create, Hibernate will create the database schema on application startup. - If set to c
reate-drop, Hibernate will create the schema on startup and drop it on shutdown. - If set to
update“, Hibernate will update the schema to match the entity mappings. - If set to
validate“, Hibernate will only validate the schema but not update it. - And if set to
none, Hibernate will not perform any schema management operations.
It’s important to choose the appropriate value for this property based on your specific needs and deployment environment.
2.4 Create a User repository and User entity
- Create a new package and a new interface named
UserRepositoryin the package with the following code:
import com.example.myFirstSpring.model.User;
import org.springframework.data.repository.CrudRepository;

public interface UserRepository extends CrudRepository<User, String> {}- Create a User entity: create a new package and a new class named User in the package with the following code:
import jakarta.persistence.Entity;
import jakarta.persistence.Id;
import jakarta.persistence.Table;
import lombok.AllArgsConstructor;
import lombok.Data;
import lombok.NoArgsConstructor;
@Data // generates getters, setters, equals, hashCode, and toString methods
@NoArgsConstructor // generates a no-args constructor
@AllArgsConstructor // generates a constructor with all arguments
@Entity(name="User")
@Table(name="USER_TABLE")
public class User {
    @Id
    private String userId;
    private String name;
    private String address;
    private int age;
}- Add
userRepository.save(user);increateUser,userService:
2.5 Execute project
When the application starts, Spring Boot will automatically execute the DDL scripts specified in the schema.sql or data.sql files located in the src/main/resources directory.
If these files are not present, Spring Boot will create an empty H2 database using the default settings specified in the application.properties file.
Once the database is created and configured, Spring Boot will use JPA to manage the database schema and entities, allowing you to easily perform CRUD operations and other database operations in your application.
Once the database is created and configured, Spring Boot will use JPA to manage the database schema and entities, allowing you to easily perform CRUD operations and other database operations in your application.
3 API Rest
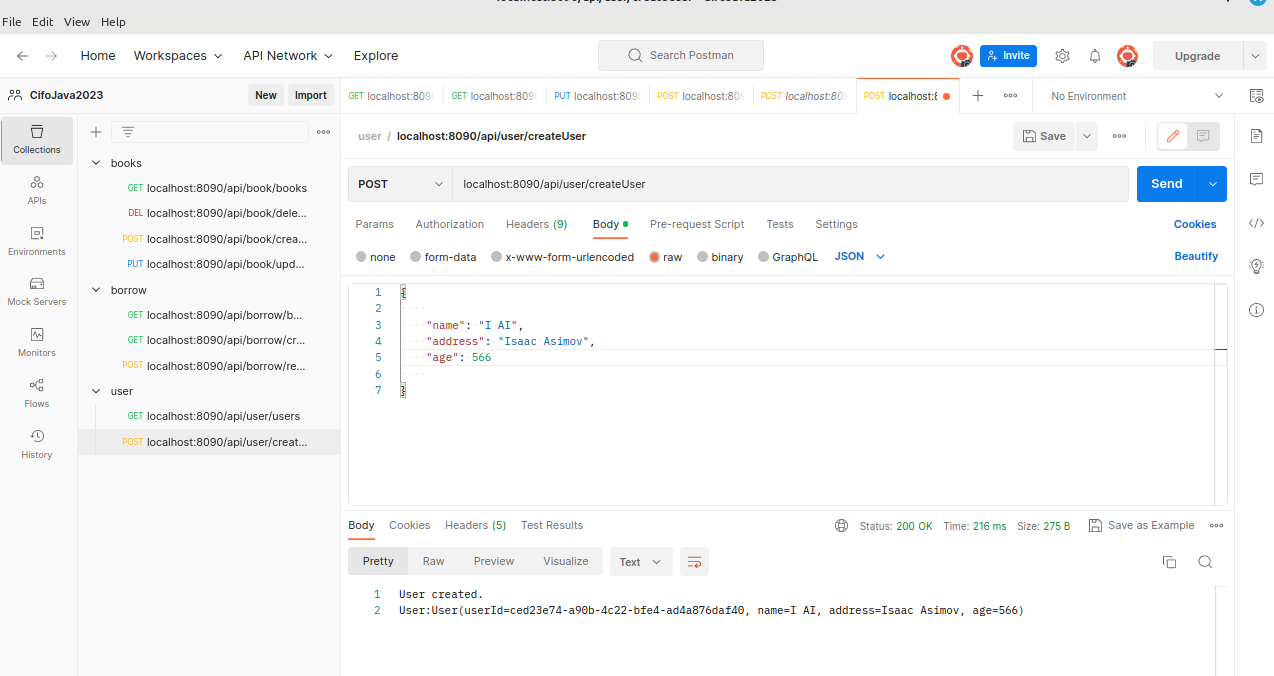
- Open Postman and create a new request.
- Set the HTTP method to
"POST"and set the request URL to"http://localhost:8090/api/user/createUser". - Click on the “Body” tab and select the “raw” radio button. Set the request body to the following JSON object:
- This will create a new User entity, so click on the “Send” button to send the
request. - If the
requestis successful, you should receive a response with a status code of 201 Created and the User entity in the response body.
- To check if the User entity has been created in the H2 database, you should use the H2 console: Open a web browser and navigate to
"http://localhost:8090/h2-console".
Driver Class: org.h2.Driver
JDBC URL: jdbc:h2:/home/albert/MyProjects/MyDBs/h2DBs/libraryManagementRest
User Name: albert
Password: 1234
Enter the following SQL query:
This should return a result set containing the User entity you just created.
4 Versions
endpoint example: http://localhost:8090/api/book/books
| Code Version | Commit | Folder-Tree | Screeshoots |
|---|---|---|---|
| Library Management Rest H2 0.0 | add H2 to project: application.properties, @Entity, @UserRepository, POM userRestController: createUser, getAllusers |
Basic Structure | localhost:8090/api/user/createUser |
| Library Management Rest H2 0.1 | refactor user to H2, remove HashMap users and add ResponseEntity |
- | - |
| Library Management Rest H2 0.2 | refactor book to H2, remove HashMap books and add ResponseEntity |
- | - |
| Library Management Rest H2 0.3 | refactor borrow to H2, remove HashMap borrows and add ResponseEntity getAllBorrows, populate , createBorrow |
- | - |
| Library Management Rest H2 0.4 | refactor borrow to H2, remove HashMap borrows and add ResponseEntity returnBook |
- | - |
| Library Management Rest H2 0.5 | user new field: borrowIds |
- | - |
4.1 Postman apis
| Domain | Link | Objects |
|---|---|---|
| books | postman link | book |
| borrow | postman link | borrow |
| user | postman link | user |


