Spring Boot: Controller
Spring Boot
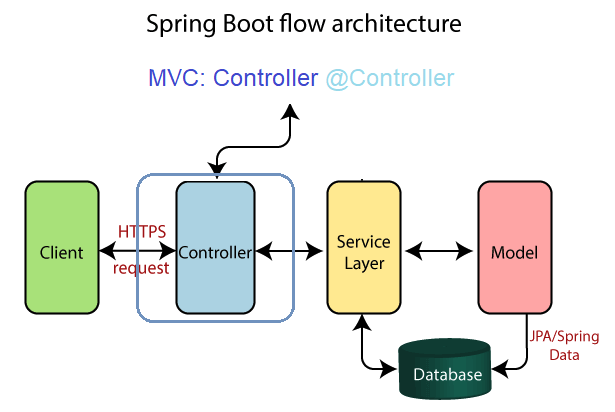
In Spring Boot, the Model-View-Controller (MVC) pattern is used to separate the application logic into three components: Model - View -Controller
📘 Controller
The controller is responsible for handling incoming requests and mapping them to the appropriate logic in the model and view.
In Spring Boot, controllers are implemented as classes with methods that handle specific request paths. The @RestController and @Controller annotations are used to define a class as a controller, and the @RequestMapping annotation is used to map request paths to specific methods.
1 Overwiew
In Spring Boot, a controller is a class that handles incoming HTTP requests and returns an HTTP response. There are two ways to handle the HTTP response in Spring Boot controllers: using a model (or ModelMap) or a model and view.
1.1 Model
A model is an object that holds data to be rendered by a view.
To use a model in a @Controller, you need to add the @Controller annotation to the class and use the Model interface as a parameter for the method that handles the HTTP request.
import org.springframework.stereotype.Controller;
import org.springframework.ui.Model;
import org.springframework.web.bind.annotation.GetMapping;

@Controller
public class HomeController {

    @GetMapping("/")
    public String getHome(Model model) {
        model.addAttribute("message", "Welcome to my Spring Boot app!");
        return "home";
    }
}
In this example, the getHome method takes a Model object as a parameter and adds a message to it using the addAttribute method.
The getHome method returns the name of the view home (html), which will be resolved by Spring Boot to the appropriate view file.
1.2 Model and View
A model and view is a combination of a model object and the name of the view to be rendered. To use a model and view in a controller, you need to add the @Controller annotation to the class and use the ModelAndView class as the return type for the method that handles the HTTP request.
import org.springframework.stereotype.Controller;
import org.springframework.web.bind.annotation.GetMapping;
import org.springframework.web.servlet.ModelAndView;

@Controller
public class HomeController {

    @GetMapping("/")
    public ModelAndView getHome() {
        ModelAndView modelAndView = new ModelAndView();
        modelAndView.addObject("message", "Welcome to my Spring Boot app!");
        modelAndView.setViewName("home");
        return modelAndView;
    }
}
In this example, the getHome method creates a new ModelAndView object and adds a message to the model using the addObject method. The method also sets the name of the view home using the setViewName method.
2 Using Annotations
In this table, we will explore some of the most commonly used annotations in Spring Boot. These annotations can be used to map HTTP requests to controller methods, extract data from the request, bind data to model attributes, and handle exceptions. Understanding these annotations is essential for building Spring Boot applications that are reliable, scalable, and maintainable.
| Annotation | Description |
|---|---|
@Controller |
Indicates that a class serves as a Spring Boot controller. |
@RequestMapping |
Maps HTTP requests to controller methods. |
@GetMapping |
Maps HTTP GET requests to controller methods. |
@PostMapping |
Maps HTTP POST requests to controller methods. |
@PutMapping |
Maps HTTP PUT requests to controller methods. |
@DeleteMapping |
Maps HTTP DELETE requests to controller methods. |
@PathVariable |
Extracts a variable from the URL path. |
@RequestParam |
Extracts a variable from the query string or request body. |
@ModelAttribute |
Binds a method parameter to a model attribute. |
@SessionAttribute |
Binds a method parameter to a session attribute. |
@InitBinder |
Initializes a web data binder for a specific controller method. |
@ExceptionHandler |
Handles exceptions thrown by a controller method. |
@ResponseStatus |
Sets the HTTP status code for a controller method. |
@ResponseBody |
Indicates that a controller method returns a response body instead of a view. |
@ControllerAdvice |
Provides global exception handling for controllers. |
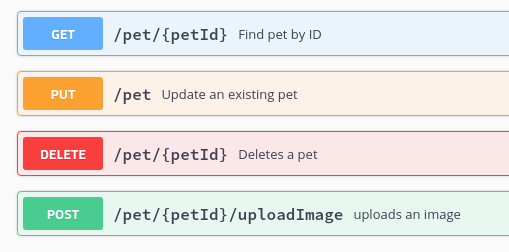
GET, POST, PUT, PATCH, and DELETE are HTTP methods that are used to perform CRUD (Create, Read, Update, and Delete) operations on resources in a RESTful API.
GET: retrieves a representation of a resource from the server.POST: creates a new resource on the server.PUT: updates an existing resource on the server.PATCH: partially updates an existing resource on the server.DELETE: deletes a resource from the server.
3 Example1: Model
The most commonly used annotation is @GetMapping, which maps HTTP GET requests to a specific method.
import org.springframework.stereotype.Controller;
import org.springframework.ui.Model;
import org.springframework.web.bind.annotation.GetMapping;

@Controller
public class HomeController {

    @GetMapping("/")
    public String home(Model model) {
        model.addAttribute("message", "Welcome to my Spring Boot app!");
        return "home";
    }
}
In this example, the @GetMapping("/") annotation maps HTTP GET requests to the root URL (“/”) to the home method.
4 Example2: @PathVariable and @RequestBody
@GetMapping("/hello")
public String hello() {
    return "Hello, World!";
}

@PostMapping("/users")
public void createUser(@RequestBody User user) {
    userService.createUser(user);
}

@GetMapping("/users/{id}")
public String getUserById(@PathVariable("id") Long id, Model model) {
    User user = userService.getUserById(id);
    model.addAttribute("user", user);
    return "user";
}
In these examples, the @GetMapping and @PostMapping annotations are used to map HTTP GET and POST requests to specific methods.
The @PathVariable annotation is used to extract a variable from the URL path, and the @RequestBody annotation is used to map the request body to a Java object.
An alternative implementation where the User object is created directly in the @Controller:
@Controller
public class UserController {

    private List<User> users = new ArrayList<>();

    @PostMapping("/users")
    public void createUser(@RequestBody User user) {
        users.add(user);
    }

    @GetMapping("/users/{id}")
    public String getUserById(@PathVariable("id") Long id, Model model) {
        User user = null;
        for (User u : users) {
            if (u.getId() == id) {
                user = u;
                break;
            }
        }
        if (user == null) {
            // handle error case
        } else {
            model.addAttribute("user", user);
        }
        return "user";
    }
}
In this implementation, we have replaced the userService dependency with an in-memory List<User> to store the user objects.
In the createUser() method, we simply add the User object to the list.
In the getUserById() method, we search for the User object with the given id in the list and add it to the model if it exists. If the user is not found, we can handle the error case appropriately.
5 Example3: @RequestParam
Let’s create a method that uses the @RequestParam annotation to extract a variable from the query string:
@Controller
public class ExampleController {

    @GetMapping("/hello")
    public String example(@RequestParam("name") String name, Model model) {
        model.addAttribute("message", "Hello, " + name + "!");
        return "home";
    }
}
In this example, the @GetMapping annotation maps HTTP GET requests to the /hello endpoint.
The @RequestParam("name") annotation extracts a variable named name from the query string and binds it to the String name method parameter.
The Model parameter is used to add an attribute to the model, which will be used to render the view. Finally, the method returns the name of the view, which in this case is home.
For example, if you visit the URL /hello?name=John, the message will say “Hello, John!”.
Assuming that you have a view named home.html in your application’s templates directory, this controller method will render a message that says “Hello, {name}!” when you visit the URL:
/hello?name=John.
The value of {name} will be taken from the name parameter in the query string.
5.1 @RequestParam and @PathVariable
@RequestParam and @PathVariable
In Spring Boot, @RequestParam and @PathVariable are both annotations used to extract data from an HTTP request.
The main difference between the two is the source of the data they extract:
@RequestParam: query string or request body@PathVariable: URL path
@RequestParam extracts data from the query string or request body, whereas @PathVariable extracts data from the URL path.
For example, if you have a URL like:
/users?name=john
you can use @RequestParam to extract the name parameter value john from the query string.
On the other hand, if you have a URL like:
/users/123
you can use @PathVariable to extract the id parameter value 123 from the URL path.
In general, use @RequestParam when you need to extract data from the query string or request body, and use @PathVariable when you need to extract data from the URL path.
- Spring MVC RequestMapping Annotation Example with Controller, Methods, Headers, Params, @RequestParam, @PathVariable.
- Annotation Interface RequestMapping
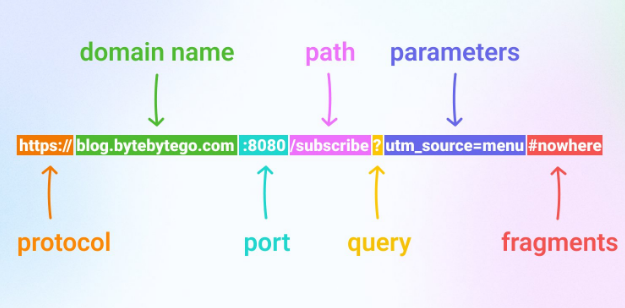
6 URL structure
