classDiagram
class Table{
+String name
+String description
+int qty
}
class Order{
+date date
+String orderNumber
+String waiter
+int peopleqty
+int totalPayment
+bool paid
+Table table
+Menu[] menus
}
class Menu{
+String name
+String price
+int price
+string conntent
}
Table "1" --* "n" Order
Menu "1" --* "n" Order
Lab#SE04-1: healthyFood Restaurant, Core Model
Java SE Lab 04 part 1
📘 Linux Lab#SE04-1: healthyFood Restaurant
Create a Maven/Gradle
Java SE Project.Add the needed dependencies:
- Lombok
- Junit
- Java Faker
Create three
Javaclasses to define the Model. Java SE Classes:- Core Model: Table, Order and Menu
- Managers and Controller: use a fake DataBase like
ArrayListorHashMaps
With
Junitdependency create unitary test to test objects and operations, and then integration tests.From here you should add new features once all the test are passed.
- Operations, you could think in a Manager Class o similar
- New fields/attributes and new classes
- New compositions and inherence: expand your model
- Use Factory design pattern to create new objects
Project Overview
- Technology Stack:
- Front-End: React
- Back-End: Spring Boot
- System Design:
- The UML diagram, designed as part of Lab#SE04-1, lays the groundwork for essential entities such as Orders, Tables, and Menus.
Integration with Spring Boot with API Rest
This Java Maven SE backe-end seamlessly integrates with the React front-end via API Rest, creating a efficient restaurant management.
The UML design acts as a guide, ensuring a cohesive flow between the front-end and back-end components.
1 General approach
Welcome to our Java SE project, where we code a culinary app from a quaint little van restaurant to a thriving establishment with over 100 employees. Our approach is simple yet ambitious: start small, dream big.
- In the initial phase, our focus is on building the core structure of our restaurant management system. At the heart of our project, we will design a Unified Modeling Language (UML) that includes essential classes such as Orders, Tables, and Menus.
- These classes will form the backbone of our application, facilitating efficient management of customer orders, table assignments, and menu items.
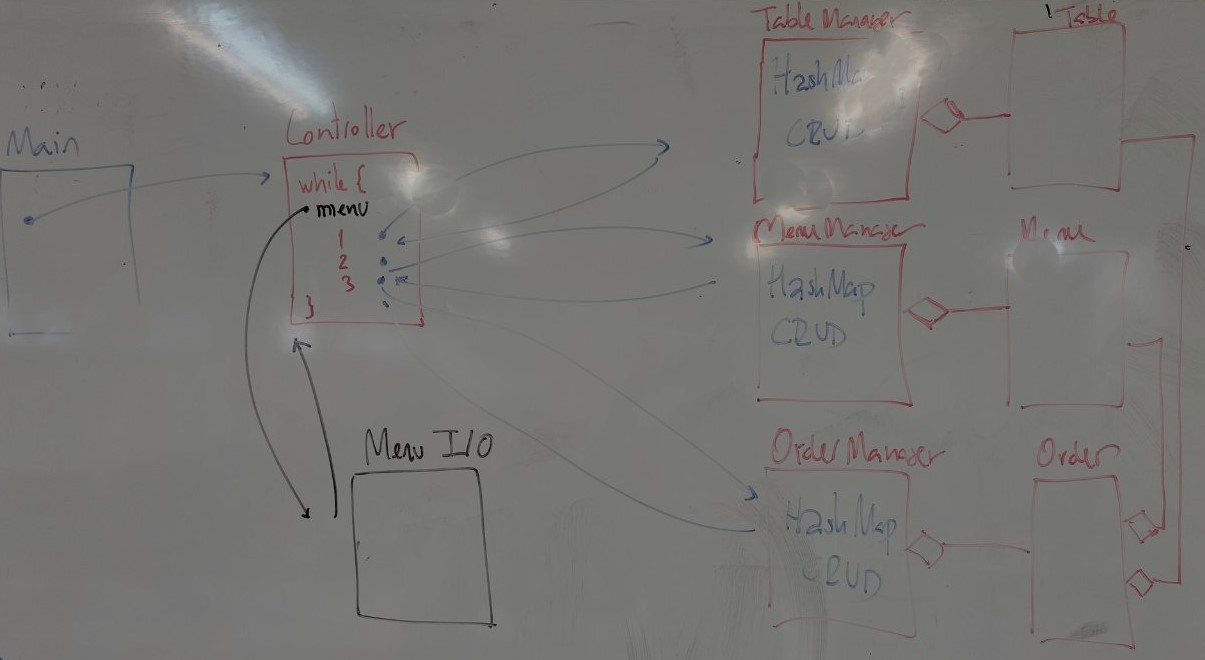
- To orchestrate the flow of our restaurant operations, we introduce a Controller class that acts as the central hub for handling user interactions and managing the overall system logic.
- To simulate a real-world database without the complexities of a full-fledged database system, we implement a DataBase class utilizing HashMaps.
- This enables us to store and retrieve crucial information seamlessly, ensuring the smooth functioning of our restaurant.
- For user interaction, we incorporate an Input/Output (I/O) class that leverages the Command Line Interface (CLI).
- This ensures a user-friendly and interactive experience, allowing customers and restaurant staff to engage effortlessly with the application.
- To guarantee the reliability and functionality of our codebase, we integrate JUnit for testing.
- This not only validates the correctness of our code but also ensures that any future modifications maintain the integrity of our system.
- Additionally, we incorporate Java Faker to generate realistic test data, saving time and effort in the testing phase.
- Simplifying development and enhancing code readability, we include Lombok as a dependency.
- Lombok streamlines the creation of boilerplate code, enabling us to focus on the core functionality of our application.
- Lastly, to manage project dependencies and facilitate easy builds, we structure our project as a Maven project.
- Maven simplifies the build process, making it more efficient and maintaining a clean and organized codebase.
As we embark on this Java SE project, our journey begins with simplicity, but the vision is grand.
We aim to transform a humble van restaurant with one person and five tables into a bustling establishment with over 100 employees, embracing scalability and innovation every step of the way.
Get ready to witness the evolution of our restaurant management system from a small-scale dream to a thriving reality.
2 Core classes and dependencies
2.1 EcoSystem: tech stack, system design and architecture
- Software Core tools: framework/engine/publishing system, Code language, SDK (software development kit)
- Development tools: Configuration system and format (.xml, .json, .yml ), Dependencies & packages management
- Developer tools: IDE, debugger, collaborative & version control, documentation (Mermaid UML)
- DevOps & App LifeCycle: test, deployment, OS, agile management
| (1) Software Core tools | (2) Development tools | (3) Developer tools | (4) DevOps | #version |
|---|---|---|---|---|
| Java SE JDK: open JDK 21 |
Maven: pom.xml Lombok, JUnit 4.11/5, JavaFaker |
IDE: IntelliJ IDEA 2023.3.3 (Community Edition) Doc: Quarto, markdown Version Control: git & gitHub mermaid UML |
Phase: Sandbox Linux 21.3 Virginia Agile: SCRUM |
v.0.x |
2.2 Dependencies pom.xml
The pom.xml file in a Java SE Maven project is crucial as it serves as the Project Object Model configuration.
The pom.xml and dependencies enhance project maintainability, collaboration, and adherence to best practices, making them indispensable components for Java developers leveraging Maven for efficient project management and streamlined workflows.
It defines project metadata, dependencies, plugins, and build configurations, ensuring consistent builds. Dependencies are vital as they specify external libraries required for the project, facilitating easy management and version control. Maven leverages these elements to automate project builds, simplifying development, testing, and deployment.
2.3 Dependency: Lombok
Use Lombok, link:
The @Data annotation is a
Lombokannotation that generates getters and setters for the fields of a class, as well as equals, hashCode, and toString methods based on the fields.The @AllArgsConstructor annotation is a
Lombokannotation that generates a constructor with all of the class’s fields as arguments.The @NoArgsConstructor annotation is a
Lombokannotation that generates a no-argument constructor for a class.
@Data All together now: A shortcut for @ToString, @EqualsAndHashCode, @Getter on all fields, @Setter on all non-final fields, and @RequiredArgsConstructor.
Adding lombok to your pom file: to include lombok as a provided dependency, add it to your
pom.xml
The version <version>1.18.24</version> crashes. Use 1.18.30
You could then use these classes as follows:
2.3.1 Dependency: Java Faker
Use Java Faker:
In pom.xml, add the following xml dependency between
pom.xml
In your Java code:
testfaker.java
import com.github.javafaker.Faker;
import org.junit.jupiter.api.Test;

Faker faker = new Faker();

String name = faker.name().fullName(); // Miss Samanta Schmidt
String firstName = faker.name().firstName(); // Emory
String lastName = faker.name().lastName(); // Barton

String streetAddress = faker.address().streetAddress(); // 60018 Sawayn Brooks Suite 449
2.3.2 Dependency: JUnit 5
To configure support for JUnit Jupiter based tests, configure test scoped dependencies on the JUnit Jupiter API and the JUnit Jupiter TestEngine implementation similar to the following.
more on Java SE TDD
3 Core user-case mockup CLI
4 Fake DataBase: HashMaps
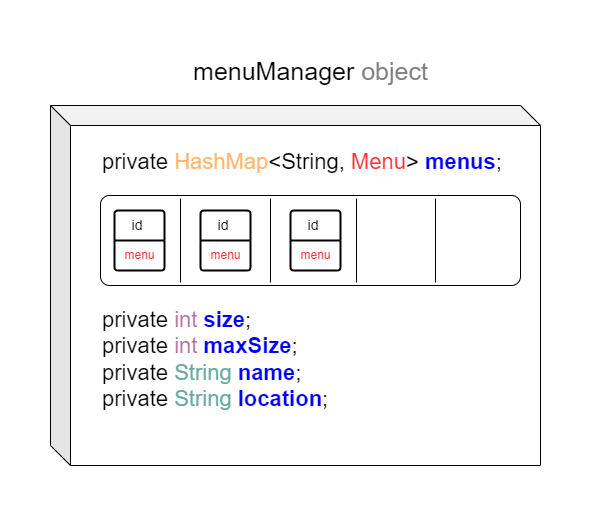
To start and test our UML we are goint to use HashMaps as a fake database.
Keep in mind that in more recent versions of Java, you can use the diamond operator (<>) to infer the generic types, making the declaration more concise:
HashMap<String, Order> orders = new HashMap<>();
Here’s what each part of the code means:
HashMap<String, Order>: This declares a newHashMapwith keys of typeStringand values of typeOrder. In other words, it’s a mapping from strings toOrderobjects.orders: This is the name of the variable that will reference theHashMap. You can choose any valid identifier as the variable name.= new HashMap<String, Order>();: This part of the code creates a new instance ofHashMapand assigns it to the variableorders. Thenewkeyword is used to allocate memory for theHashMap, and the<>syntax specifies the types of keys and values for theHashMap. In this case, keys are of typeString, and values are of typeOrder.
4.1 Entities Manager
MenuManager
classDiagram

class MenuManager {
  - menus: HashMap<String, Menu>
  - qty: int
  - size: double
  - lastModified: Date
  + addMenu(menu: Menu, data: String): void
  + updateMenu(): void
  + deleteMenu(title: String): void
  + getMenu(title: String): Menu
  + getMenus(): List<>
  + rateMenu(rate: int, menu: Menu): void
  + saveToCSV(): void
  + deleteCSV(): void
}
Overall, the MenuManager acts as a central hub for menu-related operations, promoting efficient management and systematic handling of menu entities in Java applications.
A MenuManager class is essential for managing entities like Menu for several reasons:
- First, it encapsulates the complexity of menu handling by maintaining a
HashMap<String, Menu>to efficiently store and retrieve menus based on their titles.- This abstraction enhances code organization and readability.
- Second, the
MenuManagerincludes methods like addMenu, updateMenu, and deleteMenu to provide a clear and controlled interface for manipulating menus, promoting a modular and maintainable codebase. - The class also tracks additional metadata such as quantity, size, and last modification date, offering valuable insights into the menu collection.
- It facilitates data persistence with methods like saveToCSV and deleteCSV, allowing menus to be stored in a CSV format.
4.2 References
4.3 Definition
In Java, you use a HashMap to store items in key/value pairs. You can access items stored in a HashMap using the item’s key, which is unique for each item.
4.4 What Are the Features of a HashMap in Java?
Before working with HashMaps, it is important to understand how they work.
Here are some of the features of a HashMap:
- Items are stored in key/value pairs.
- Items do not maintain any order when added. The data is unordered.
- In a case where there are duplicate keys, the last one will override the other(s).
- Data types are specified using wrapper classes instead of primitive data types.
4.5 How to Create a HashMap in Java
In order to create and use a HashMap, you must first import the java.util.HashMap package. That is:
Here’s what the syntax looks like for creating a new HashMap:
4.6 Example
Create a HashMap object called capitalCities that will store String keys and String values:
import java.util.HashMap; // import the HashMap class

HashMap<String, String> capitalCities = new HashMap<String, String>();
Create a HashMap object called capitalCities that will store String keys and String values:
6 Business Logic & Controller
The sequence diagram illustrates the creation of a Menu object.
It begins with the Main initiating the process. The Controller requests Main options, and the View responds. After selecting an option, the Controller communicates with MenuManager to create and store the object, ultimately informing the Controller of the completion before ending the process with Main quitting.
sequenceDiagram
autonumber
    Note right of Main: useCase create Menu object
    Main->>+Controller: start
    Controller-->>-View: call Main options list
    View-->>Controller: send Main options list
    Note right of Controller: select option 1
    Controller->>+menuManager: create Menu object and store at HashMap menus<br/>menuManager.add(menu)
    menuManager-->>+Menu: uses Menu entity class
    Menu-->>+menuManager: uses Menu entity class
    menuManager->>+Controller: object created and stored
    Controller-->>-Main: quit
References:
- Sequence diagrams
- create Menu object use case sequence diagram
- mermaid live editor: create Menu object use case sequence diagram
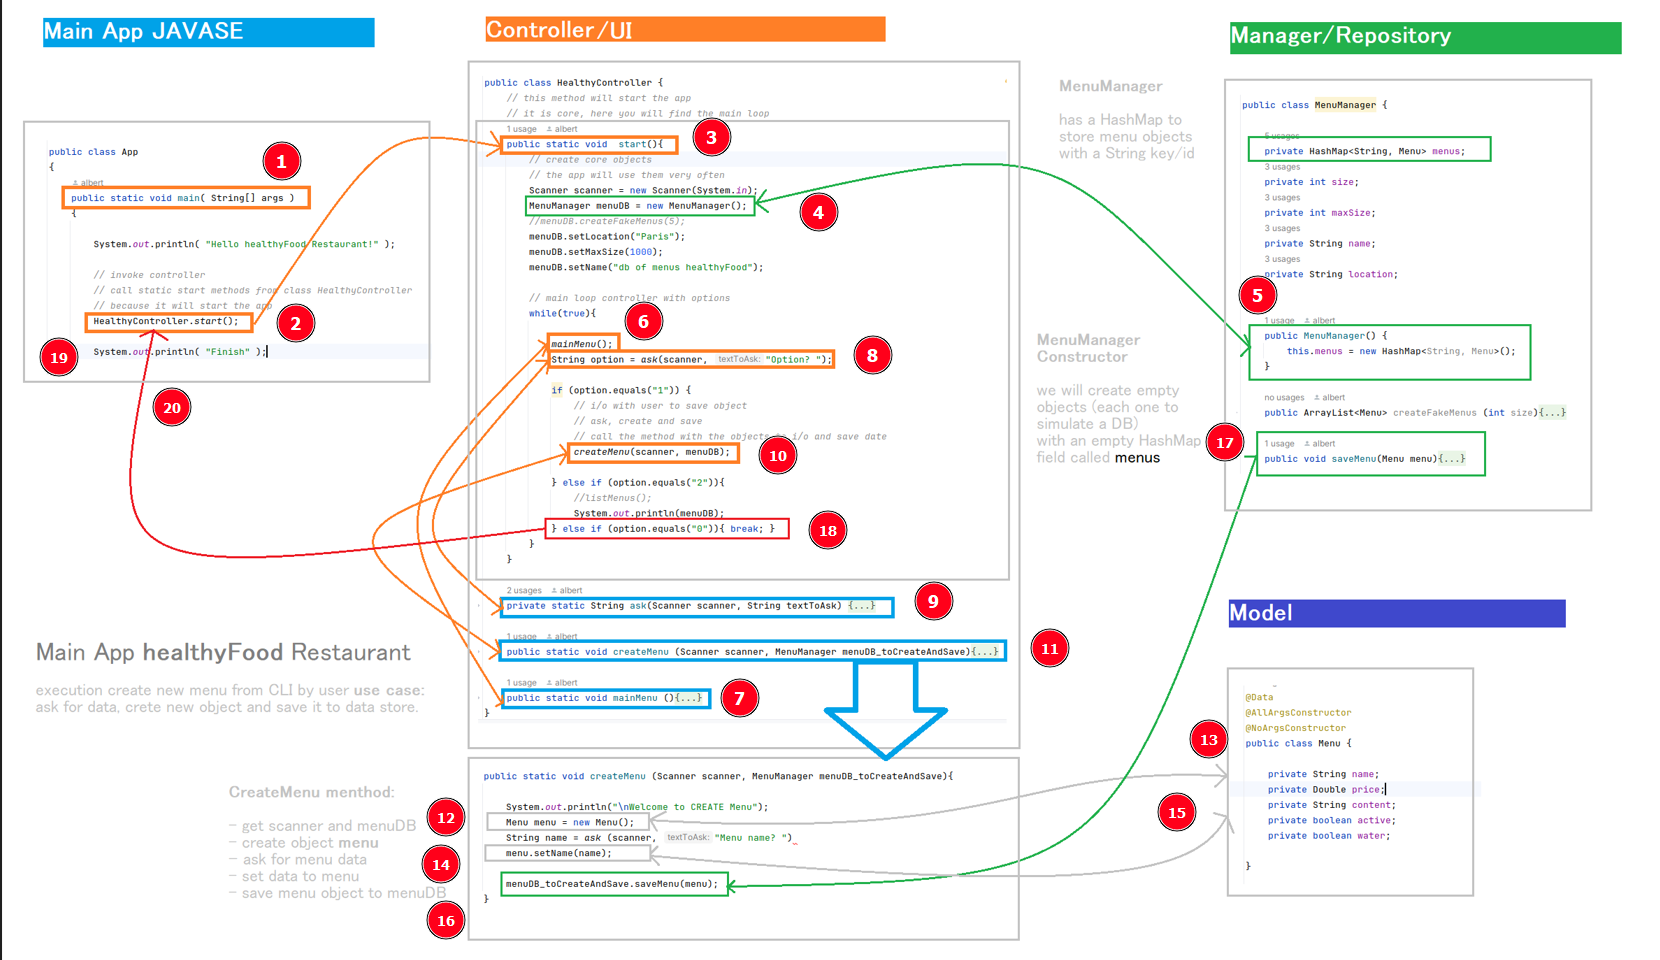
6.1 Implementation v0.2
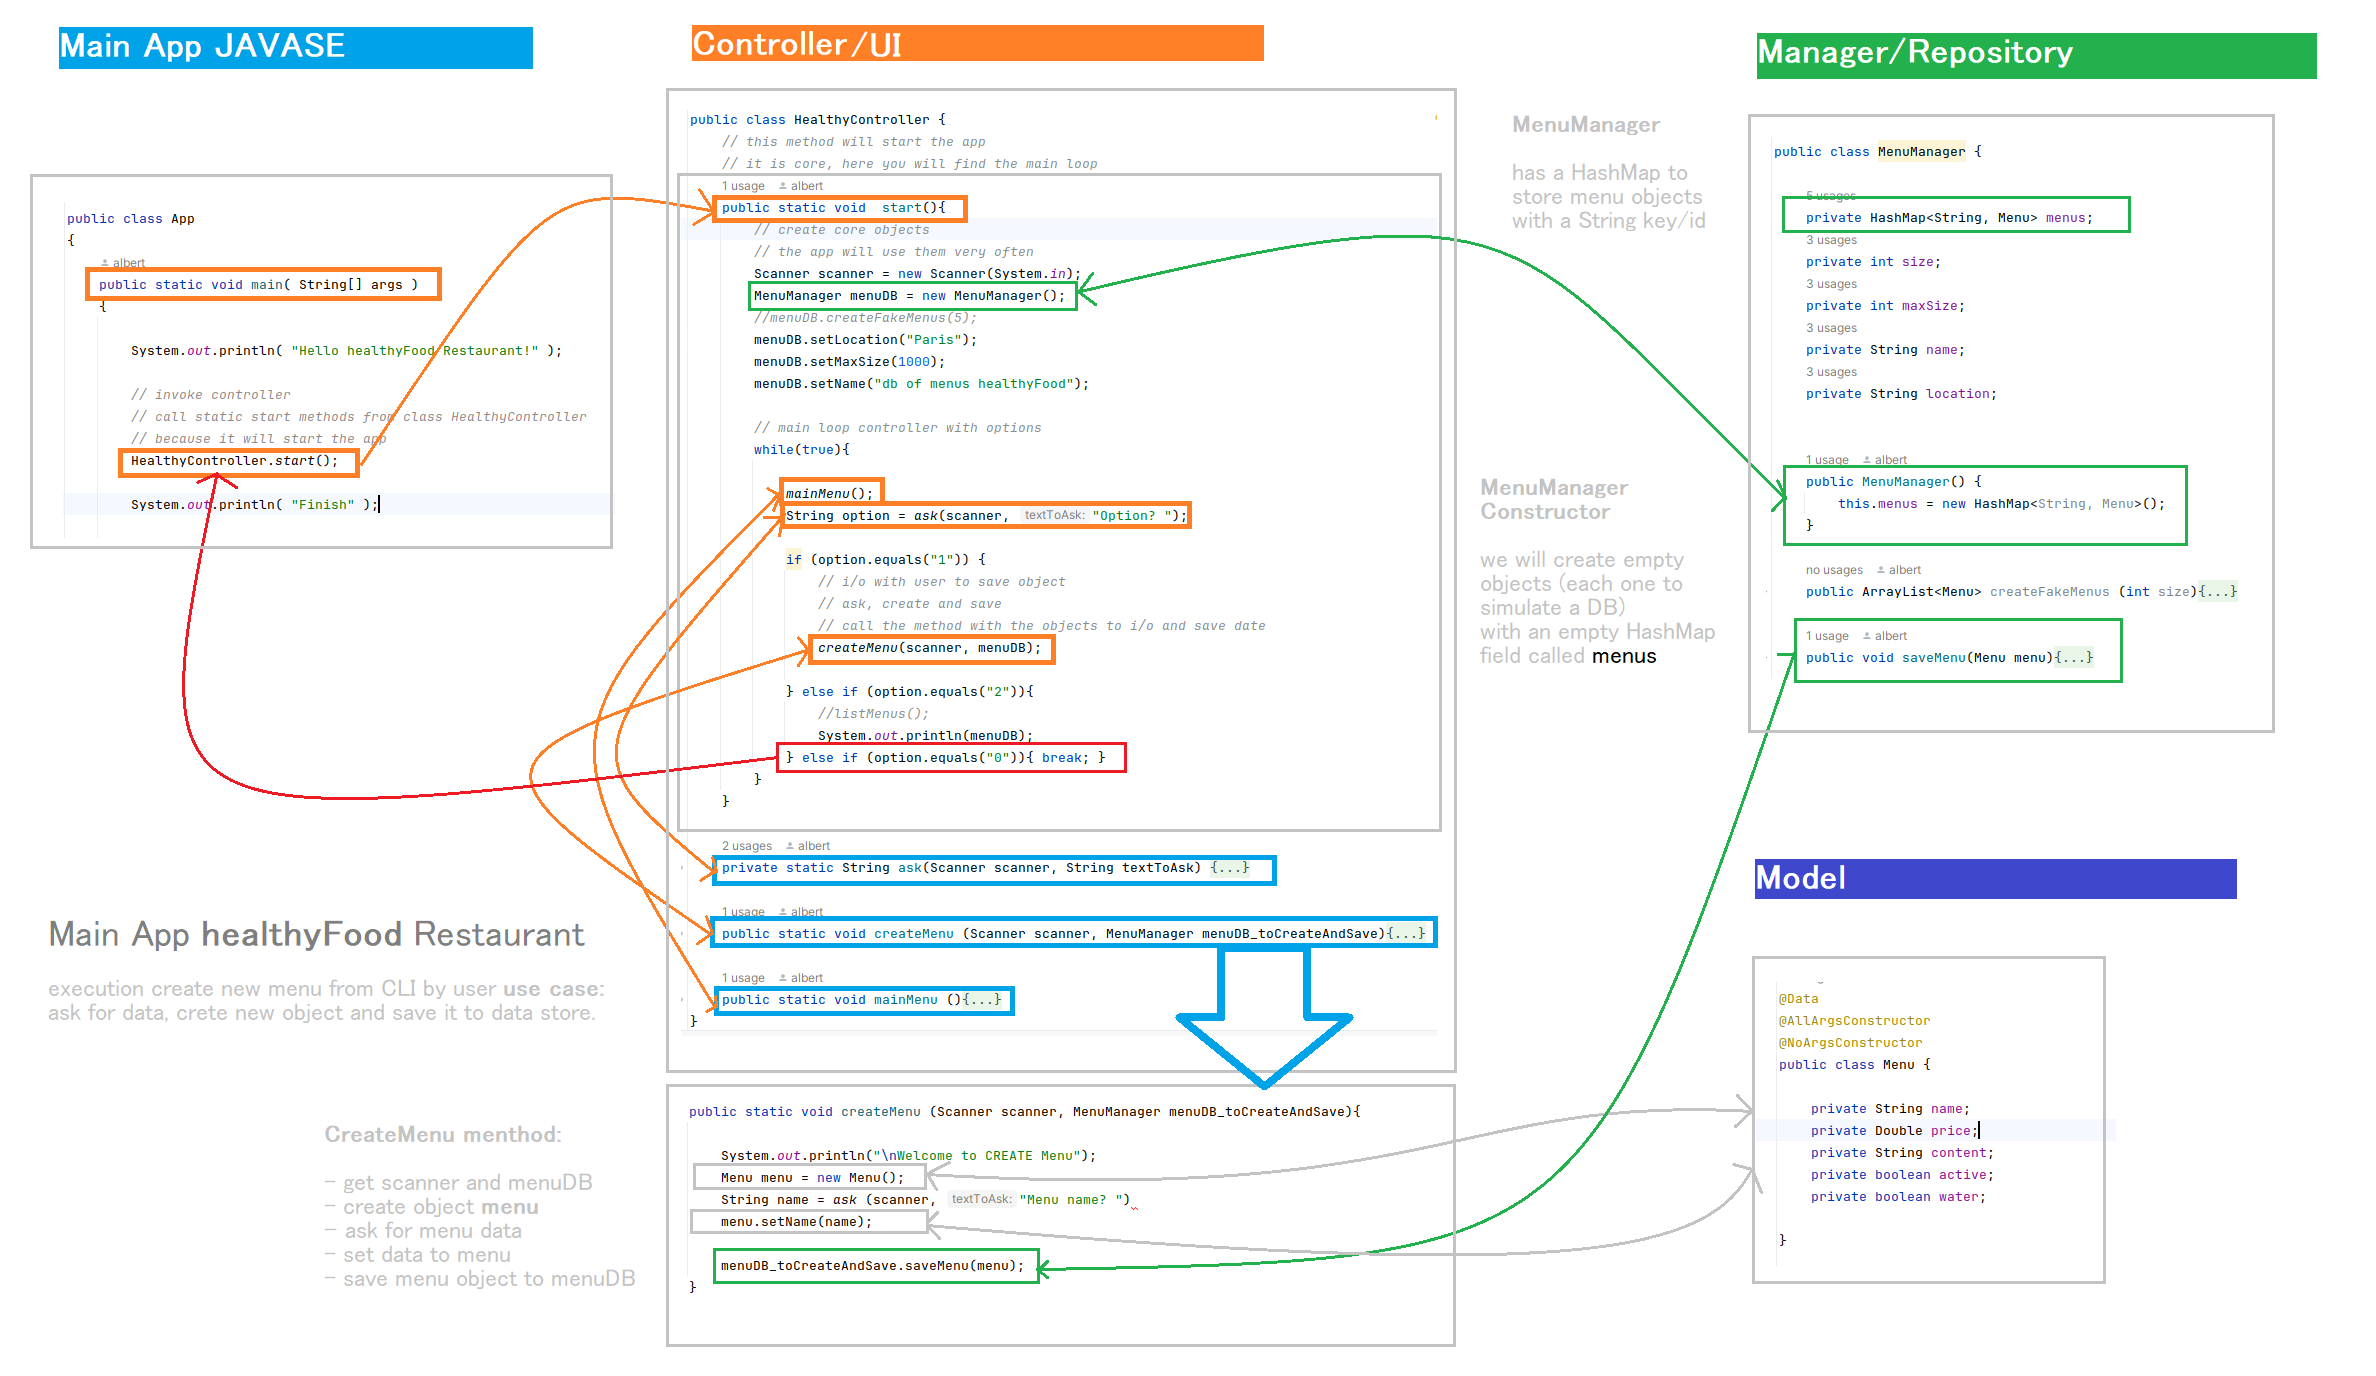
The use case implemented in Java Maven SE is a console-based application is the creation of a new menu.
At its core, the HealthyController class orchestrates the application’s execution, featuring a perpetual loop for user interaction.
The main menu options are displayed, prompting users for input. Based on the selection, the program either initiates menu creation through the
createMenu()method or lists existing menus stored in theMenuManager.
Within the MenuManager class, menus are managed using a HashMap, allowing for the storage and retrieval of menus. Additionally, auxiliary methods such as ask() facilitate user input and toString() aids in menu listing.
Execution flow begins with the start() method, initializing necessary objects, followed by continuous interaction until the user opts to exit the application. This setup streamlines user engagement, guiding them through menu creation and retrieval seamlessly.
7 Exploring Domain-Driven Design: a Practical Approach
Here, we’ll break down DDD concepts into simple, understandable components:
Controllersmanage user interactions, whileManagershandle business logic.Modelsrepresent domain entities.Repositoriesmanage data, andUtilsstreamline common tasks.
Using practical examples like Orders and Menus, we’ll see how these concepts play out in real Java SE applications.
By the end, you’ll grasp how DDD principles seamlessly integrate with Java SE, you will build clearer, more maintainable software.
Code:
| Name | Description | Why | Example |
|---|---|---|---|
| Controller | Controls the flow of the application, handling user input and invoking appropriate manager methods. | Separates user interaction from business logic, promoting modularity and easier maintenance. | HealthyController.java |
| Manager | Contains the business logic of the application, coordinating operations between different components and enforcing rules. | Centralizes and encapsulates business rules, ensuring consistency and facilitating testing. | TableManager.java, MenuManager.java |
| Model | Represents domain entities and data structures used within the application, encapsulating their state and behavior. | Provides a clear representation of the application’s domain, promoting understanding and reuse. | Order.java, Menu.java, Table.java |
| Repository | Manages the persistence of domain objects, abstracting data storage and retrieval details, providing a clean data access layer. | Separates data access concerns from business logic, enabling flexibility and testability. | TableRepository.java, MenuRepository.java |
| Utils | Contains utility classes and methods providing common functionalities required across the application. | Encourages code reuse, reduces redundancy, and enhances maintainability. | CommonUtilities.java |
| View | Represents the user interface components of the application, presenting data to the user and capturing user interactions. | Separates presentation logic from other components, improving maintainability and flexibility. | MenuOptions.java |
8 Code & project Management
| Code Version | Commit | Folder-Tree | Output |
|---|---|---|---|
| GitHub code v0.0 | create project, core UML classes and fast-test Hashmaps in main | Basic Structure | output v0.0 cli |
| GitHub code v0.0 - testFaker | test new dependencies: JUnit, javaFaker, lombok | - | Check version dependencies |
| GitHub code v0.1 | basic MVC structure Java SE | - | - |
| GitHub code v0.2 | create and save Menu on HashMap menus from UI cli to MenuManager |
Classes Structure | output v0.2 cli |
| GitHub code v0.3 | refactoring to DDD and tableManager with createTable |
Classes Structure | output v0.3 cli |
| GitHub code v0.4 | refactoring to DDD first non-tentative approach | Classes Structure | output v0.4 cli |
| GitHub code v0.5 | create new order, static method createOrder |
- | output v0.5 cli |

